|
|||
|
Paine House - Virginia |
|||
|
 |
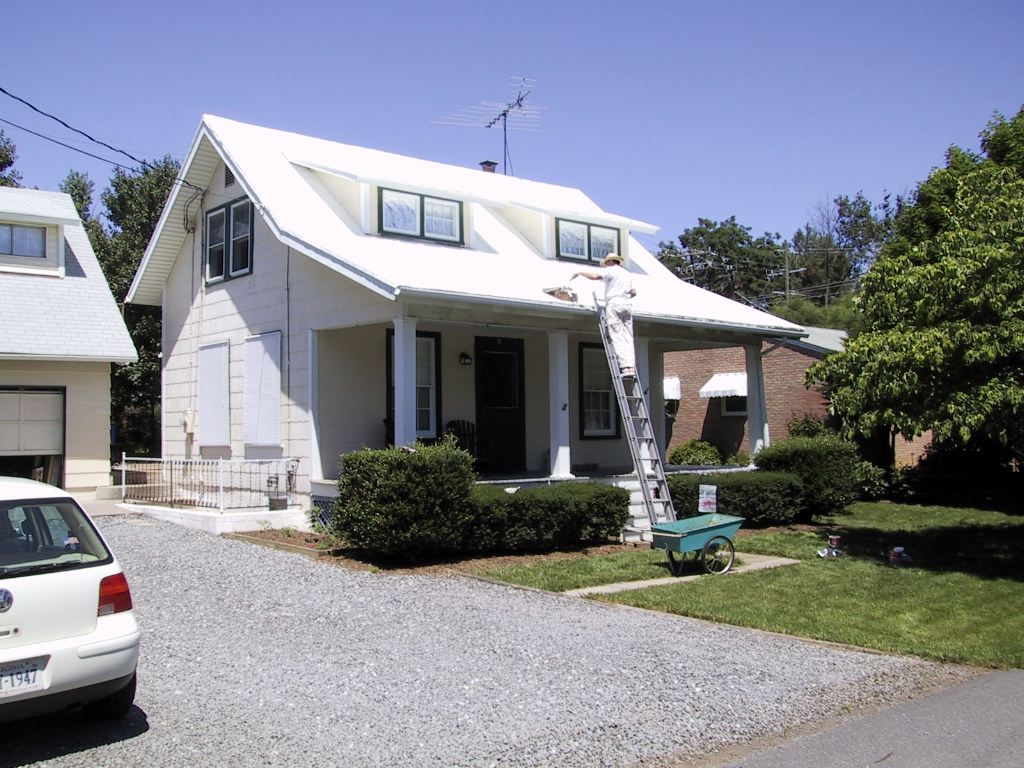
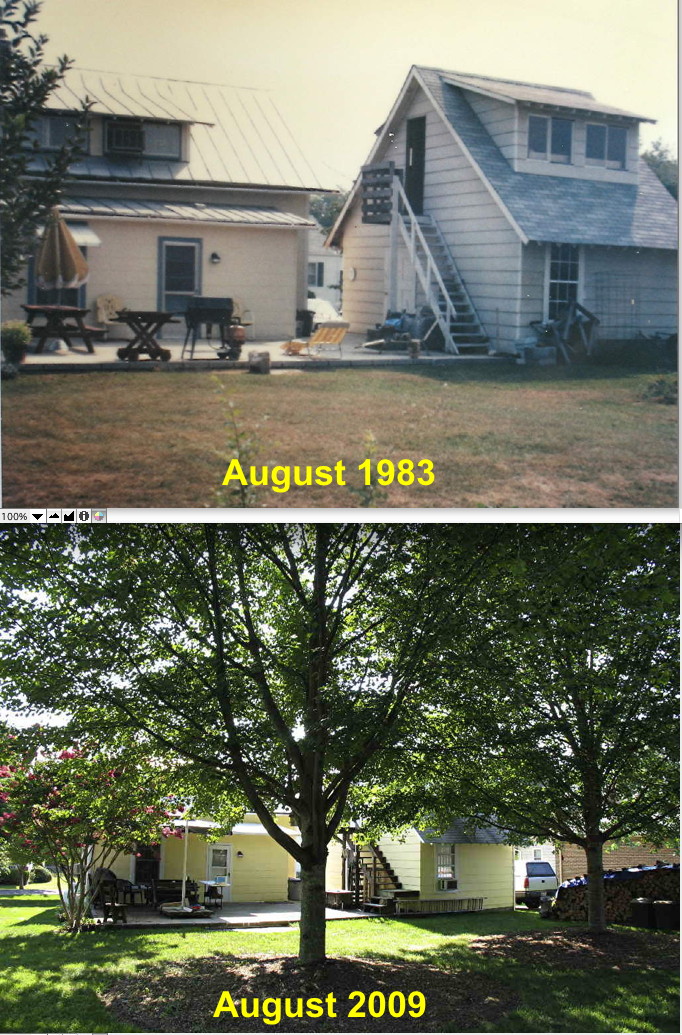
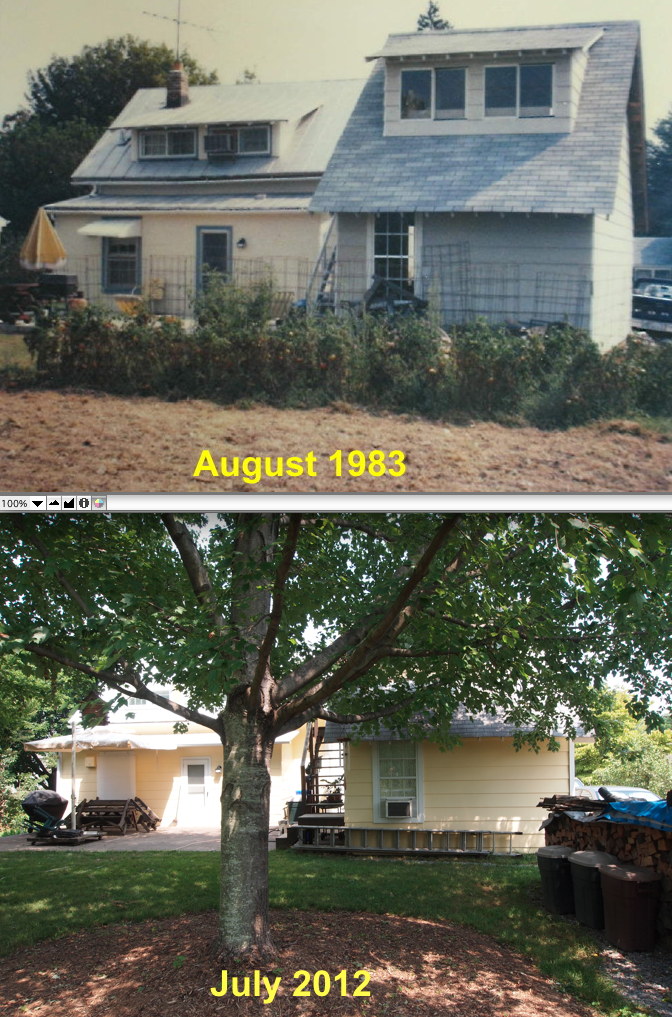
 August 1983
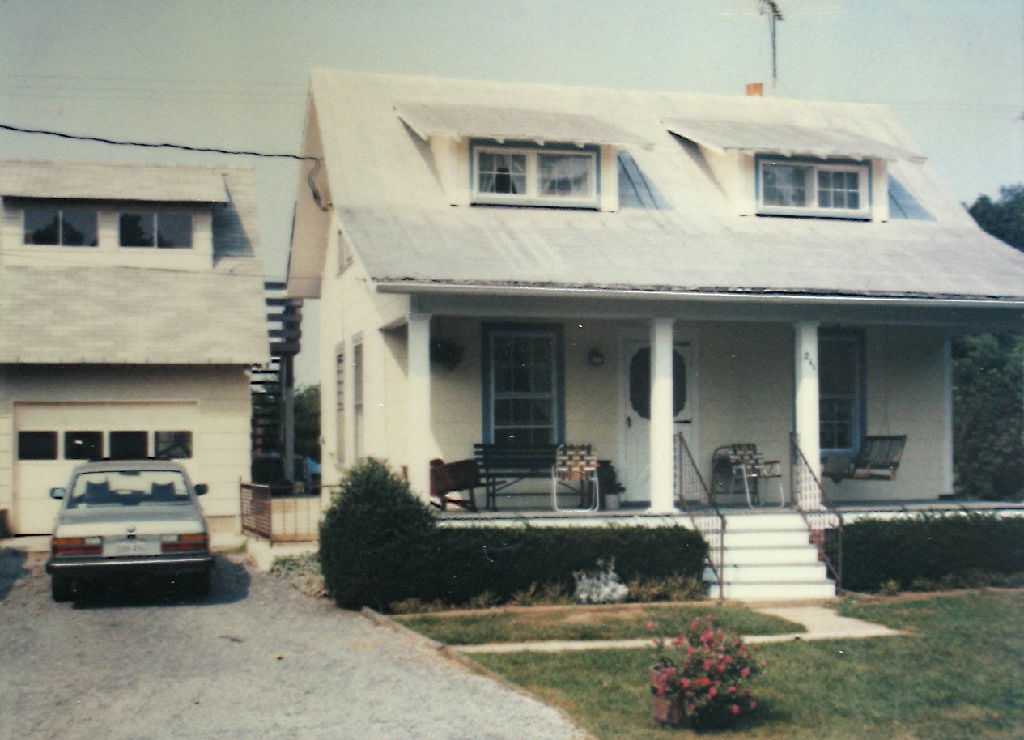
During our second look at the house and purchase offer
that afternoon. Picture is a digital scan of a Polaroid picture... no digital cameras back then. The car in the driveway is
my brand new 1983 BMW 528e, considered by many long term BMW owners as the best 5-series BMW ever built and which I still
own today. It has its own website, here.
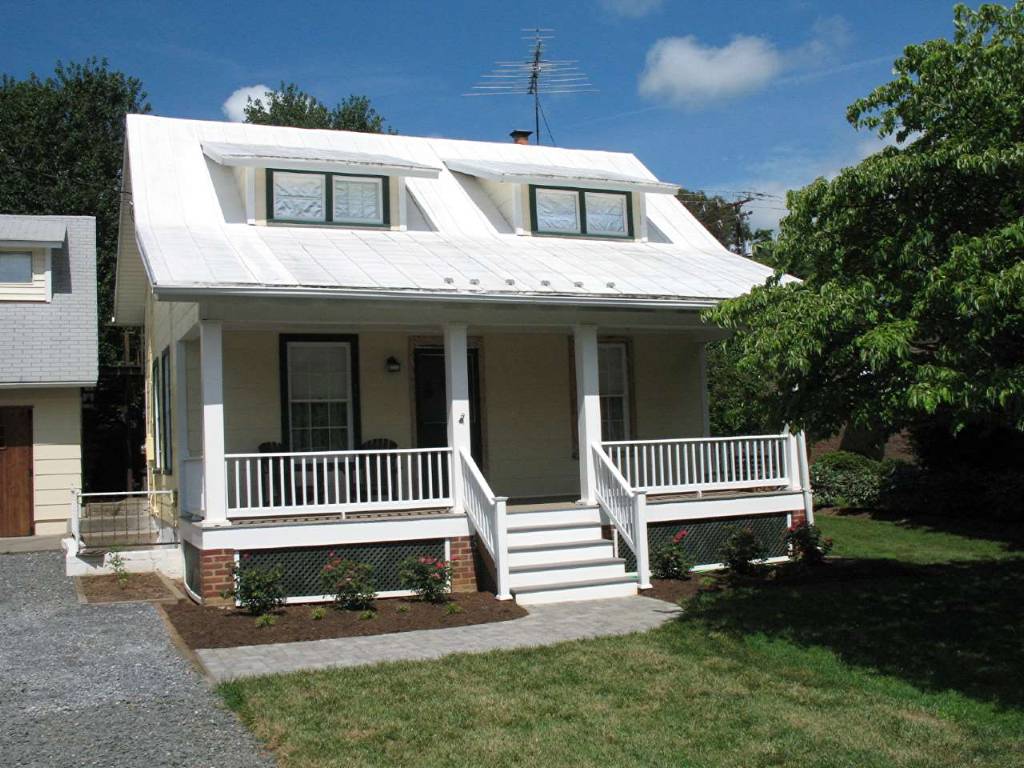
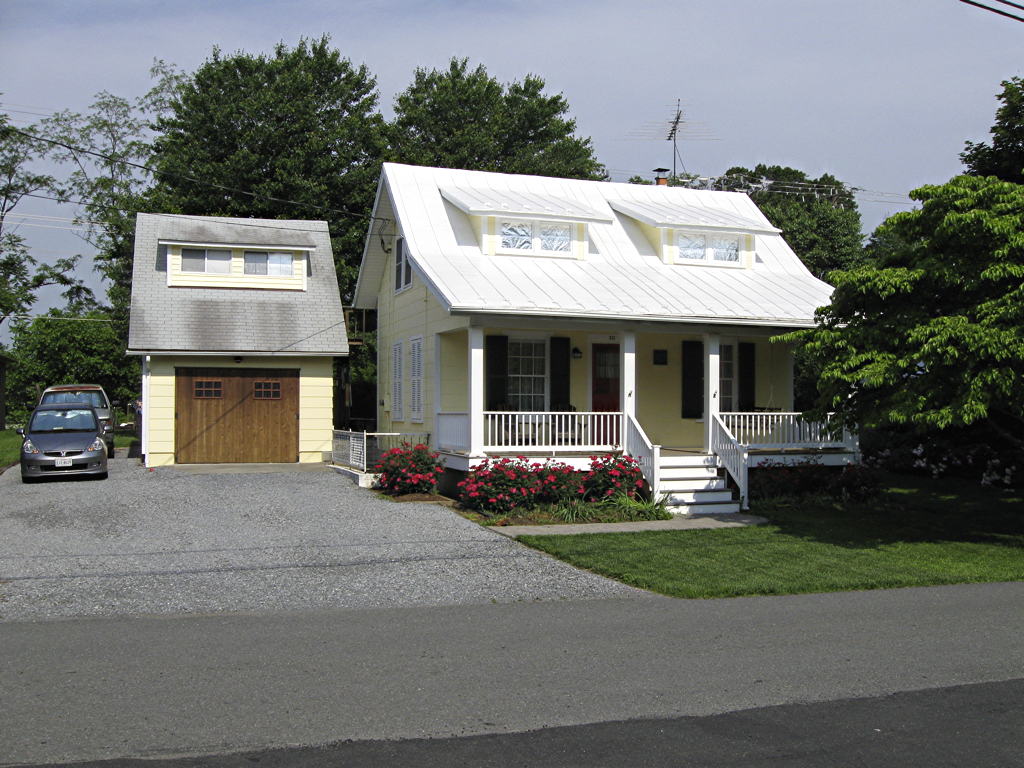
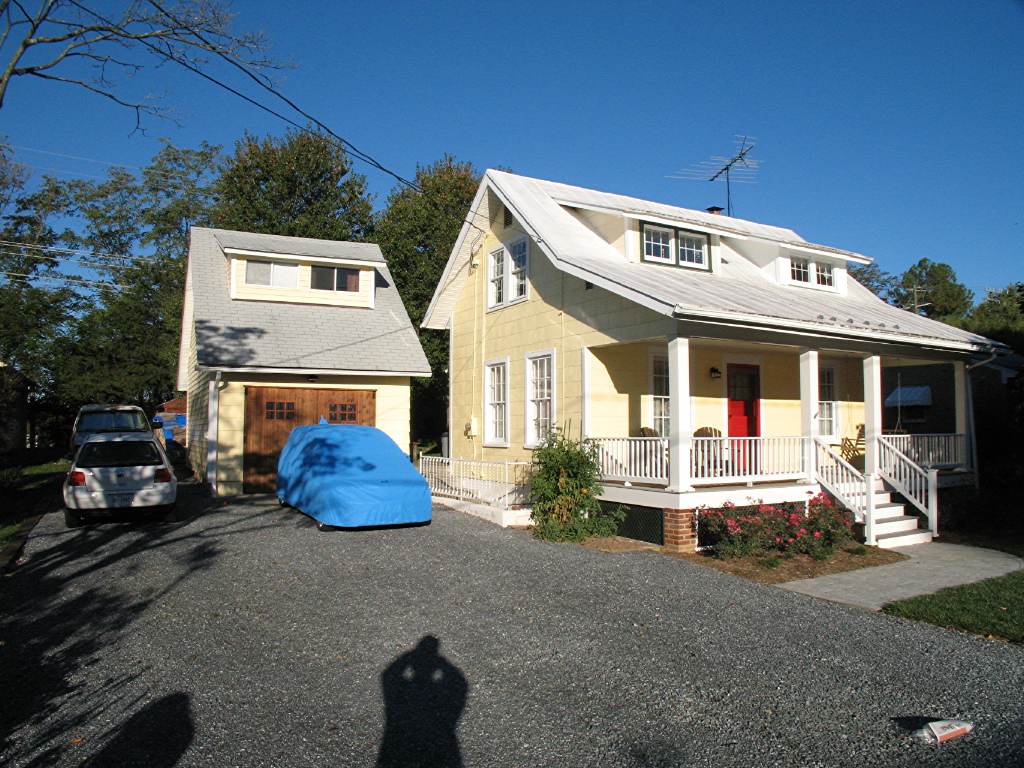
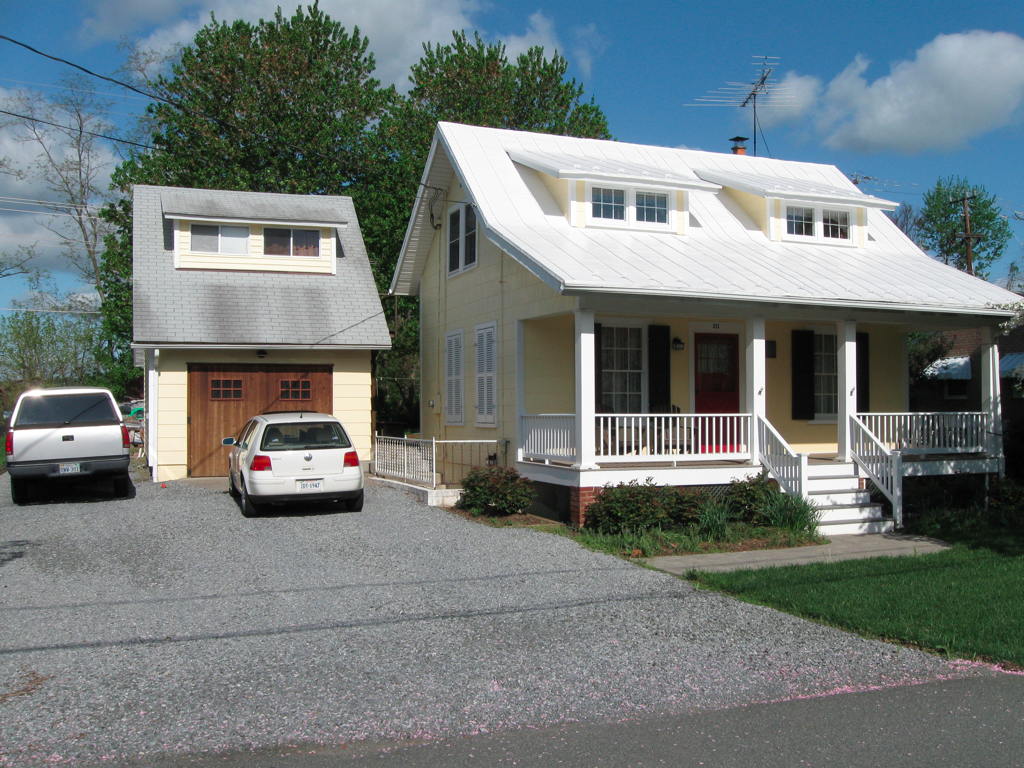 September 2013
Showing the current status of our house now 30 years later,
with all aluminum triple track storm windows removed; interior thermal windows installed; new cedar exterior window shutters
installed on all first floor windows (south facing shutters on driveway side now closed to reduce summer heat gain);
new wooden storm windows on second floor shed dormer windows; complete new front porch including support framing, ceiling,
second floor knee wall insulation and ventilation along with new tumbled paver front walkway and new cedar garage
carriage doors (real, not a roll-up door!). The house roof color was changed from dirty gray to white in 2005, which
greatly reduced sun heat gain... along with the two 19 year old red maple trees in the back yard, planted March 1994 and which
now play a major role in keeping the house cool and energy efficient.
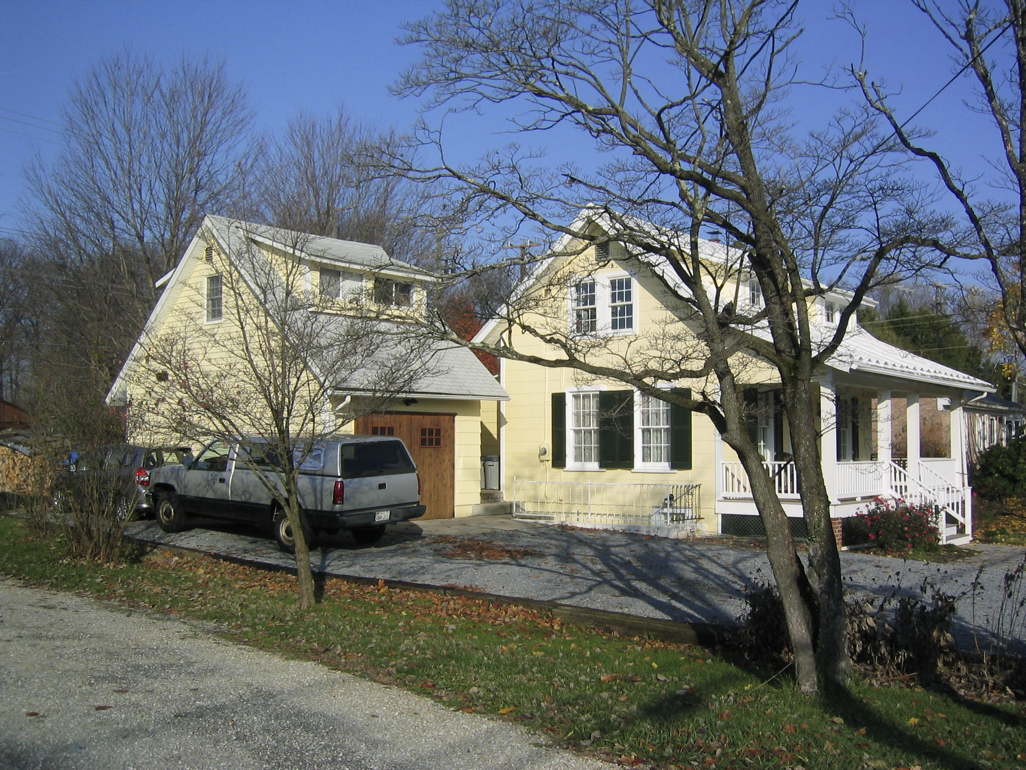 October 2011
Fall with the south facing shutters now open to allow winter sun
to heat these rooms. Note that the open side of the shutters are dark green, while the closed side are white, which reflects
summer sun and also reduces the temperature of the shutters, prolonging their life and paint. This is a fairly popular
shutter paint scheme I noticed in Europe, where exterior shutters are fully functional and used daily, versus the phony plastic
shutters used on American homes, which are ugly and not at all functional. Absurd, to say the least!
Update January 15, 2012
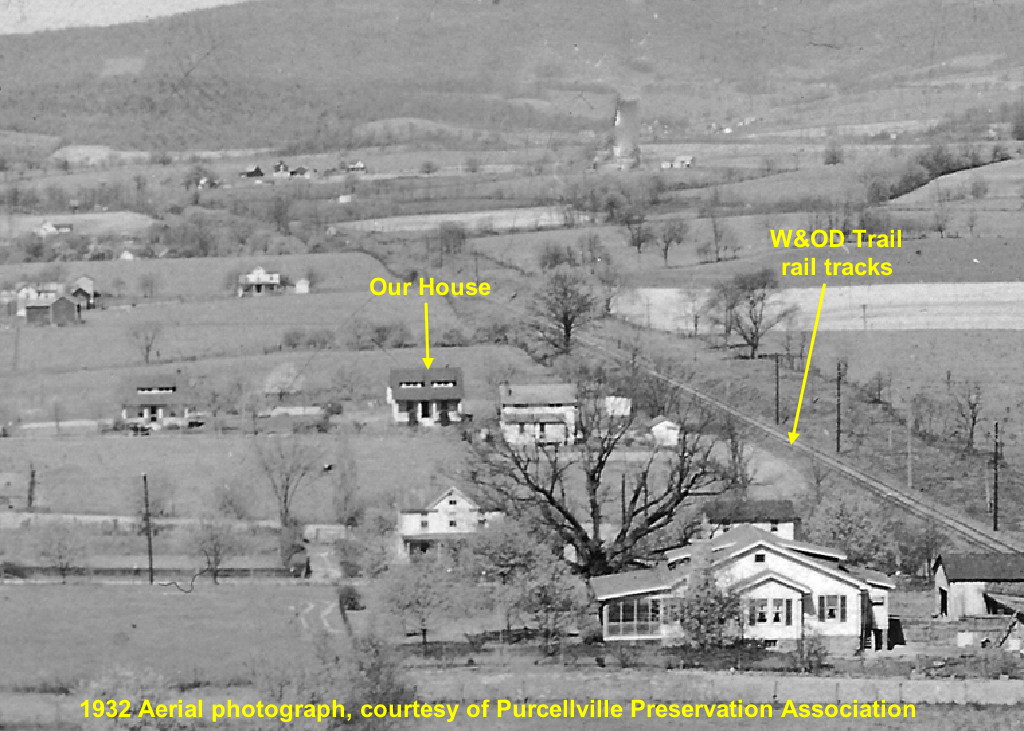
A cropped picture of a much larger picture made available to us
by The Purcellville Preservation Association, showing the three Case brothers houses built in the late 1920's. Our house,
the house to the left of our house and the house across the street sitting closer to the W&OD railroad tracks. These
houses plus the large house in the foreground at the bottom of the picture are still in use, but the two smaller houses shown
in between these houses are no longer there, replaced by new houses.
Background...
Our house was built in 1927, by Clarence Case, master
carpenter, assisted by his brothers, all from Purcellville. As shown above in the 1932 picture, it did not
have a garage until sometime in the late 1940's. The current garage shown in the color pictures, was built in the late 1970's,
modified and improved by the subsequent owners, including ourselves after our purchase in 1983. My
background with old houses started in 1963 with a 1923 tudor style rental house in Santa Monica, a 1928 Spanish custom built
house, our first house in 1966, an 1840's schoolhouse in Millwood, VA in 1975 and now this current 1927 house.
The first owner, Edith M. Alder, moved in November
1927. She sold the house in June 1941. The house has had six owners, including our purchase of the house in October
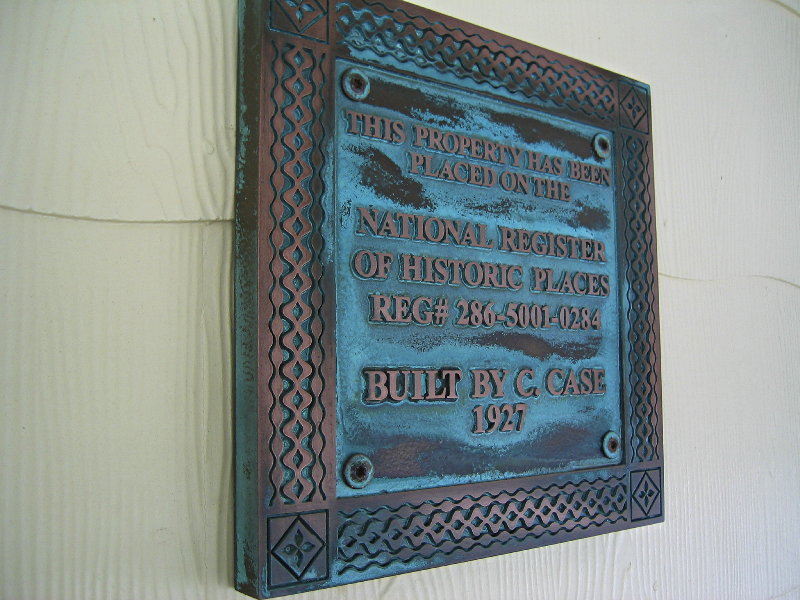
1983. We have the full history of who owned the house since it was built. It
is one of four houses (3 of the 4 can be seen in the picture above) built in this style on our street and is registered (286-5001-0284) as a house in the Purcellville Historic District, National Register of Historic Places. It is a style
and floorplan based on a Sears Roebuck kit home and our house is a mix of the Carlin (catalog #3031) using its full width front porch and Lebanon (catalog #3029) using its shed dormer and first floor front door and window arrangement floor plans and revising the location
of the kitchen door from the side to the rear. Clarence Case combined these
different features of these two models, as well as expanding the size of the rooms, which are
larger than the Sears houses. I have created 'as built' floor plan drawings in .pdf format, you can see them here.
Our house and the others are not actual Sears "Kit" houses, but were built
from materials obtained by Mr. Case and his brothers, including materials from earlier structures which had been disassembled. Many
of the master carpenters of this period used materials from earlier buildings, as it was less expensive to obtain, but also
of high quality and strength. Recent comments about the benefits of 'old wood' appears here, at a web site that I am a member of. The Case brothers built a number of houses in Purcellville, using a number of
different designs, also including those made by Aladdin and others of this period. We consider ourselves very fortunate, to have found such a home constructed the way that it was
and in very good shape for its age.
If you are interested in learning more about these type of homes, here is a list (updated 1/14/10) of books and webpage resources that I have found very helpful, that I
suggest you take a look at. It is updated as I find, or am advised of additional high quality resource material.
Our house has been updated over the years, including wall
and attic insulation, bedrooms knee-wall insulation above the porch ceiling, porch roof ventilation, soffit ventilation, attic
fan ventilation, 200 amp electrical service, complete re-wiring to replace the original knob and tube wiring, new copper plumbing,
and a dug-out basement in 1950, replacing the crawl space. A 12 cu.ft. (2'h x 2'w x 3'd) wood stove in the basement is our
primary heat source, as shown here. The house is also equipped with electric baseboard heaters in all rooms, installed in the 1970's. These replaced an oil
fired floor furnace between the living room and dining room.
Other improvements to the house have been made, which most
86 year old houses have received. Fortunately, our house was never the victim of remuddling, which we are very grateful for,
as some of our neighbors houses were not so fortunate, the victim of thoughtless changes and very poor renovation/modernization
work. What a shame that such incompetence is allowed in older neighborhoods.
 House projects...
Replacing the old original cement pads narrow walkway, built in
the early 1940's, with a much wider (5 foot) tumbled stone pavers walkway, to match the rebuilt front porch completed in 2007,
which was built by Kenneth C. Wine.
Update April 18, 2011
(per Email requests for additional porch info)
January 2006
Restoring the front porch brings the house much closer to its
original look, when its construction was completed November 1927. We continue working to restore the outside to
as near its original appearance as possible, using modern maintenance free materials, such as Azek, Tendura, Trex and other
such products, along with the use of high technology Silyi-terminated polyether and Tri-Polymer caulks and sealants, replacing
old, cracked, leaky and stone hard caulking from decades past.
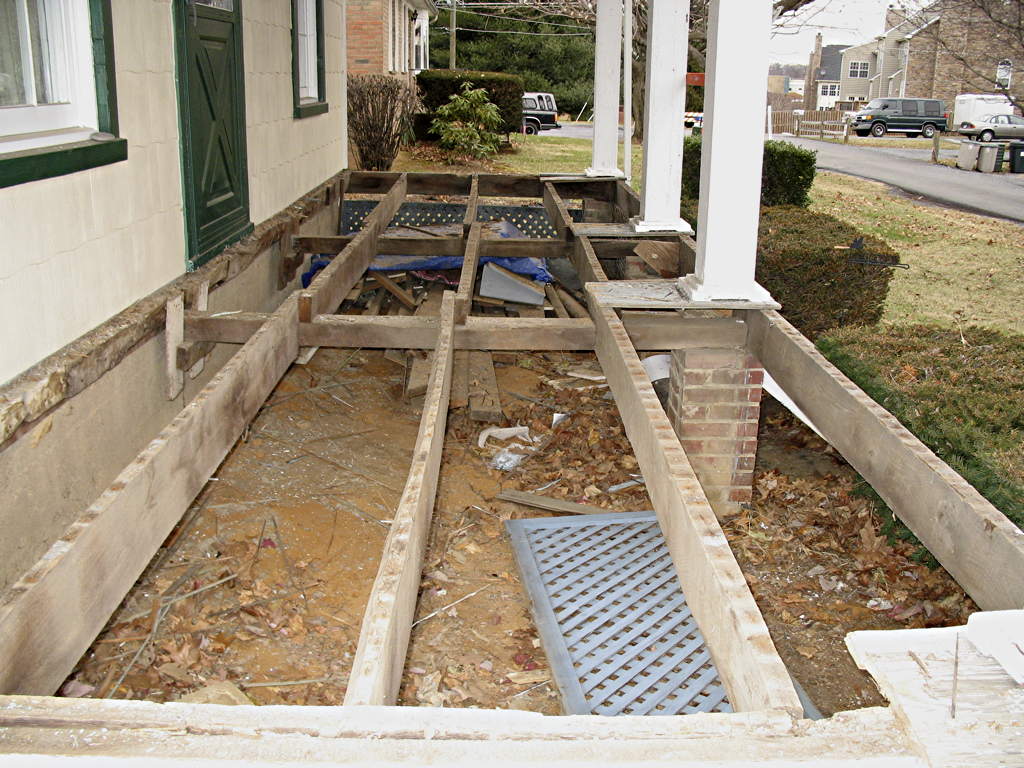
The original 1927 porch floor frame structure still intact,
but certainly very bouncy when walked across. Note the cross braces suspended at one end and sitting on brick piers at the
other end. The pine flooring (second or third(?) generation 1960's installation) has been removed and the old oak framing
will be cut up, along with the pine flooring and used to heat the house, using our system shown here.
An important area to examine, if you are thinking about replacing your porch ceiling...
If you are taking down your porch ceiling for some reason, that
will be a good time to look at your knee wall situation, in terms of its insulation, area ventilation and an opportunity to
add new AC outlets from the backside in the now exposed lath & plaster walls. If you find that area like ours, shown below,
you can make some very worthwhile changes like we did.
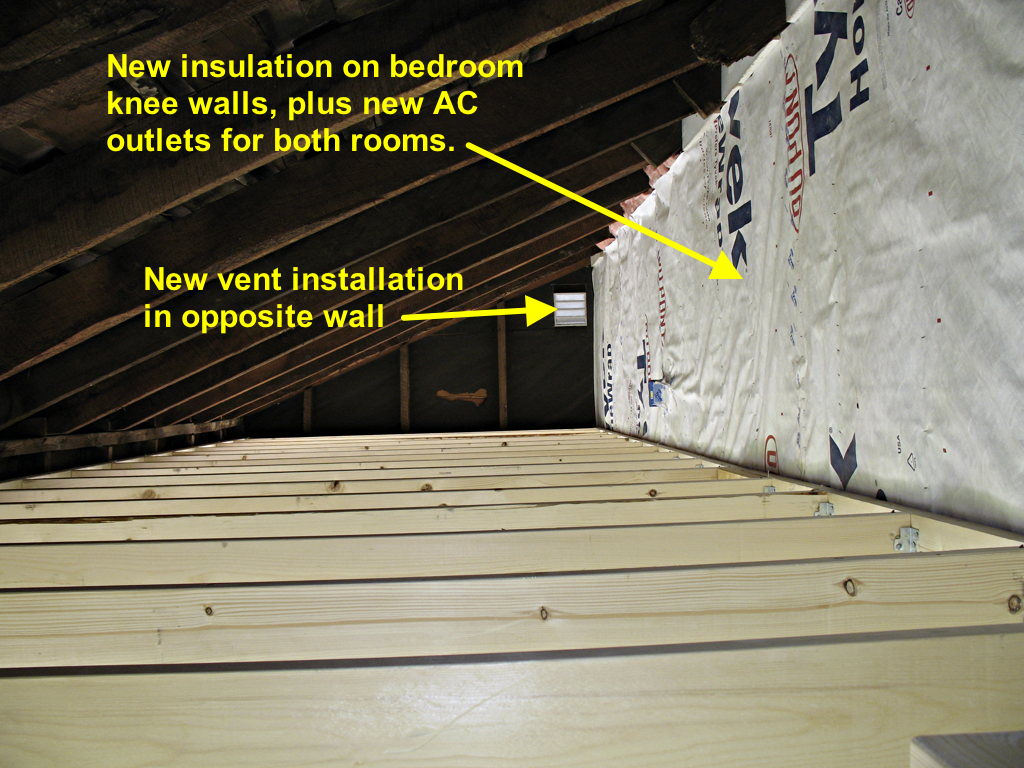
 View of the knee wall above the porch ceiling, which is the east
wall of both bedrooms. Yes, very cold in the winter and hot in the summer! There was absolutely no insulation or ventilation
in this area above the porch ceiling and evidence of water vapor staining of the roof boards is clearly evident, since it
came through the lath and plaster walls, but couldn't escape to the outside. You can see where some of the Celotex pumped
into the walls, has overflowed a bit at the top of the first floor wall.
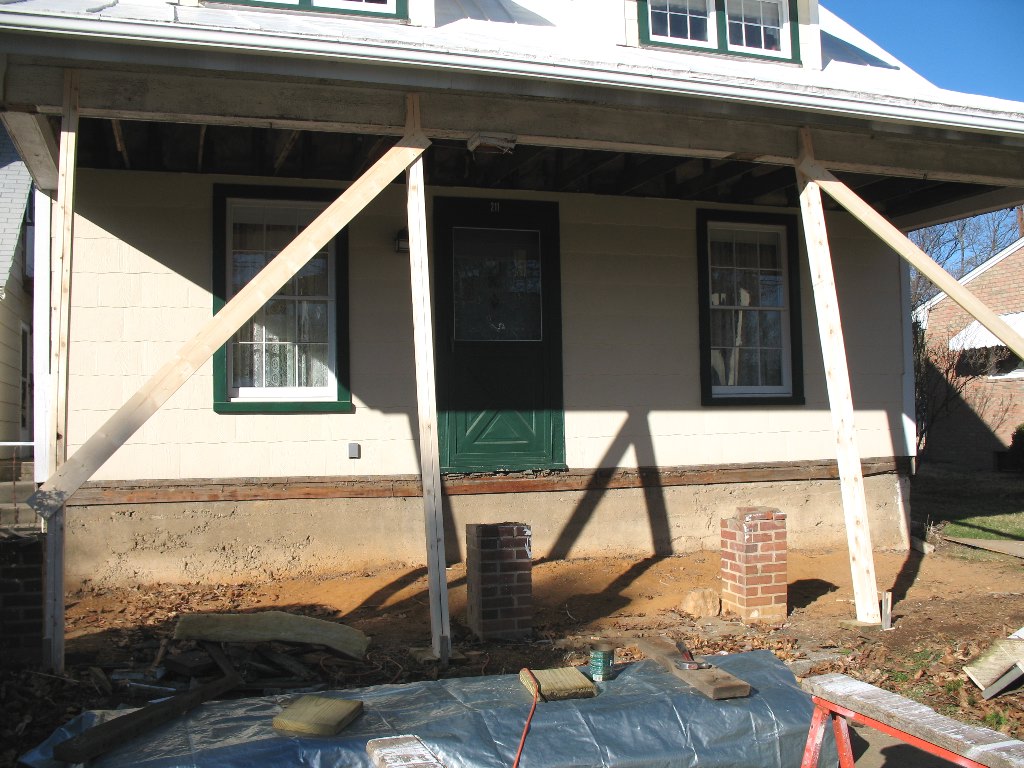
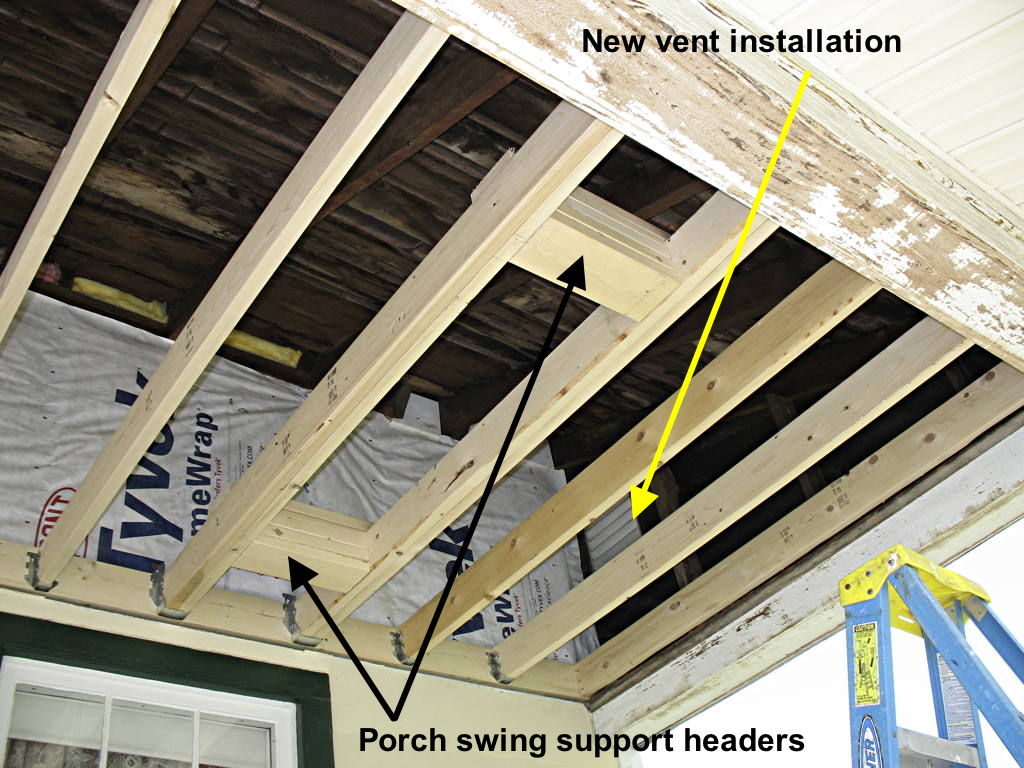
 New porch ceiling framing, with bracing for the porch swing chains
to attach to, after the eye bolts are installed. The knee walls have been insulated with foil faced fiberglass and covered
with Tyvek held in place with stainless steel staples. And two new electrical outlets have been installed in
these bedroom east walls. Balloon framing made the wiring run simple to install down to the 200 Amp circuit breaker box
in the basement. Note the wall vent in the right (north) exterior wall. Another is installed in the left exterior south
wall to provide good ventilation in this area above the porch ceiling.
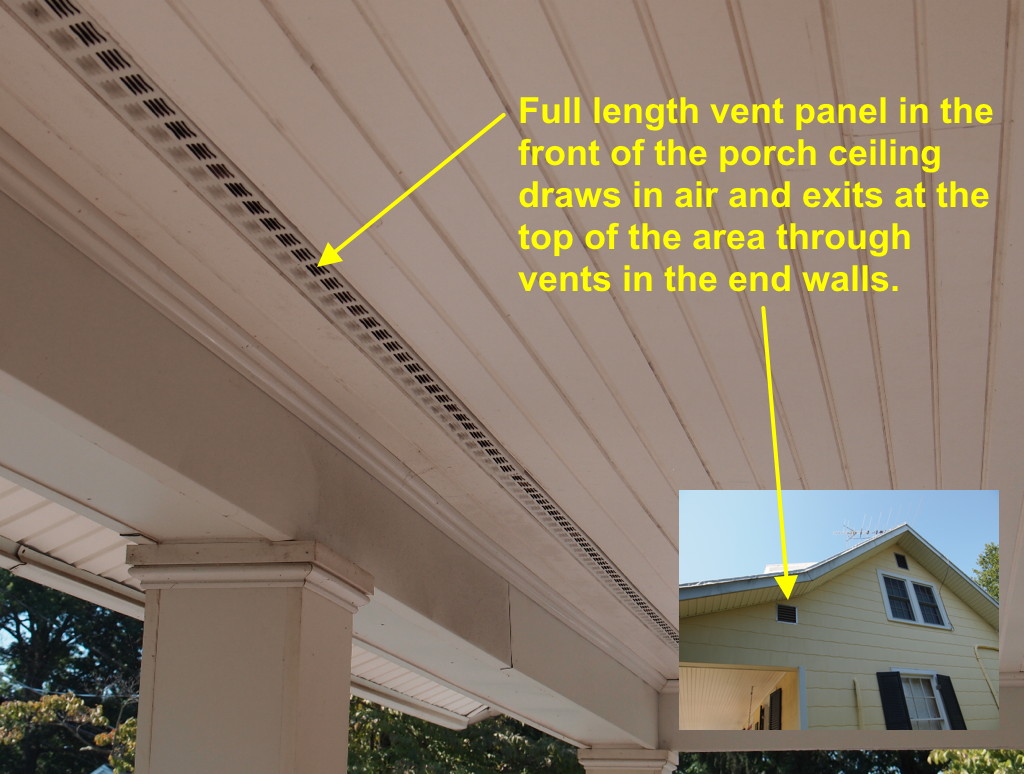
A full length narrow louver type vent is installed in the new
beadboard ceiling at its front edge as shown above. The original wooden attic vents at each end of the building
had been covered over with cement/fiber siding, thus preventing any ventilation! The vents have since been uncovered and aluminum
vent panels installed, as can be seen just below the roof peak, above the pair of windows.
The difference that the insulation and ventilation has made is MAJOR
in terms of the greatly increased summer and winter comfort of these rooms, including the increased acoustical isolation from
outside noises. A lot of old homes should consider this upgrade. Especially if the porch beadboard ceiling is in
bad shape and replacement is being considered.
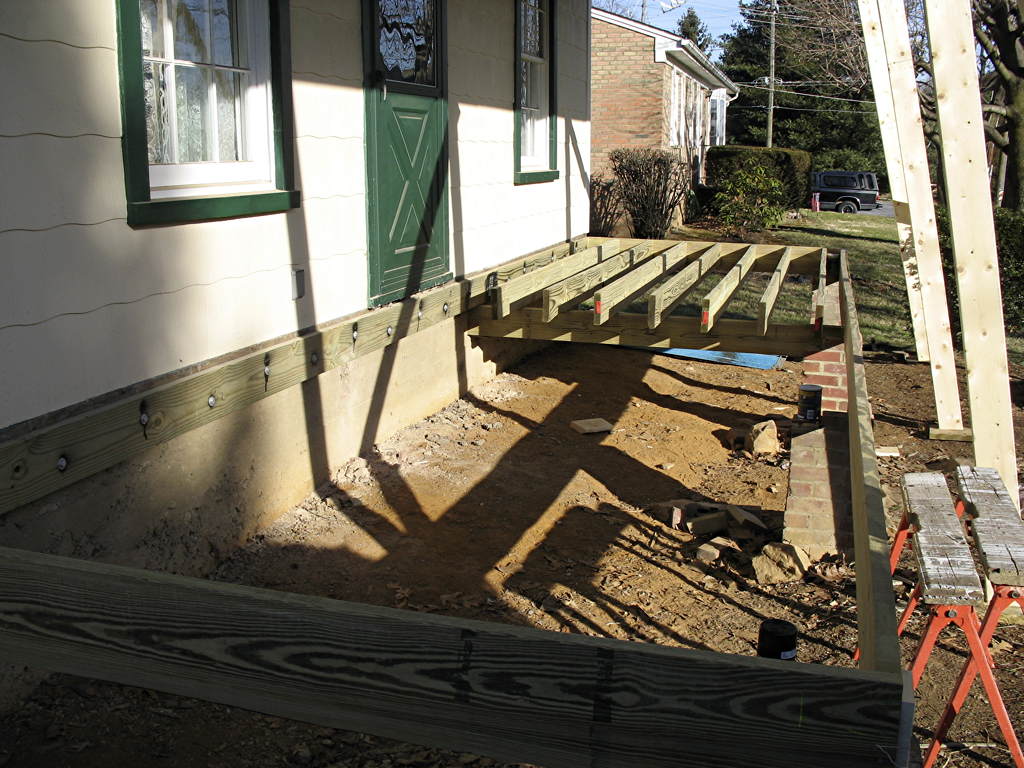
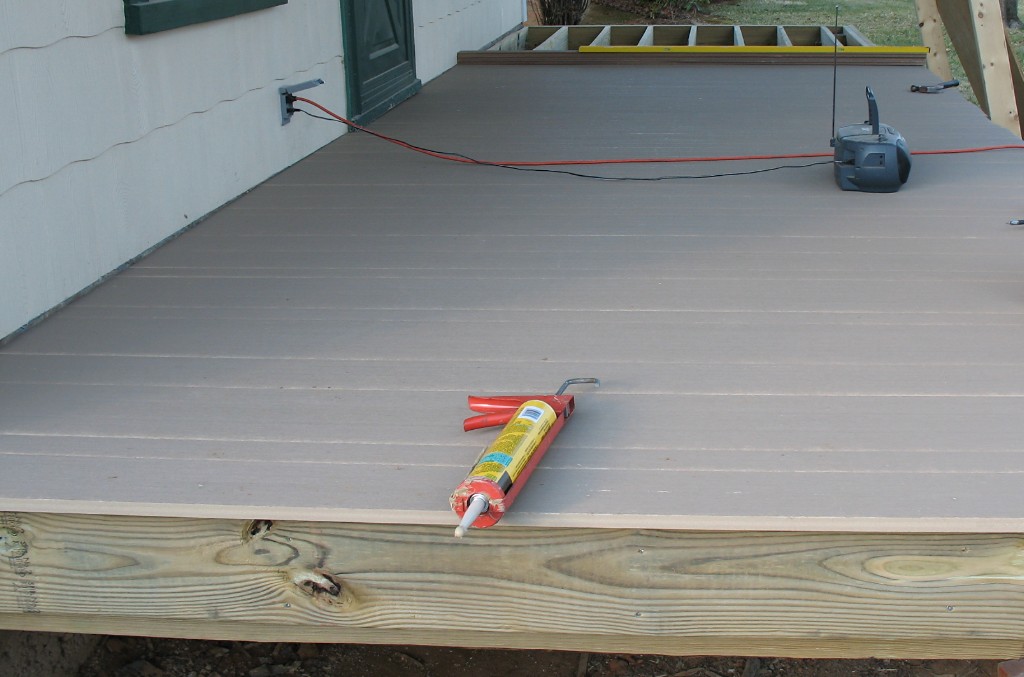
Below, the new porch floor is being finished on top of the new porch floor framing.
 Tendura Decking Failures -
There have been a number of comments about the Tendura decking products failing and that they
have been bought out buy another company. I am listing these web sites for your info. Our Tendura installation, completed
in October 2006, shows no signs of the failures discussed in these links, nor do the five other installations that Kenneth
Wine has since installed.
FineHomebuilding - Synthetic Decking (added Aug. 25, 2009)
If you have any additional information
about this observed Tendura problem, please contact me.
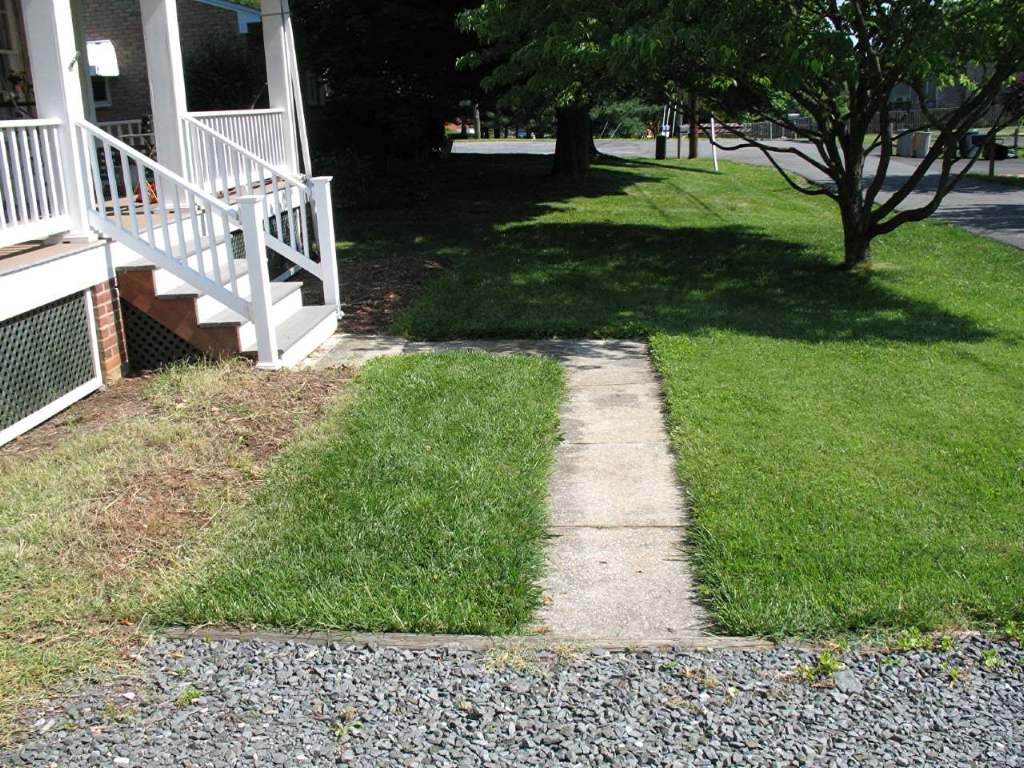 This is the cement slab walkway installed in the early 1940's. The
small strip of grass to the left of the walkway looks awful and is a pain to maintain. It will be removed to allow for a much
wider walkway and a deeper flower bed, matching the size of the flower bed on the right side of the porch.
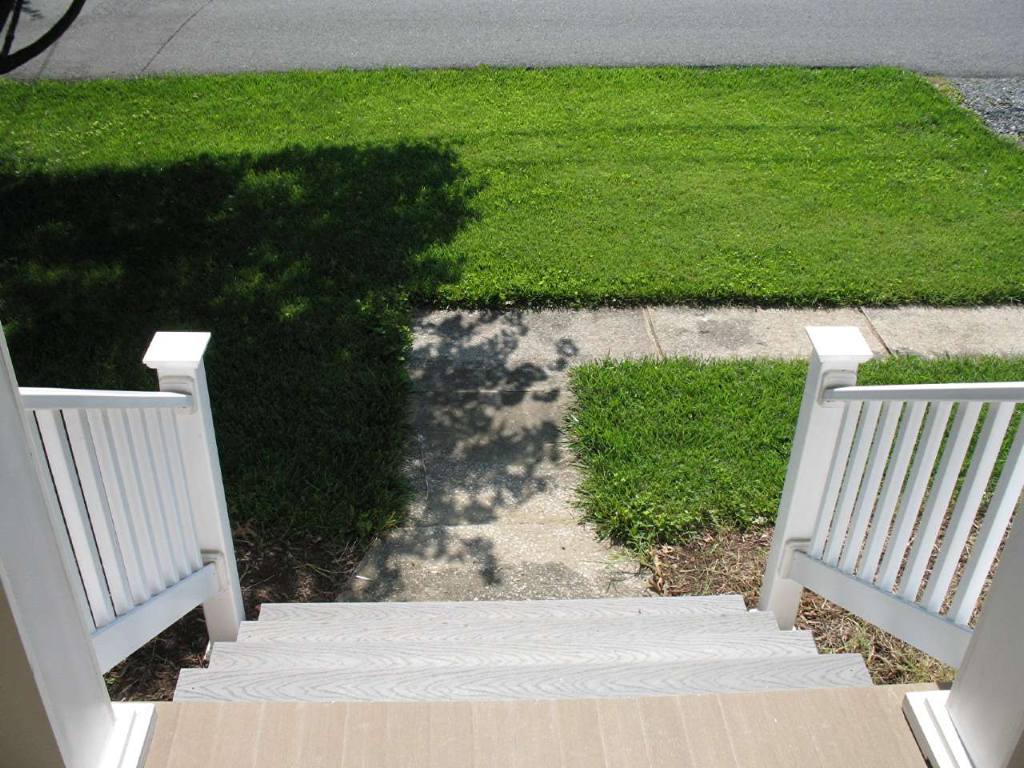 The new stairway is much wider at 5 ft, which replicates the original
width of the original stairway versus an earlier replacement which was only 3-1/2 ft wide... probably done at the time
of the cement walkway, in the early 1940's and replaced again in 1983 due to failing materials cited during a pre-purchase
inspection, just before we bought the house. So, the old walkway looks odd as it is not wide enough to match the new
stairs, which are the proper width, based on the placement of the original porch support columns, now replaced with new columns.
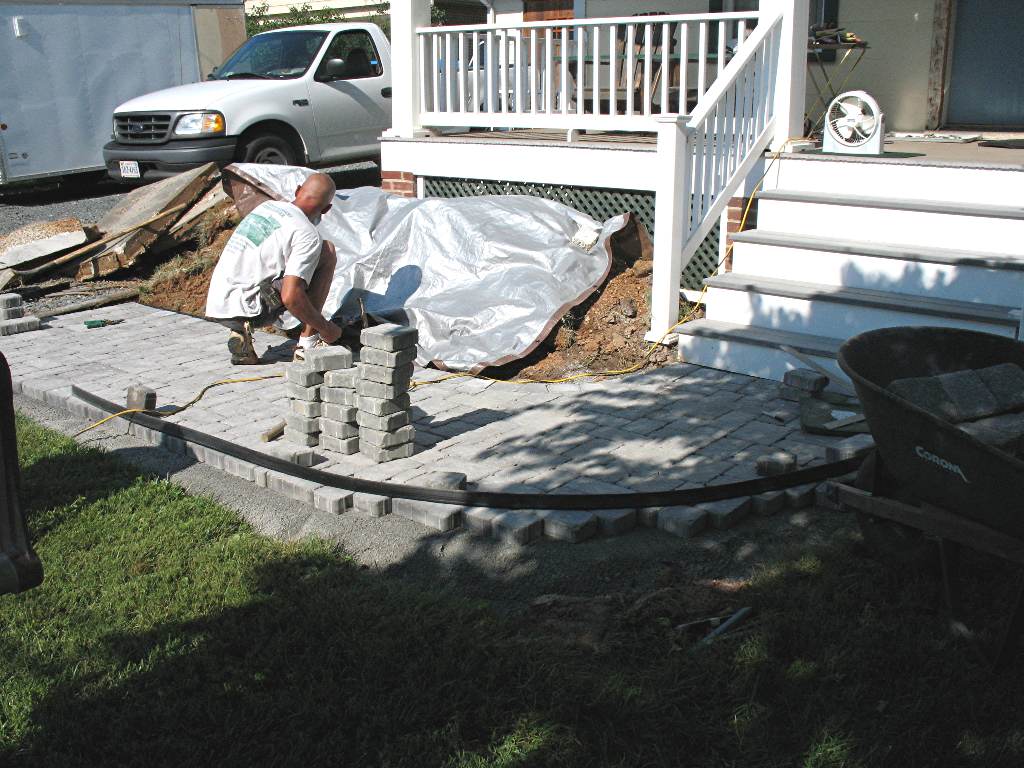
Below, the construction of the new walkway is nearing completion,
with each tumbled stone paver used in the curve of the walkway, cut with a diamond saw to make a perfect fit. Removal of the
old cement slabs and regrading the lawn area with the dirt under the tarp for installation of new turf will be completed next.
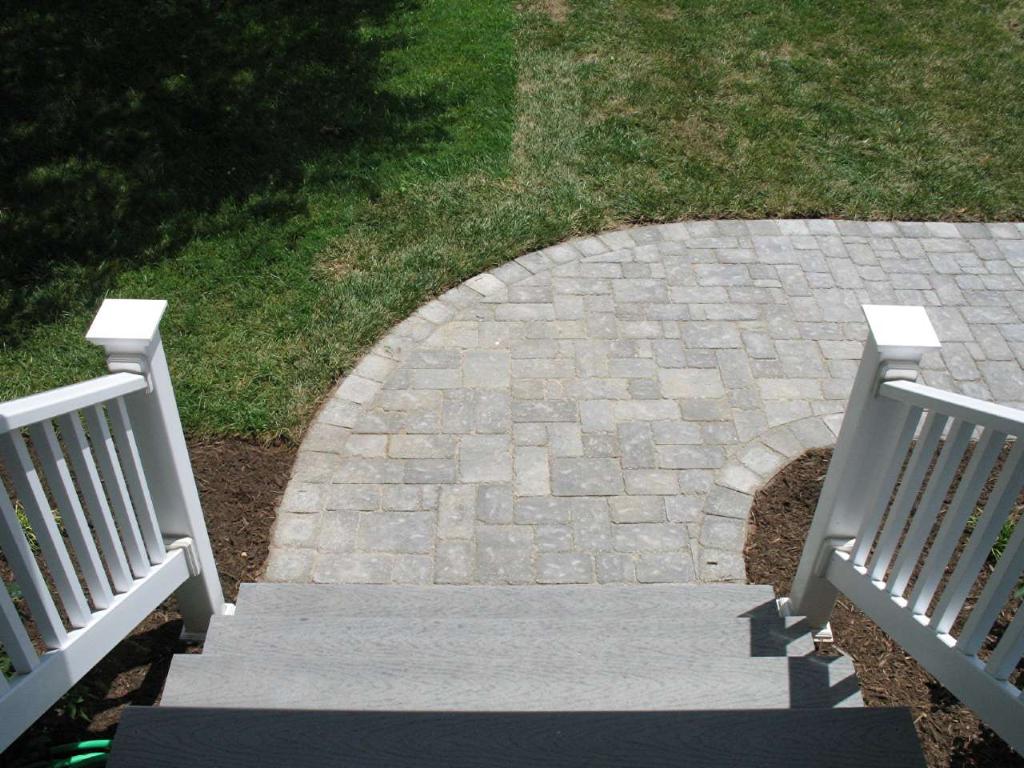
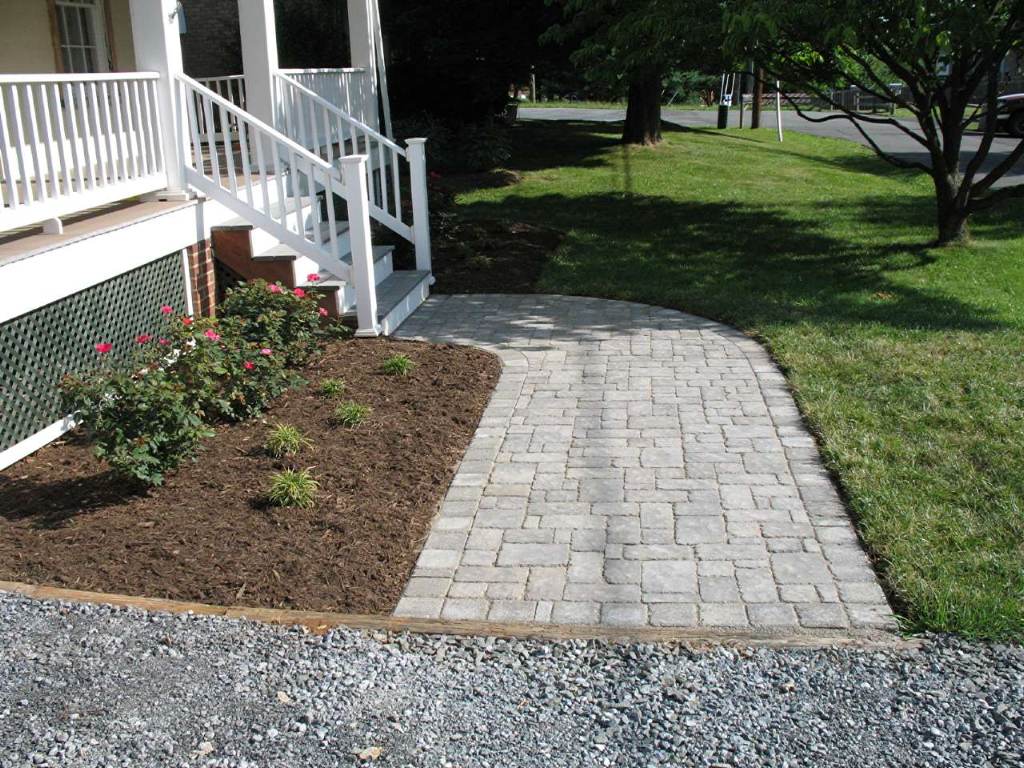 The new five foot wide tumbled pavers 4-size pattern walkway,
installed by Anderson's Nursery, Berryville, VA. The new walkway changes the whole appearance of the house as you approach the porch and its greater width
gives the entry a very welcoming feel.
We would love to have been able to do the whole driveway with these pavers, but at $18,000
because of its large size, we couldn't do it now... but perhaps at a later time.
The house has changed color, too, to a darker 1926 yellow
(a shade lighter than Dodonna Manor in Leesburg, VA, 13 miles from us) and the trim color is being changed from dark green to white, as can be seen on the second
floor windows, on the driveway side. The dark green, while color correct for this 1927 house, collected too much heat, damaging the paint and the wood. Some years ago, (estimated to be early
to mid 1960's) installation of aluminum triple-track storm windows caused the original exterior wooden window shutters
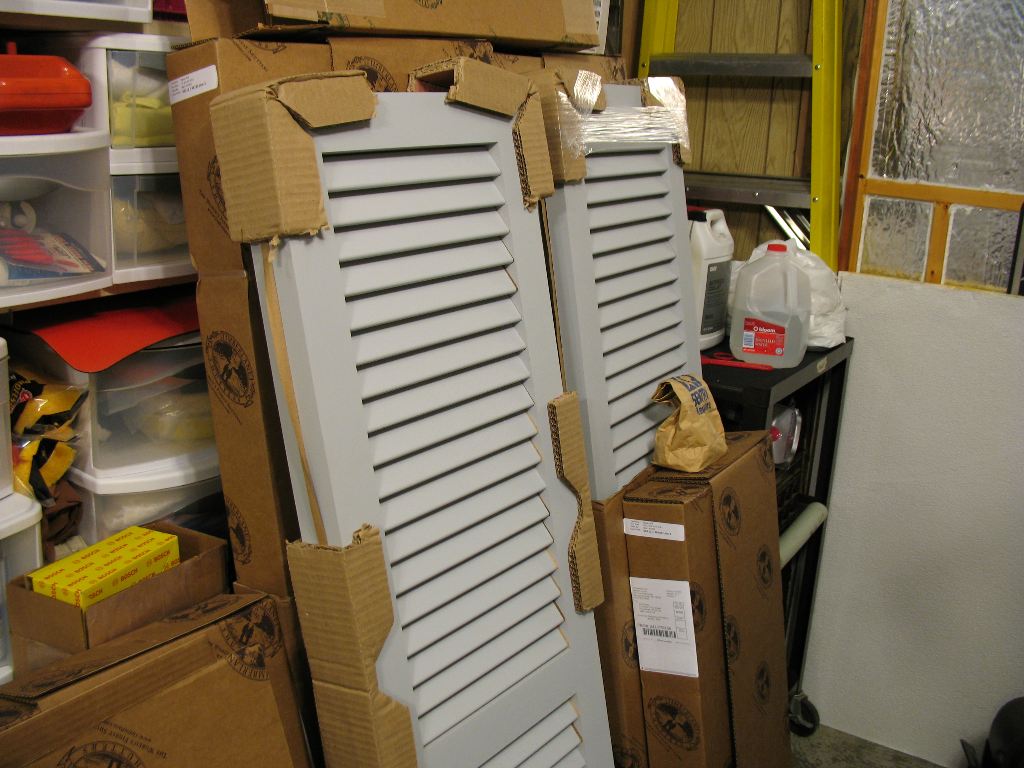
to be removed and discarded. The exterior window shutters have been replaced with new white cedar fully functioning
shutters, with period correct hinges and are used during the summer to reduce heat gain into the house. Installation
is shown here.
The first floor is already fitted with custom internal Petit Industries
(now known as Climate SEAL) thermal windows (installation shown here), which are superior to plain double glazed windows (see chart at this link) and were installed when we removed the triple-track aluminum storm windows in 2002, allowing the old (pre 1910) original
6-over-6 panes double-hung windows with their wavy glass to be seen. Many of the triple-track windows had been improperly
installed, as the aluminum window mounting screws were too long and had gone clear through the exterior top window
stops and into the window sashes, making them impossible to open! The upper sashes interior wood was badily scared in many
places, from multiple attempts to pry them open with things like screwdrivers. The second floor south and north facing windows
were replaced with premium Anderson double-glazed windows for various reasons, as discussed here.
Turning our attention to the driveway, we added 6 tons of #67 Crush
& Run gravel in 2008, to compensate for the older gravel compressing into the ground. The driveway was widened and lengthened
to the rear of the garage in 2006, installing an 8-inch base of #3 stone and a 4-inch layer of #67 stone top
layer. This configuration supports a 10 ton or heavier dump truck, for the delivery of firewood, which can be seen here, discussing our wood stove heating method in our house.
A few neighbors have asked why we didn't blacktop the
driveway (and create another water run-off and heat island problem!) but we say it wasn't blacktop in 1927 and it's superior
to blacktop in terms of ease of maintenance and it doesn't create problems for the environment!
Update July 18, 2009
Yesterday (July 17, 2009), NPR Radio ran a 12-minute story about the effects of dark colored roofing and all the blacktop
we put down and its cost to us in energy useage, versus using much lighter colored materials and saving huge amounts of energy.
If you're concerned about what your house may be doing to the environment, you should listen to this NPR story.
Update May 26, 2011
Aluminum foil faced one-inch thick foam insulation panels visible
in the shed dormer windows on the second floor, are placed between the outer wooden storm window and the inner main 6-pane
window, to greatly reduce the solar heat gain from the light colored roof and potentially higher cooling costs. In the winter,
these panels are stored and the sun is allowed to contribute its heating strength, reducing winter heating costs. Today, NPR
ran a story about Energy Secretary Steven Chu, who talks about the effectiveness of reflective window shades, among other things. Our 1927 house, with its modifications, is an extremely efficient building.
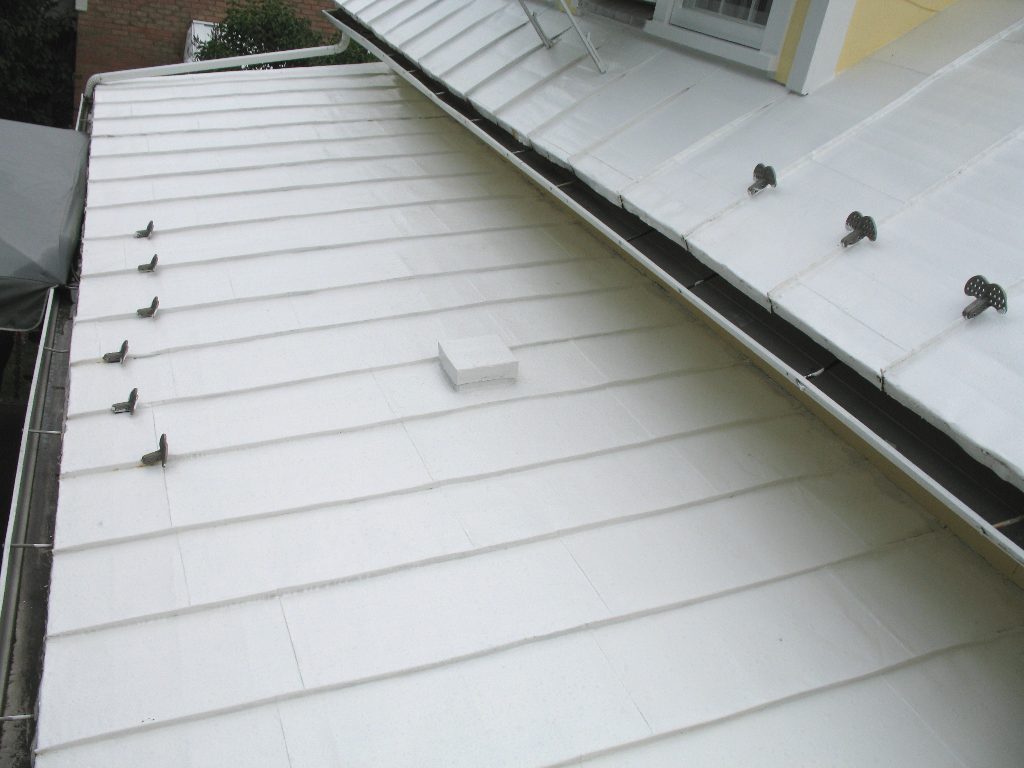
A white roof -
During the process of painting the roof in 2005 (it was a dirty
dark silver/gray, having originally been silver), first with a white primer coat, we noticed that the attic fan wasn't coming
on anymore and I suspected the thermostat had failed. I found that nothing was wrong with it... the white roof was reflecting
so much more of the sun's rays, that the attic temperature wasn't getting high enough to activate the fan thermostat! A condition
I was working for, having lived in Tucson some 50+ years ago while growing up and seeing many white roofs... including
the white pebble roof on my father's adobe brick home.
The roof has been repainted white, again, in 2010, after power
washing and scraping. It received two full coats, applied by a professional roof painter. We hope to be able to have a standing
seam white tin roof installed on the garage soon, to replicate the look of the house roof and provide greatly improved
summer heat reduction.
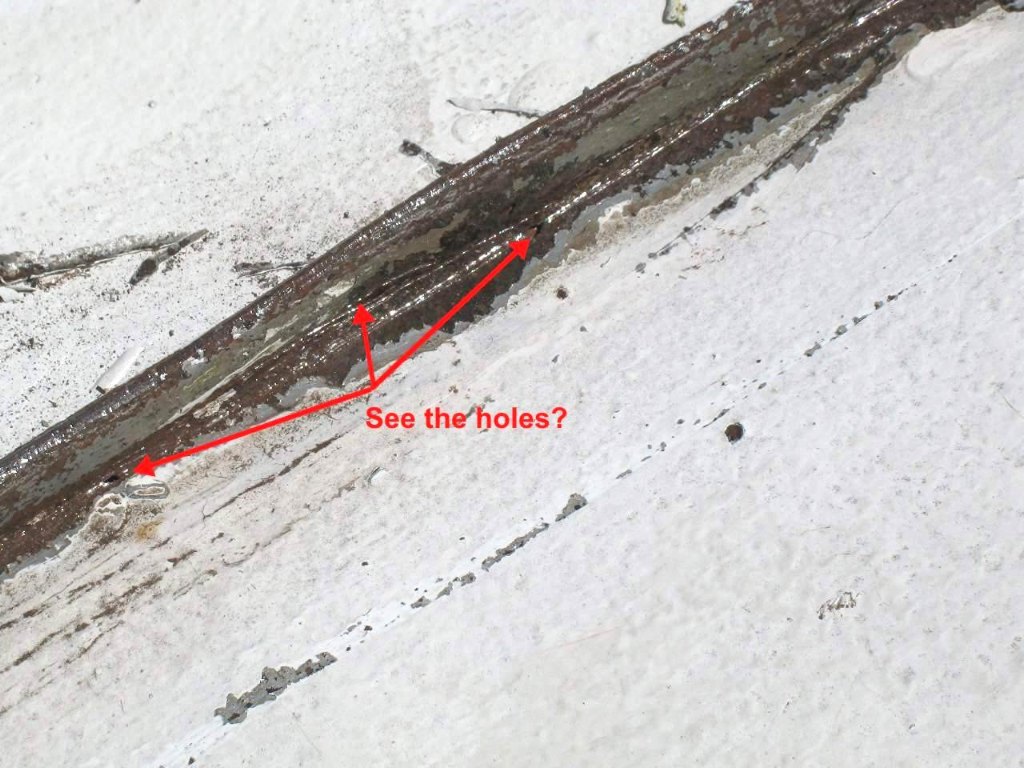
 Don't Overlook This
-
And while preping the roof for paint, don't overlook those standing
seams that have been walked on and have become bent over during the years, no longer vertical, or "standing" up. They have
collected dirt, excess paint and all sorts of stuff which can lead to the base of the seam rusting, as shown below, creating
some small areas or holes that will leak! Clean them out and seal any leaks.
Update August 2, 2012
And before I leave the subject of my metal roof and its color, here
are some very good articles by other sources, for those of you who are interested. Well worth reading.
Rebuilding the windows -
As stated above, the house has windows that came from earlier buildings
that were being torn down at other locations, such as the windows below that came out of a Pennsylvania school building in
1925 and are of a design not built after 1910. (source: Oatlands Plantation, National Historic Trust restoration staff, Leesburg, VA)
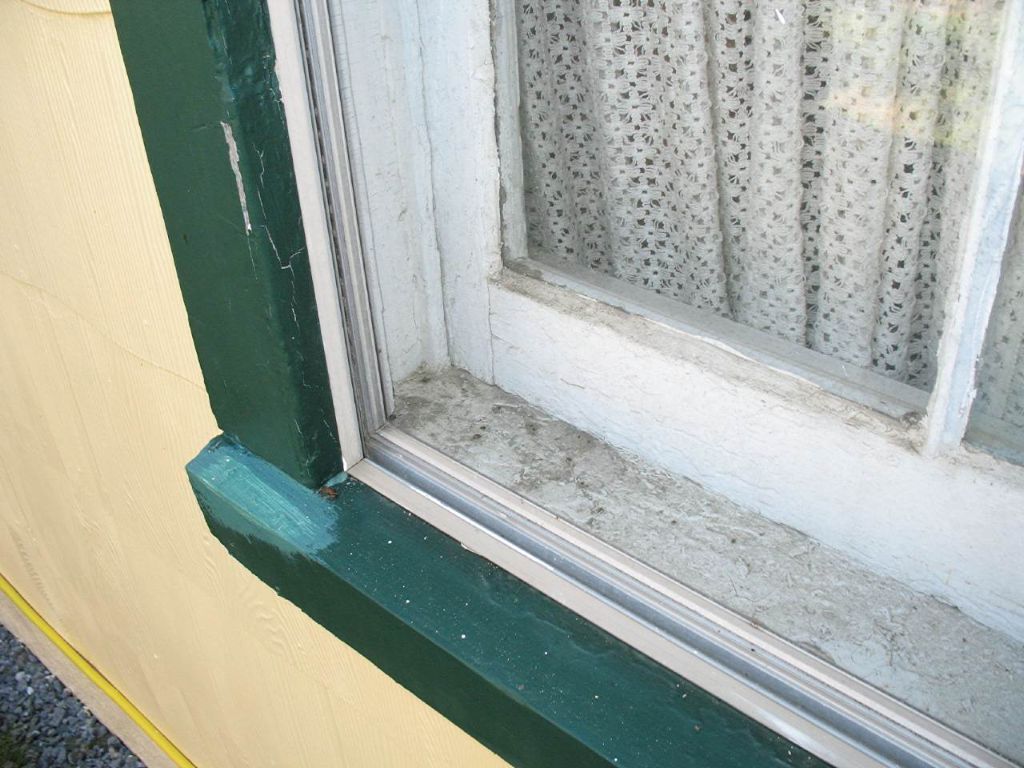 In this close-up, you can see the decades of paint that has been
applied, the failed paint surface condition and failed window glazing, along with the installation of aluminum triple-track
storm windows in the 1960's, which required that the original wooden shutters be removed, since the storm windows were not
the correct design to permit use with existing exterior window shutters... so they were removed!
Additionally, the storm window frames were not correctly installed,
as they used mounting screws too long for the wooden window stops and the screws penetrated the stop pieces and went into
the top window sash, making it impossible to open all of the top window sashes, and many lower sashes such as this one...
and the previous owners just kept painting them shut with each application of paint!
All the window sashes and window trim has been rebuilt by stripping them to bare wood,
filling damaged areas; regluing joints; building new stop strips where necessary; fitting 3M V-Seal to the stops to significantly
improve window sealing; applying two primer coats and reglazing the glass using a Tri-Polymer product; then two coats
of premium acrylic latex semi-gloss paint. These windows have lasted 100 years and with this restoration and care over the
coming years, they'll last another 100 years!
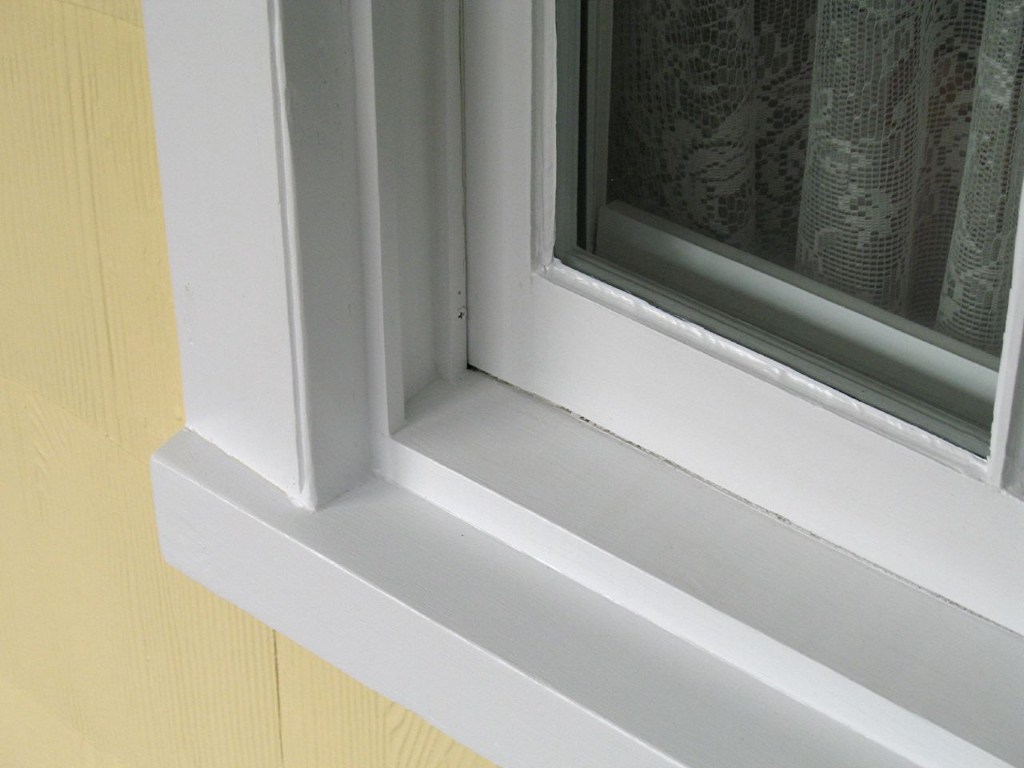 This close-up of the window shows that the aluminum storm window
has been removed and an interior thermal/acoustic window, manufactured by Climate SEAL can be seen mounted inside the original prime window, allowing the wonderful character of the original 100 year old window
to be seen. Note the window glazing, which is now a flexible Tri-Polymer sealant.
Because of the large amount of interest by other owners
of old homes, I have created another webpage that details my Window Restoration Work, including
the replacement of original style wooden exterior window shutters, which is linked here.
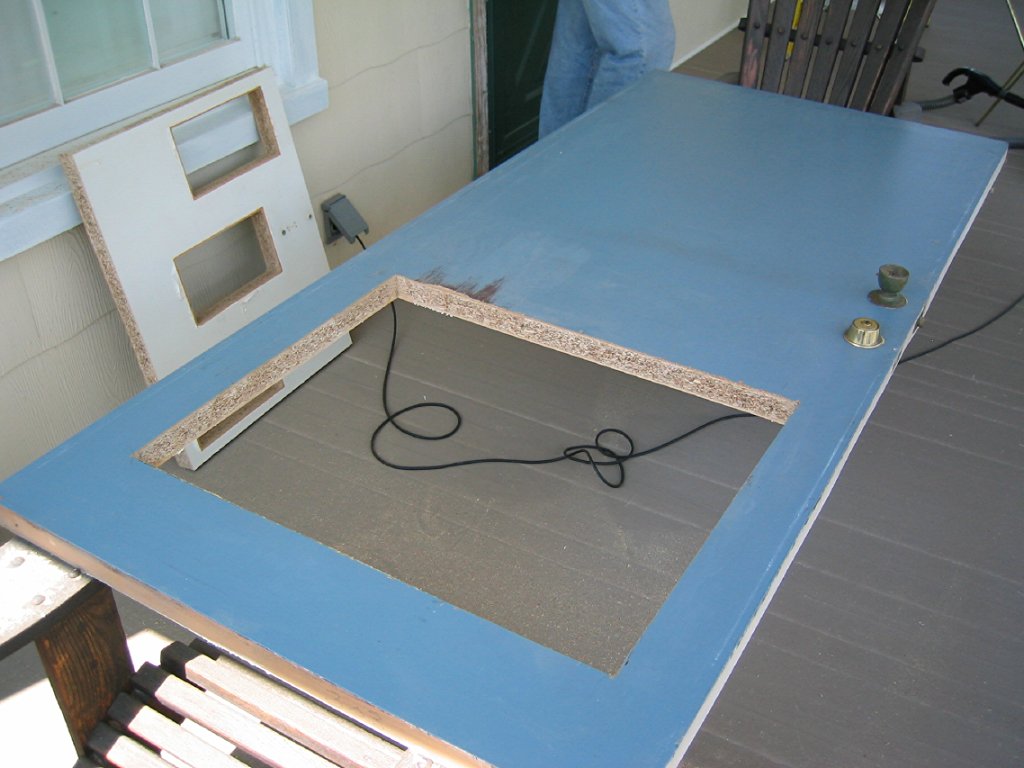
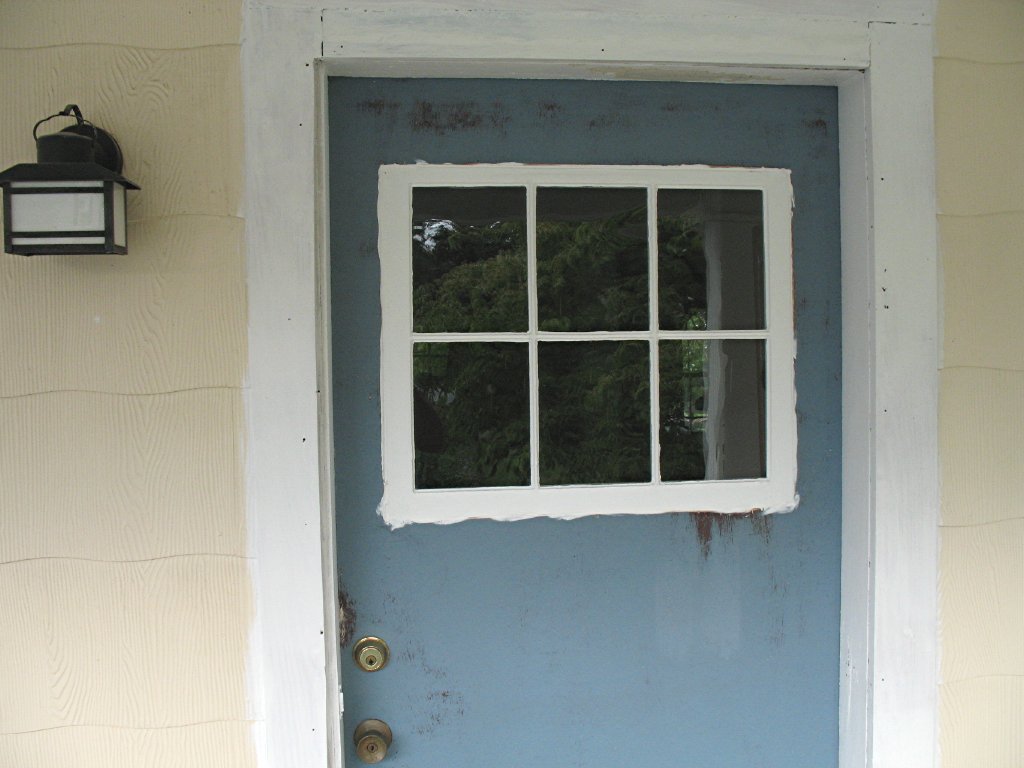
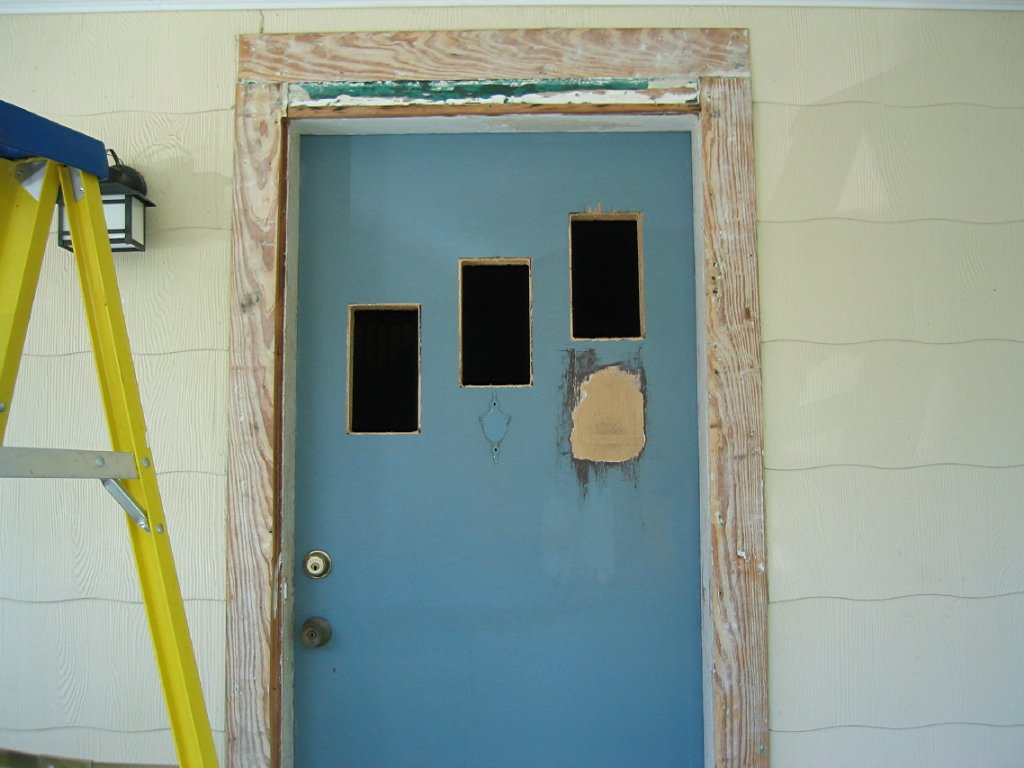 Above, the 1960's style front door is being modified to look more
like the front doors of the 1920's, using a small 6 pane window sash with old wavy glass, that was in the rear dormer window,
where the second floor window air conditioner was installed. Some original 1920's front doors remain on houses in our neighborhoods,
but not very many.
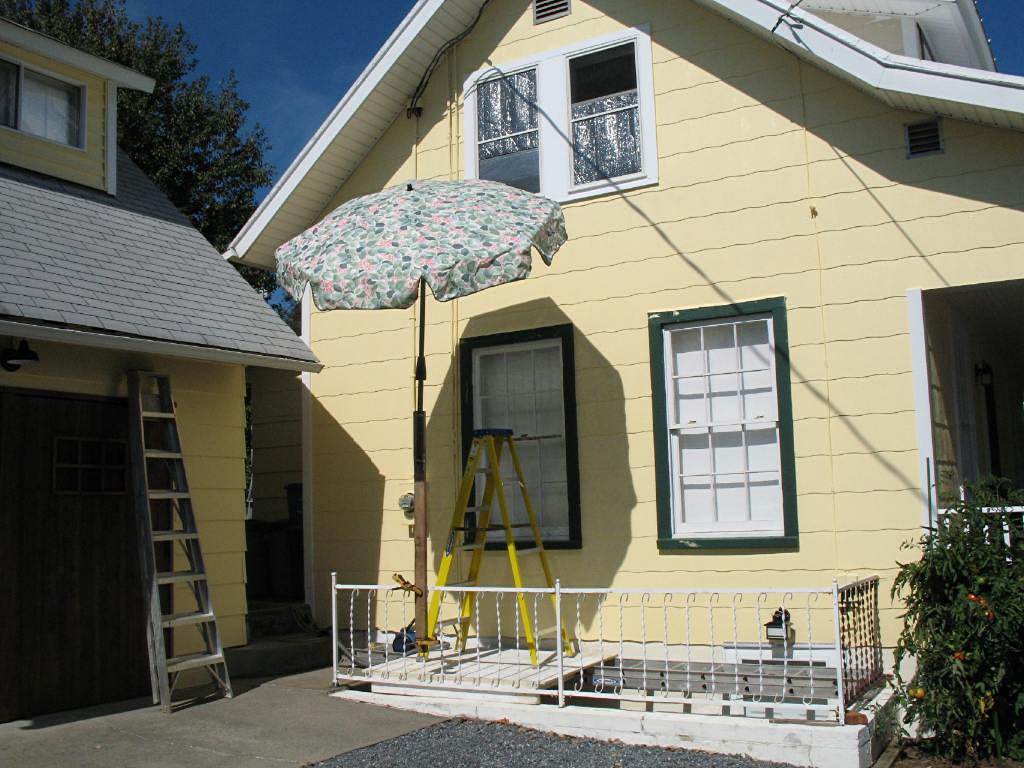 Window trim painting continues, changing the color from dark green
to brite white. The dark color has cooked the wood in the summer, especially on this south side, so wood restoration is necessary
before painting. The umbrella is necessary to prevent heat gain from the sun while working on the wood surfaces... as well
as protecting me, the worker!
 Work now begins on the shed dormer windows on the roof. Difficult
because of the slippery metal roof... which is accomplished by a professional painter friend, who I hired to handle
all second story work.
At this point the upper right dormer windows have been power sanded and
primed with two coats of 100% acrylic exterior primer and all joints recaulked with T-Rex. UPDATE - T-Rex is no longer available. The product was actually manufactured
by SOUDAL known as SoudaSeal FC and distributed in the U.S., but not to DIY people, only to contractors in bulk. I had a number
of conversations with SOUDAL about this, but they are not interested in supporting us DIY home owners. Unfortunately, what
I've used in the past, White Lightening 50 year Tri-Polymer is no longer made, but T-Rex/SoudaSeal FC appears to be an
excellent replacement and may be better... time will tell, of course, and we've had a lot of failed caulk over the past 25
years on this house, especially on the south side, so we know what works and what doesn't, inspite of advertising hype about
products lasting 50 years, which they don't!
The single pane dormer exterior storm window (mounted in front of
the 6 pane interior window) PVC seals have died after 4 years. They have been replaced with EPDM weather strip seals
brought back from the Netherlands, in 2007, purchased at GAMMA, a fantastic DIY Home Center, vastly superior to our stores here in the U.S., which, more and more, seem to concentrate
on stocking lowest cost items and not quality products or materials.
The left dormer window trim has not yet been worked on, as
they're still a green color. I am rebuilding the window sills, since they are easily worked on by leaning out of the window
from the inside. Rebuilding is necessary due to the sun and heat damage. Fortunately, all the window sills on our
old house are old growth longleaf pine or old growth oak, as shown here with very dense and close growth rings, so damage is only about 1/16 inch deep into the very hard surface. However, the previous
products for resurfacing exterior wood surfaces, such as these window sills, has failed! I won't go into details here, but
will be happy to talk about it if you're interested. Fortunately, all the trim is old growth southern yellow pine. Another
reason why old houses are better houses... the wood trim doesn't rot from weather damage after only 7-10 years of age, requiring
complete replacement... as it has on several of our friends 5-10 year old homes!
Our inability to obtain old growth wood, locally, during the porch rebuilding, was the primary
reason we went with treated lumber, faced with protective materials, such as Azek, which does not require painting. A win-win
construction method, in my opinion.

Painting finished November 1, 2008
Finally, just in time ahead of the weather turning much colder. Lots of work and only the detail
can be seen in person, but it's done. Special thanks to my friend Julian Worsley, a painter for 19 years, who made himself
available to handle all the second story work, which I can no longer do because of balance problems on tall ladders and
second story heights.
The next step is to measure and order new wooden window shutters to be installed on the ground
floor windows, used on the south (driveway) side to stop sun entry during the summer. Shutters installed on the porch won't
be closed, of course. What color? Dark green or black?
May 8, 2009 UPDATE
The shutters have arrived and painting and installation is beginning. Shutter installation
and notes are here on the Window Restoration webpage.
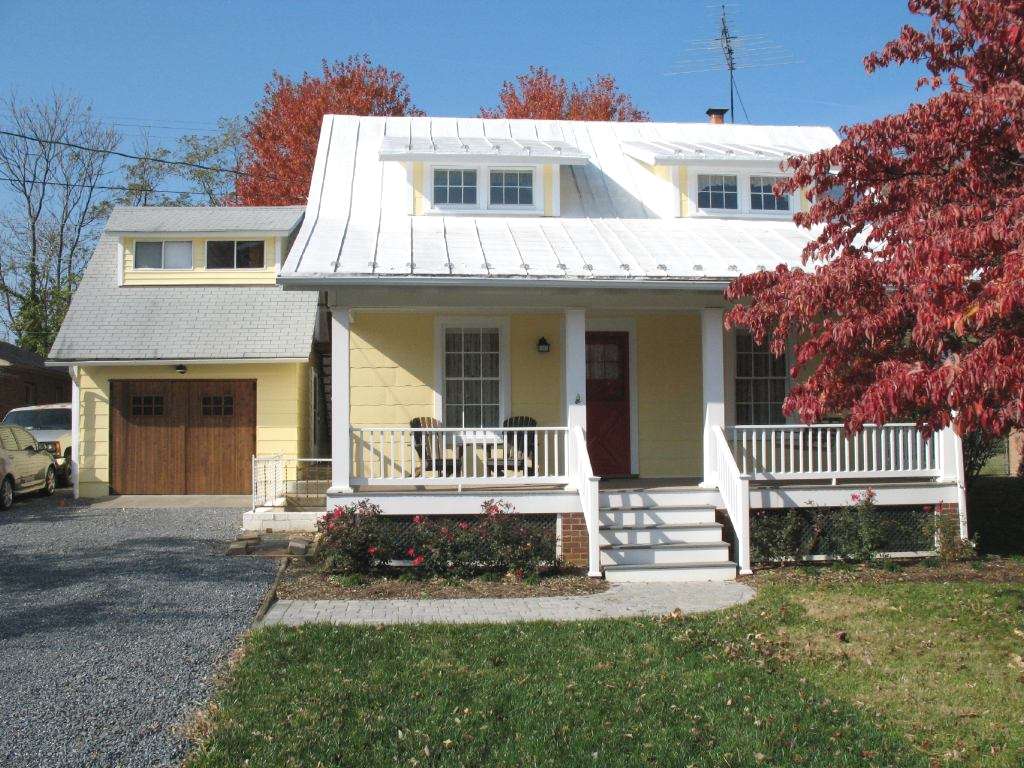
Update May 26, 2011
Current picture of front of the house, which faces east. The south facing shutters on the driveway
side are now closed, showing their white painted side and the foil faced insulation panels are now in the dormer windows and
south bedroom windows, stopping the summer sun heat gain, as well as protecting the the windows from the sun.
Update February 12, 2010
Pictures of the snow storms we received, starting December 6, 2009 through February 10, 2010,
with a total amount of 82-inches measured in our back and front yards.
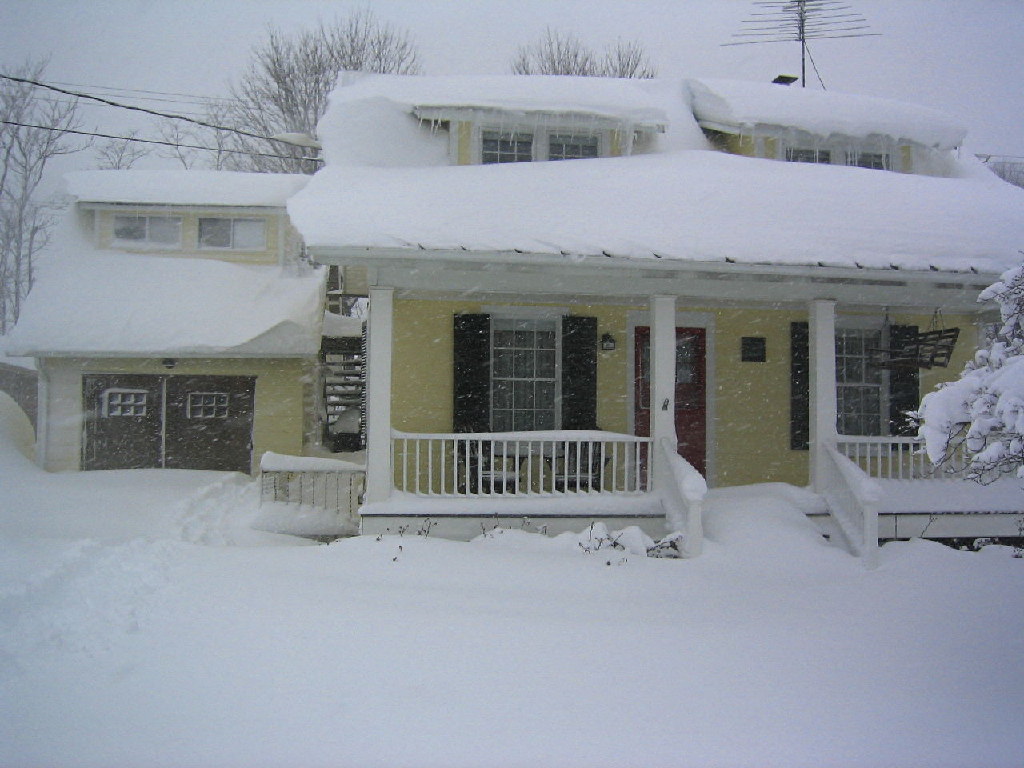 February 6, 2010. 23-inches of snow and still coming
down. When it ended we had 26-inches, with some 36-inch drifts.
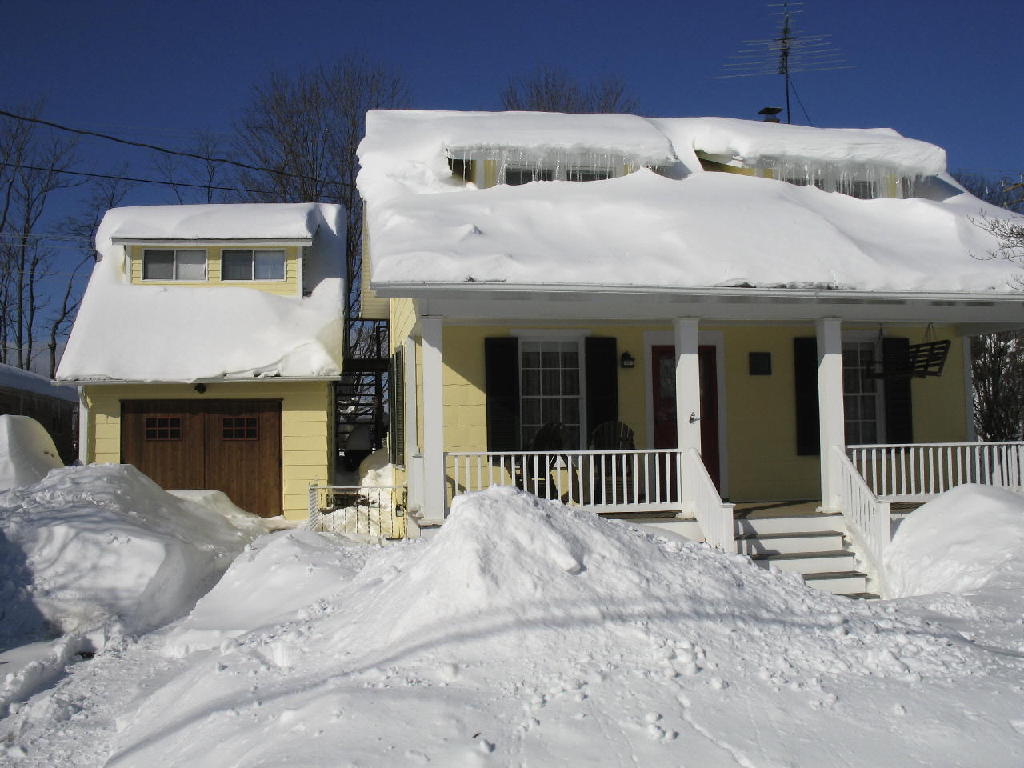 February 10, 2010. Cleaning up after an additional 8-inches!
Total snow fall since it started in December was 82 inches! In the above picture, you can see that I had dragged quite a bit
of snow off the roof, using a snow rake, which is now piled in front of the porch, but a large amount remains on the porch
roof. When moving this snow further out into the yard, I measued the weight of the snow which averaged 44 pounds per
shovel full. I gave up the count when I reached 100 shovel fulls... realizing that the roof with this amount of snow, already
equaled the weight of our 1988 Chevy 4x4 pickup truck, which weighs 4400 pounds! A considerable amount of weight
to have on your roof!
October 21, 2010 -
Fall has started its new color scheme and our roof painting is complete, after power washing,
scraping and two coats of paint. Last years winter with its heavy snow and ice scraped some areas pretty heavily and we chose
to repaint, versus a lot of touch-up painting. Our 84 year old house is the only one left on the street with its original
tin roof, still in very good condition. Three other tin roofs have since been replaced with asphalt shingle type roofs and
only one other tin roof house remains, but its condition is poor. Too bad all these tin roofs received insufficient
maintenance and have required replacement with inferior systems. They could have easily provided another 80+ years of service,
had they been properly maintained. Far too many home owners have become lax, when it comes to understanding, or even thinking
about proper house maintenance, regardless of the age of the house.
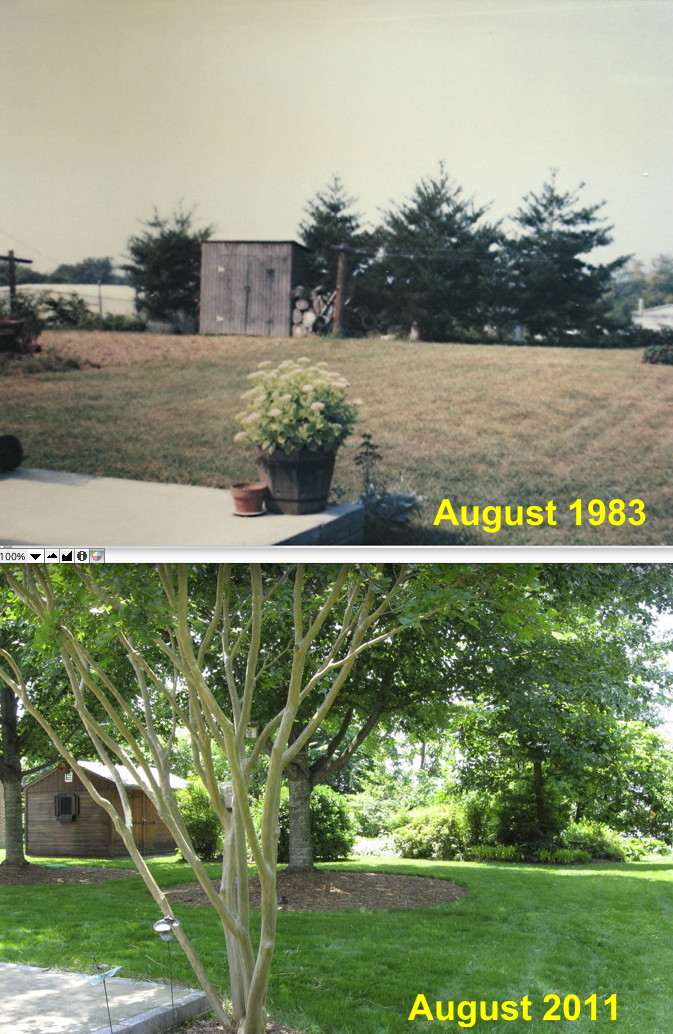
Pictures of the backyard, then and now -
(updated August 2011)
Go to the Ductless Air Conditioning installation page
Go to the Garage Carriage Doors installation page
Go to the Window Sun Shade installation page
Go to the Heating With Wood information page
Need to talk about any of the above? |
||||||||||||||||||||||||||
|
|