

We call them shoulder bolts over here, not sure if that's the technical name. Mine has those, I'll try to snag a pic next time I'm under the car.szacsi72 wrote: Aug 13, 2024 7:03 AM Sure is. I made them double sided so that I could use precision/matched bolts - or whatever their proper name is. It's ISO 7379. Apart from the middle being 10mm-f9, meaning a really nice fit with BMW's selector joint, I can adjust the preload, to dial in slack and tension, or make up for wear over time.
External links now open in a new browser tab - turn this off in your UCP - Read more here.
szacsi72's 1984 Zinnoberrot 535i Build
Re: szacsi72's 1984 Zinnoberrot 535i Build
Re: szacsi72's 1984 Zinnoberrot 535i Build
Heyall,
Not a lot of updates lately, but here's a quick sumup.

Not a lot of updates lately, but here's a quick sumup.
- I am not dead! That's a start. I started my new job in September, which is really nice, but it does requite a lot of work; at least in the beginning. I had to drive a lot to learn at a different location that is 3hrs away from me, sometimes 3-4 times a week. Glad that's over.. I'm going to Germany this weekend for 2 weeks, to learn from the german collegues as well. I'm excited for that, haven't been there for a while. Hopefully I'll see some nice old bavarians... I'll be in Stuttgart, I plan to visit the Porsche and Mercedes Museums in my free time.
- I bought a 200 E39 Touring 523i for a cheap daily/secondary car. It's quite nice, but needed/needs some work, so that took away from the E28.
- Since I'm going to Germany, I asked my friend to shop a couple of rarer items for me, that are cheaper there, including Cerakote. I'll be coating my pistons (and maybe some other components too) with C110 and C186.
- I still have not had the time to take the front cover to the machine shop...
- But I'm 80% trough with the head porting, I just need to buff it out a little (up to 180grit), and it's done.
- I took apart my suspension for measurements, it's going slowly, but I've at least decided on the springs rates: 6k front, 5.5k rear.
Re: szacsi72's 1984 Zinnoberrot 535i Build
This is off-topic, but I'm sure many of you guys are interested. The Porsche museum was awesome. It feels more of a car exhibition than a "proper" museum, but as a Porsche fan, I'm not complaining... 
I took almost 500 photos, here's a couple of them.
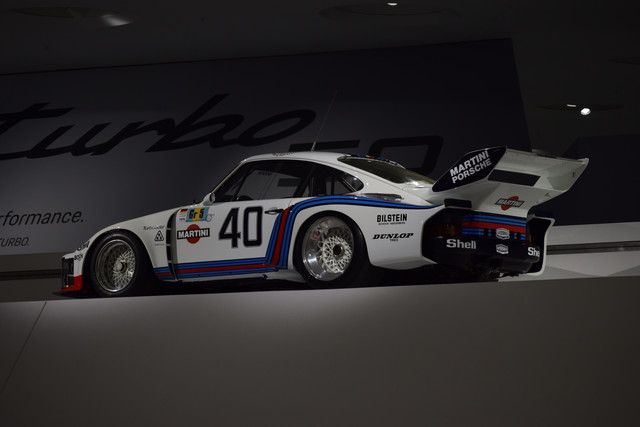
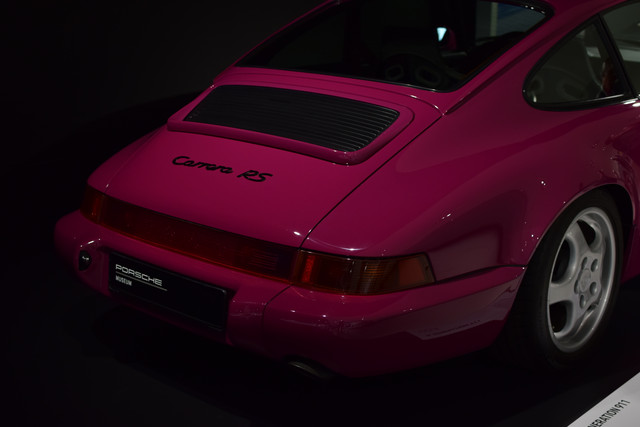
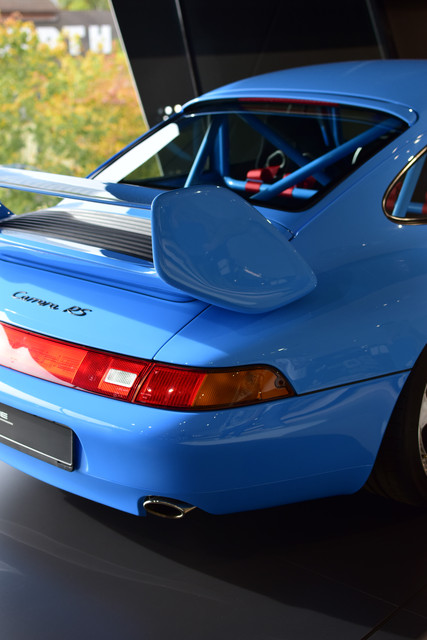
And yes - from now on, I'm using my DSLR instead of my potato phone camera to document the build
I took almost 500 photos, here's a couple of them.
And yes - from now on, I'm using my DSLR instead of my potato phone camera to document the build
Re: szacsi72's 1984 Zinnoberrot 535i Build
I need some help. Maybe someone out there has done cerakote already - but even if not, I'm eager to hear your opinion.
The question is simple: what should I cerakote?
Micro slick:
Coat the whole piston (apart from the top); coat only the skirt; coat the whole bottom part of the piston, apart from ringlands.
I've seen all the versions before, even on the original website. I'm leaning towards whole bottom part, but not the ringlands. That part of the piston should even really touch the cylinder walls, and I don't like the idea of having less space around the rings.
Anything else I could benefit from? I'm thinking of coating the camshaft bearing journals too. I was considering the rocker shafts, but the coating would come off anyway during install.
The thermal barrier part is easy; top of the pistons + the cylinder head (w/ valves).
Re: szacsi72's 1984 Zinnoberrot 535i Build
I'm about to do this on the B35 pistons that I'm about to install as part of the rebuild. Micro Slick is intended for the skirt area of the pistons and what I've seen is that they tend to leave about 1/8" gap from the edge of the piston. However, it doesn't cover the whole side of the piston pin area, just from slightly below it to the previously mentioned margin. Sideways I have no idea but I'm waiting for the aluminum oxide media to arrive to start blasting the pistons. The top of the piston gets covered with Piston Coat which is apparently a different product with different characteristics.
By the way, are you using oven or air cure? Air cure needs 5 days to cure prior to installation. I've only used air cure since I don't have an oven to cure the items I was handling.
By the way, are you using oven or air cure? Air cure needs 5 days to cure prior to installation. I've only used air cure since I don't have an oven to cure the items I was handling.
Re: szacsi72's 1984 Zinnoberrot 535i Build
Yes, I have bought air-cure, micro-slick and piston-coat, because I have plenty of time for the build and I figured it's easier.jimoreno wrote: Oct 21, 2024 3:23 PM I'm about to do this on the B35 pistons that I'm about to install as part of the rebuild. Micro Slick is intended for the skirt area of the pistons and what I've seen is that they tend to leave about 1/8" gap from the edge of the piston. However, it doesn't cover the whole side of the piston pin area, just from slightly below it to the previously mentioned margin. Sideways I have no idea but I'm waiting for the aluminum oxide media to arrive to start blasting the pistons. The top of the piston gets covered with Piston Coat which is apparently a different product with different characteristics.
By the way, are you using oven or air cure? Air cure needs 5 days to cure prior to installation. I've only used air cure since I don't have an oven to cure the items I was handling.
Re: szacsi72's 1984 Zinnoberrot 535i Build
I'm back from Germany for one week, so I continued the build with some minor progress.
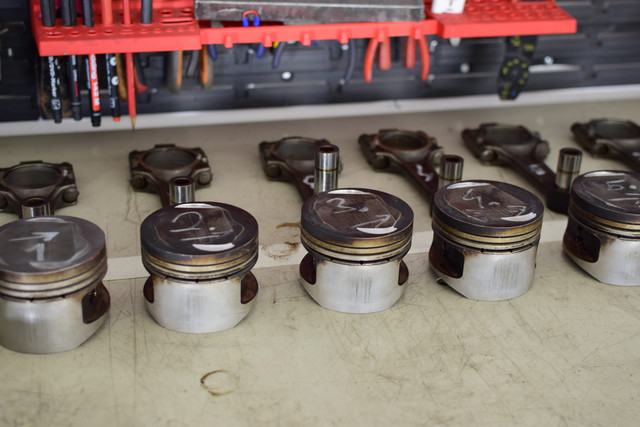
First of all, I started cleaning and prepping the pistons.
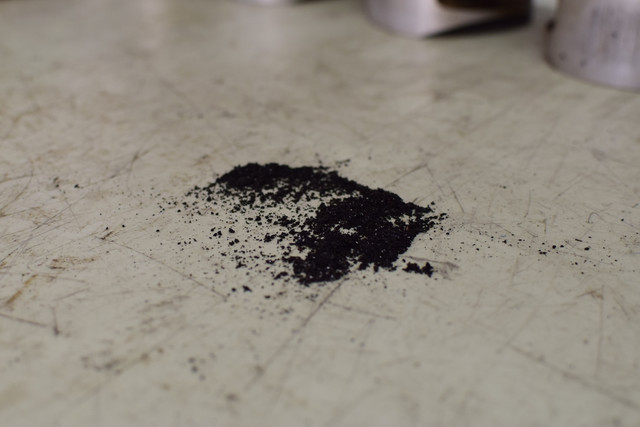
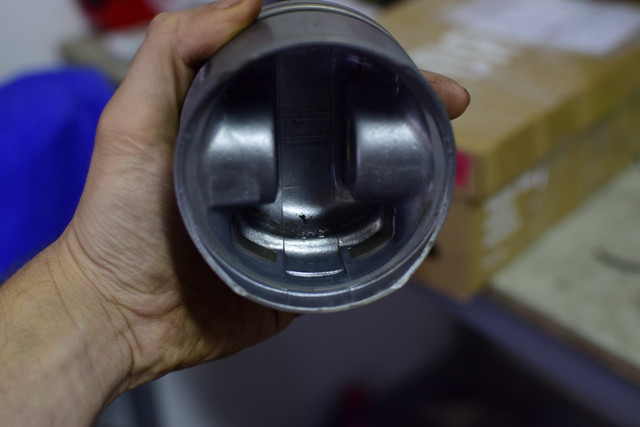
You can see just how much soot's on there - especially in the ring grooves. On multiple pistons, even some of the holes in the oil-ring-grooves were fully clogges. The attached picture is the soot from one piston.
I used old rings that I broke in half to start off...
...then I used well-done's "hideg zsíroldó = cold degreaser" - a strong cleaning agent + elbow grease; smoothened the top of the pistons with a dremel tool, then finished off with the ultrasonic cleaner.
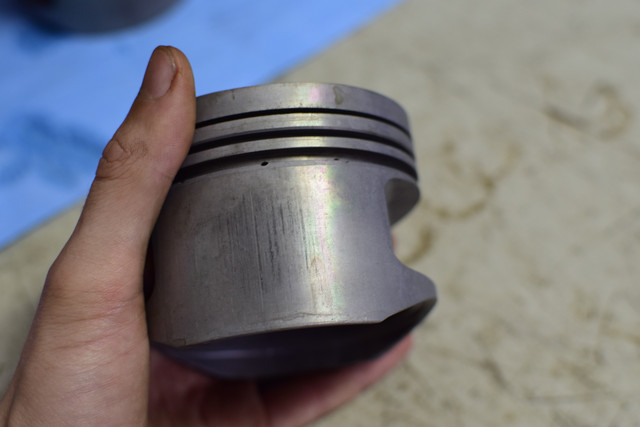
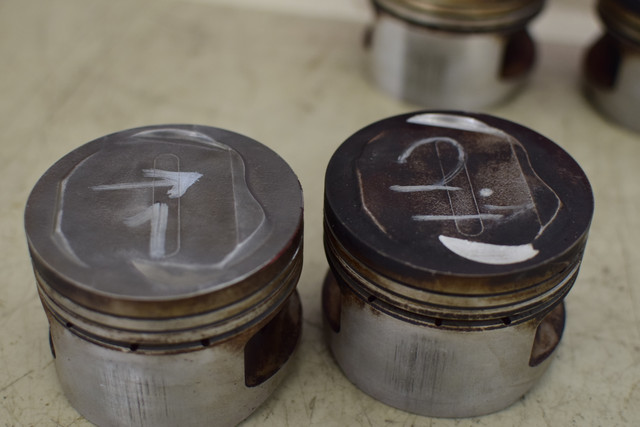
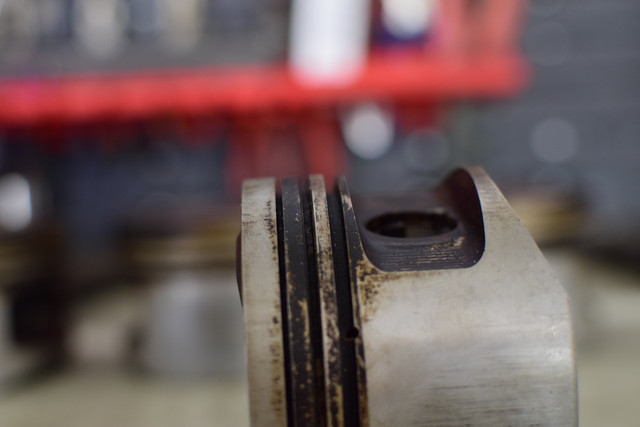
Off: does anyknow know what these random pieces of a different metal (steel?) are in the pistons? These are OEM Nural B35 E32 pistons.
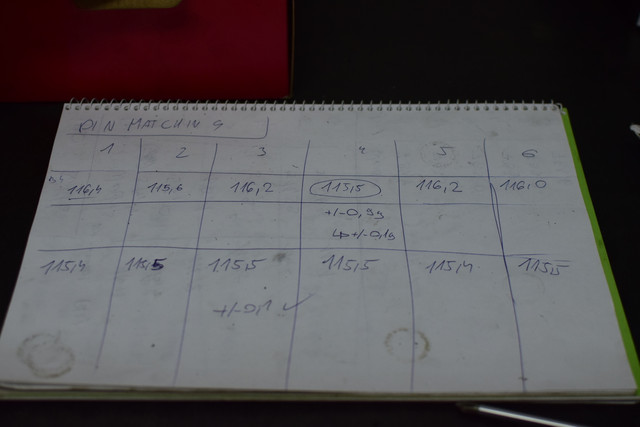
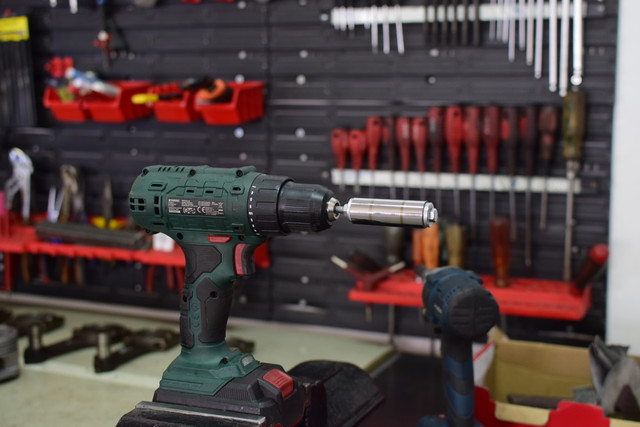
I gave the wrist pins a quick polish, just to clean them a bit; then weight matched them to +/-0.05grams by sanding the inside of them.
I also prepped the pistons for cerakote, and I cleaned my engine block thoroughly, now completely ready for assembly.
I sprayed the top of the pistons using cerakote C-186; they are drying right now.
I'll take some pictures on tuesday, we will see how it went.
I used a 1.4mm HVLP gun, because I did not want to buy another gun just for this.
Turned down the pressure to 25psi, full fan, and low material flow. It's was my first time ever with a gun, but it went really smoothly. The material is quite easy to apply. I apply one heavy, and one lighter coat. I preheated the pistons to 40C.
I'm headed back to Germany on wednesday for a final trip this year; once back, I'll move on to cerakote the skirts. While drying, I'll weight match the rods, then I can finally start the engine assembly.
I only have one camera (and only a potato phone):
If anyone is interested, what you like to see more?
Detailed pictures with comments, or a time-lapse of the build?
First of all, I started cleaning and prepping the pistons.
You can see just how much soot's on there - especially in the ring grooves. On multiple pistons, even some of the holes in the oil-ring-grooves were fully clogges. The attached picture is the soot from one piston.
I used old rings that I broke in half to start off...
...then I used well-done's "hideg zsíroldó = cold degreaser" - a strong cleaning agent + elbow grease; smoothened the top of the pistons with a dremel tool, then finished off with the ultrasonic cleaner.
Off: does anyknow know what these random pieces of a different metal (steel?) are in the pistons? These are OEM Nural B35 E32 pistons.
I gave the wrist pins a quick polish, just to clean them a bit; then weight matched them to +/-0.05grams by sanding the inside of them.
I also prepped the pistons for cerakote, and I cleaned my engine block thoroughly, now completely ready for assembly.
I sprayed the top of the pistons using cerakote C-186; they are drying right now.
I'll take some pictures on tuesday, we will see how it went.
I used a 1.4mm HVLP gun, because I did not want to buy another gun just for this.
Turned down the pressure to 25psi, full fan, and low material flow. It's was my first time ever with a gun, but it went really smoothly. The material is quite easy to apply. I apply one heavy, and one lighter coat. I preheated the pistons to 40C.
I'm headed back to Germany on wednesday for a final trip this year; once back, I'll move on to cerakote the skirts. While drying, I'll weight match the rods, then I can finally start the engine assembly.
I only have one camera (and only a potato phone):
If anyone is interested, what you like to see more?
Detailed pictures with comments, or a time-lapse of the build?
Re: szacsi72's 1984 Zinnoberrot 535i Build
What is it? It's reinforcing steel. I've seen it on lots of pistons. Where it is and how it makes it stronger I'm not sure, I missed that day in engineering class.szacsi72 wrote: Dec 01, 2024 2:12 PM
Off: does anyknow know what these random pieces of a different metal (steel?) are in the pistons? These are OEM Nural B35 E32 pistons.
Re: szacsi72's 1984 Zinnoberrot 535i Build
I normally work on 90s to 00s cars and I haven't seen this so far on any pistons.Mike W. wrote: Dec 01, 2024 11:09 PMWhat is it? It's reinforcing steel. I've seen it on lots of pistons. Where it is and how it makes it stronger I'm not sure, I missed that day in engineering class.szacsi72 wrote: Dec 01, 2024 2:12 PM
Off: does anyknow know what these random pieces of a different metal (steel?) are in the pistons? These are OEM Nural B35 E32 pistons.

It's interesting. One thing I can imagine is that it helps distribute a high contact pressure.. maybe.
Anyway,
Here's how the C-186 turned out:
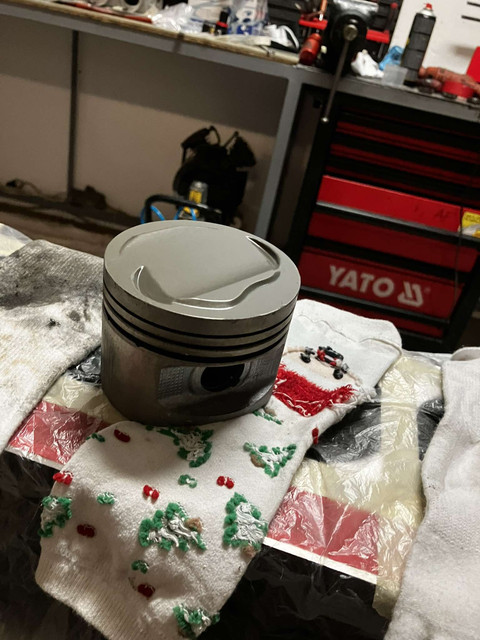
Turned out pretty nice, for what it is.. first time cerakoteing, first time using a spray gun.
I'll apply the micro slick once I'm home again.
I've decided to not apply it around the ringland, but I will apply it all the way around, not just the two skirts. Probably in un-measureable amounts, but it may help with sealing, reduce drag, but the most important factor in my head is that it could improve the oil film thickness' uniformity by wearing into shape.
Re: szacsi72's 1984 Zinnoberrot 535i Build
The E39 took quite some time from me, as I had to do a complete coolant system overhaul. But it's finally done, so I did some progress on the E28.
The cerakote-ing is ready. Working with the micro-slick is quite tricky... it's not like paint at all. The piston coat was easy, but this... it did not want to stick and ran... and then it turned out ok anyway? VERY weird material. The surface finish is not perfect but since this is a sacrificial, "wear into size" type of coating, I'm not too worried.


Also, I finally found a machinist who was able to mill the timing cover based on my measurements, and it fits PERFECTLY.


Up on my list, there's only a couple of stuff left.
#1: cerakote the cylinder head. This is already in preparation, I just have two valves left to clean, then I can spray the coating.
#2: weight match the rods
#3: weight match the pistons
After these are done, I can finally assemble the engine, top to bottom.
However I have a question for you regarding colours.
Here's what's sure: the engine block and lower timing cover will be/are painted jet black. The engine mounts, the transmission, the cylinder head, the sump and the upper timing cover will be either left raw, or painted flat silver. The intake manifold and the valve cover will be painted diamantschwarz metallic.
I'm not sure what to paint the:
-thermostat housing
-alternator
-water pump
-power steering pump
-starter motor
-alternator+PS pump console
What do you think?
I think a lot of black looks really good in a red engine bay, but I feel like last time I might have over-done it, and I'd like a more classic look this time, a bit more period correct.
Thanks!
Prep:


The cerakote-ing is ready. Working with the micro-slick is quite tricky... it's not like paint at all. The piston coat was easy, but this... it did not want to stick and ran... and then it turned out ok anyway? VERY weird material. The surface finish is not perfect but since this is a sacrificial, "wear into size" type of coating, I'm not too worried.
Also, I finally found a machinist who was able to mill the timing cover based on my measurements, and it fits PERFECTLY.
Up on my list, there's only a couple of stuff left.
#1: cerakote the cylinder head. This is already in preparation, I just have two valves left to clean, then I can spray the coating.
#2: weight match the rods
#3: weight match the pistons
After these are done, I can finally assemble the engine, top to bottom.
However I have a question for you regarding colours.
Here's what's sure: the engine block and lower timing cover will be/are painted jet black. The engine mounts, the transmission, the cylinder head, the sump and the upper timing cover will be either left raw, or painted flat silver. The intake manifold and the valve cover will be painted diamantschwarz metallic.
I'm not sure what to paint the:
-thermostat housing
-alternator
-water pump
-power steering pump
-starter motor
-alternator+PS pump console
What do you think?
I think a lot of black looks really good in a red engine bay, but I feel like last time I might have over-done it, and I'd like a more classic look this time, a bit more period correct.
Thanks!
Prep:
Re: szacsi72's 1984 Zinnoberrot 535i Build
Dear Diary,
The valve spring problem.
So here's the issue, briefly. I am going to be running the KMCams Stage2 cam (more agressive profile, 292°, 10.2mm lift) with KMCams steel rockers; and going to be revving the engine to 6800-7000rpm. I had a gut feeling that the stock B35 springs will not hold, so I contacted Kenneth@KMCams to suggest me some values. After some discussion, we agreed on the following values.
The springs should have a seat pressure of 35-40kgs. He stated that over 40, the rockers may get damaged at it's too much.
So, off I went to find myself some springs. Here are the options.
1. Run the stock B35 dual springs
I measured the dimensions of the B35 springs and I ended up with the following values for springs rates (calculated)
33kg @0mm (72.7lbs)
3.46kg/mm (19.4 lbs/in)
68.3kg @10.2mm (150.5lbs)
Not quite 35-40kgs.
2. Space the stock B35 dual springs
I was recommended this before and it sounds like it *would* work.
Spacing it 1mm would give me the following results:
36.46kg @0mm
71.7kg @10.2mm.
So this is plenty.
But here's the issue. According to my calculations, the main spring bottoms out at roughly 25mm. There's also some measurements of coil bind at 24.41mm (thanks, Luke!).
Based on this... L1 -1 -25 -10.2 = 0.8mm.
I'm not sure if I'm comfortable with this - that's not a lot of gap (and also, more stress on the stock springs).
Does anyone have experience with this? Please let me know.
3. PPF retainers
The same as above expect the PPF retainers do the job instead of getting spacers. I was informed that they space the springs down by 1.0mm, but I'm waiting for confirmation.
UPDATE 1!
Their retainers do not space down the springs.
UPDATE 2:
Even tho PPF says their retainers don't space down the springs, they DO. So watch out for this.
4. PPF stage 1 springs
45kg @0mm.
Kenneth said these will damage the rockers, so unfortunately not an option.
(This is also just stage 1, stage 2 is 68kg??)
UPDATE 1:
AB from PPF just messaged me back.
They state that they have been running KMCams rockers with these springs and had no issues whatsoever.
Secondly, he gave me more specs for their springs.
44kg @37mm
81kg @15.5mm (coilbind)
So their spring rate is 2.38kg/mm ---> less than stock?!
For my engine:
44kg @0mm
68.4kg @10.2mm
Looks like their spring has more inital seat pressure, but less strength later on. This is quite much the same as the OEM B35 springs.
THIS IS VERY WEIRD TO ME.
Does valve float usually appear on these engines at low lift?
UPDATE 4:
These are turbo engine valve springs, that's why it's weird. More valve float protection is not really needed, but the seated pressure is higher to protect against the exhaust pressure opening the exhaust valves.
5. Schrick springs
I've found a set of Schrick springs that state "for M20/M30"
000202090
270N @38.5mm
880N @26.5mm
--> 50.8N/mm
Let's translate this to my engine.
35.3 kg @0mm (stock retainer height of 37.0mm)
88.2kg @10.2mm
The spring is juuust long enough when compressed - 26.8mm, and Schrick states that I need a minimum of 26.5mm.
I think so far, this is my best bet, but I will ask Kenneth (as we only ever talked about installed strength.)
This is a single spring, I need to ask Schrick if it will fit my B35 dual retainers. (ofc, I can measure myself, but I just want to make sure)
For fun, I just wanted to see what would happen if I paired this with the stock small springs.
5kg @0mm
14kg @10.2mm
40.3kg @0mm
128.5kg @10.2mm --> OK, this is overkill.
6. DBilas springs
Literally no info on them whatsoever
I'm hoping to resolve this soon, as I cannot continue due to this issue.
I'll update this soon with my choices and answers from Kenneth, PPF and Schrick
Regards
Dave
Last edited by szacsi72 on Mar 26, 2025 6:37 AM, edited 1 time in total.
Re: szacsi72's 1984 Zinnoberrot 535i Build
I'm running this Dbilas Cam in my B35 head with stock rockers/springs which has 11 mm of lift. I should have time tonight to pop the valve cover off and take a look at the valve springs when the valves are fully open and see if it looks like a spacer would lead to spring bind.
Re: szacsi72's 1984 Zinnoberrot 535i Build
So I popped the valve cover off tonight and rotated the motor over until the springs were fully compressed both on intake and exhaust sides. With the cam linked above (11 mm lift) I would say there was around 2 mm or a bit more of travel left in the outside springs. The inner spring were harder to see but on the exhaust side I could clearly see the valve seal through it, the intake was harder to tell but it looked like there was clearance there as well. I would be willing to bet that a 1 mm spacer would not be an issue with my head. Of course I don't know the full history of this head either, at some point all of the rockers were changed out but I doubt it had a valve job. I did lap the valves but the material removed is so slight with that. I presume valve springs are original.
Exhaust spring

Intake spring

When you put in spacers I presume they go under the lower keeper (if that is the right term) between the head and them?
Exhaust spring

Intake spring

When you put in spacers I presume they go under the lower keeper (if that is the right term) between the head and them?
Re: szacsi72's 1984 Zinnoberrot 535i Build
Adam,
Thanks for your input!
Yes I would space the lower retainers (or, make thickers ones to it's one-piece).
Luke B. measured new, OEM B35 springs to coilbind at 24.4mm, stock preloaded length is 37mm, 37-24.4-10 = 2.6mm, so that aligns with what you see.
However another 1mm would make it scathy (for me, at least), I would be worried that I get too close, or even above the fatigue limit of the spring steel.
I could probably get away with just running the stock springs as-is. However, since both the rockers and the cam was provided by KMCams, and they told me that I need 35kg --> I don't want to take the risk to overwrite that. 120Eur for 12 springs is more than worth it for safety for my 5000-6000 (maybe?) EUR engine.
UPDATE 3:
Kenneth agreed on the Schrick springs; so I ordered them from Bar-Tek.
I may need to change or modify the retainers, we will see. But in any case, the springs look like a good match for my needs.
Re: szacsi72's 1984 Zinnoberrot 535i Build
Some minor updates.
I decided to upgrade the brake a little to make my brake balance more optimised.
From E34 M5 300x20 --> E36 M3 312x20mm. The 911 calipers still fit perfectly. This is with the laser cut trial adapters, waiting for the final versions; they will be CNCd from 6082. Pistons are also getting CNC milled like the previous ones.


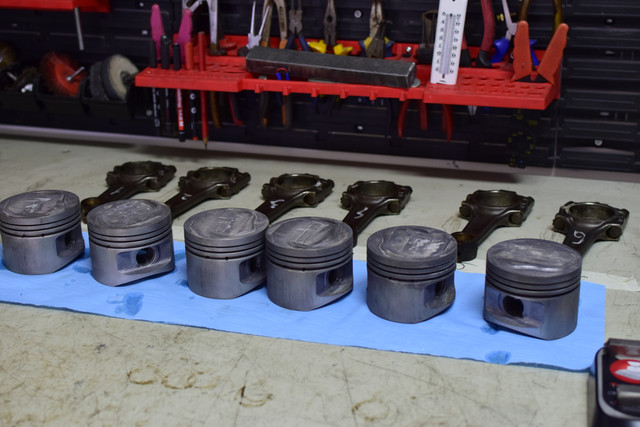
Also finished weight matching the pistons to +/- 1grams. The amount of material you need to remove for 1-2 grams is crazy.


The tactic to "restore" my pistons also worked perfectly. I sanded the skirt coatings a bit to make them smooth and give them some grains for the oil film to grab onto; the coating fills the scoring perfectly, making a new, nice and even surface. (this is important for film strength)
I started polishing and weight matching the rods, but that's much harder than pistons, and will take me a while.
I decided to upgrade the brake a little to make my brake balance more optimised.
From E34 M5 300x20 --> E36 M3 312x20mm. The 911 calipers still fit perfectly. This is with the laser cut trial adapters, waiting for the final versions; they will be CNCd from 6082. Pistons are also getting CNC milled like the previous ones.
Also finished weight matching the pistons to +/- 1grams. The amount of material you need to remove for 1-2 grams is crazy.
The tactic to "restore" my pistons also worked perfectly. I sanded the skirt coatings a bit to make them smooth and give them some grains for the oil film to grab onto; the coating fills the scoring perfectly, making a new, nice and even surface. (this is important for film strength)
I started polishing and weight matching the rods, but that's much harder than pistons, and will take me a while.
Re: szacsi72's 1984 Zinnoberrot 535i Build
I am sure I have already asked this somewhere but I'm unable to find the thread, sorry for the re-post.
Does anyone have a value for timing chain stretch limit? Not by eye; but any actual value? %, or mm for XY links, or anything?
I need to buy a new tensioner and a guide, they are really worn as shown below. But the sprocket, to my eye, didn't appear too bad.
Maybe some parts were changed before me (this engine has seen stuff..); if it's not needed, I would really like to save myself from spending more on the already overly expensive rebuild.
The chain itself isn't actually that bad (a new oem chain is currently less than a FEBI), but then I also need a sprocket and the lower double sprocket.
The 3 together, OEM BMW, is around 350?
Thanks in advance!
Re: szacsi72's 1984 Zinnoberrot 535i Build
Hello,
has anyone used this bracket before from e28goodies? I have heard many bad reviews about them.
https://e28goodies.com/product/coilpack-rail-stainless/
This is the only option I have found so far, so it's either this or custom made.
has anyone used this bracket before from e28goodies? I have heard many bad reviews about them.
https://e28goodies.com/product/coilpack-rail-stainless/
This is the only option I have found so far, so it's either this or custom made.
Re: szacsi72's 1984 Zinnoberrot 535i Build
I've had no complaints with that stainless rail on my car, it holds the coils in place, they're removeable fairly easily but still in there tight enough to not worry about them. You need to bend them yourself but that wasn't a big deal from memory. Mine looks identical to what they show in the pictures, I'm really not sure what there is to complain about other than needing to remove the coils and bracket to pop the valve cover off.
Re: szacsi72's 1984 Zinnoberrot 535i Build
adam_poll wrote: Aug 15, 2025 12:37 PM I've had no complaints with that stainless rail on my car, it holds the coils in place, they're removeable fairly easily but still in there tight enough to not worry about them. You need to bend them yourself but that wasn't a big deal from memory. Mine looks identical to what they show in the pictures, I'm really not sure what there is to complain about other than needing to remove the coils and bracket to pop the valve cover off.
Thanks I'll order one.
I think the complains are usually to their customer service, etc not so much of the parts themselves
I think the complains are usually to their customer service, etc not so much of the parts themselves
Re: szacsi72's 1984 Zinnoberrot 535i Build
I'd like to seize the moment and ask a question for the rest of the viewers: Can you comment on the advantages of going for a coil-on-plug setup, specifically in the context of a M30B34 or B35 engine? Reliability, throttle response, engine longevity, performance, easier fixes down the road, what exactly is it? Would love to hear opinions, thanks.
Re: szacsi72's 1984 Zinnoberrot 535i Build
Foonfer wrote: Aug 19, 2025 12:02 AM I'd like to seize the moment and ask a question for the rest of the viewers: Can you comment on the advantages of going for a coil-on-plug setup, specifically in the context of a M30B34 or B35 engine? Reliability, throttle response, engine longevity, performance, easier fixes down the road, what exactly is it? Would love to hear opinions, thanks.
I'm switching to coil-on-plug because:
1. My parts are getting old and I needed to replace them anyway. A set of rotor, distributor, coil and ignition wires costs 2-3 times as much as modern COPs. A single Bosch M5 (ring?) style coil is 100-120 euros, a set of ignition wires is from 50 (chinese) to 200 (original), the rotor is 40 eur, the distributor cap is 70 eur (for aftermarket)
I got the 6 BERU VW coils for like 80 euros?
2. Cost is one thing, but parts are also not so available anymore. Especially plugs, for example, are getting harder to find
3. I would like to benefit from modern ignition --> the only real upgrade here is a bit smoother idle.
4. There is no added complexity or extra costs are I'm switching to MS3 and making a new wiring harness anyway.
5. I like how they look. Also my coils are RED, matches the car!
6. Removing the distributor allows me to install a cam sensor.
Re: szacsi72's 1984 Zinnoberrot 535i Build
I haven’t updated the build in a while.
That is partly because: I switched to an iPhone (company phone) and it’s an utter piece of crap. No real folder structure, just „albums” that don’t mean a thing, always has problems uploading to google drive… in short, I can’t organise my photos normally and it’s a headache, I have like 2000 pics floating around now.
Second: I’ve been busy… turbocharger gave up on the daily, tranny went out ont he E39, the tractor gave up, had to repair and then gave up again, so had to get a new one. We also bought a flat, so I had to sell my motorcycles, AND of course there’s work and work trips.
But here’s some updates. I don’t even remember what I have/have not posted, so it may be chaotic and I may make multiple posts.. sorry if I’m repeating myself.
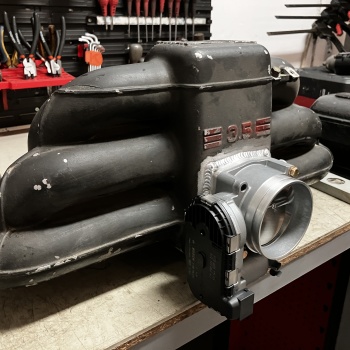
1.: Intake system
So, first of all. I have decided to go for a drive-by-wire setup.
„lag” is not really a thing anymore, and it’s actually a cleaner install. TPS + IACV is 3+3 wires, DBW TB is 6 wires, but there’s no throttle cable.
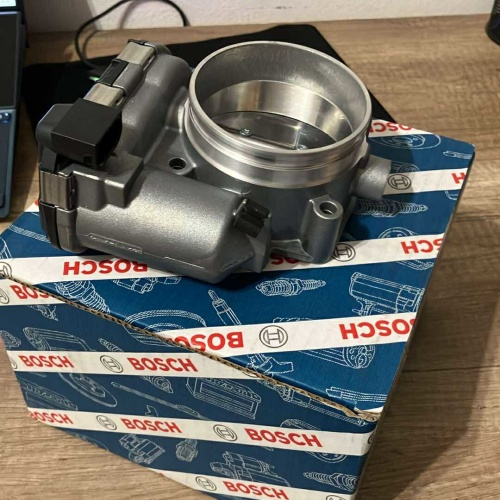
I’m planning to use an E46 accelerator pedal (BOSCH unit, same pinout as the TB) and the 74mm BOSCH Motorsport throttle body. The 82mm is more common but I thought it is too big for my needs.
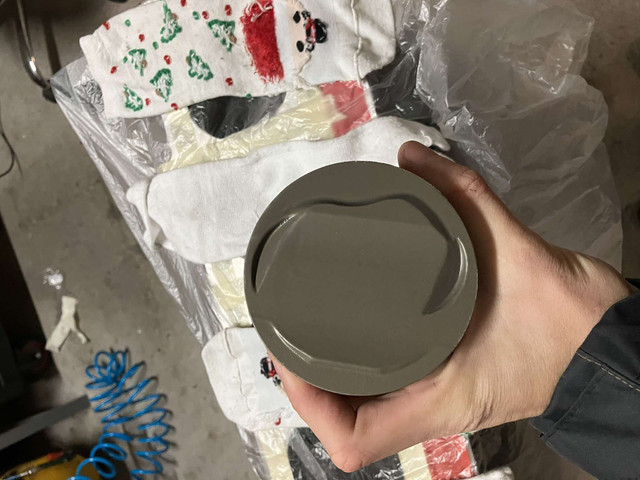
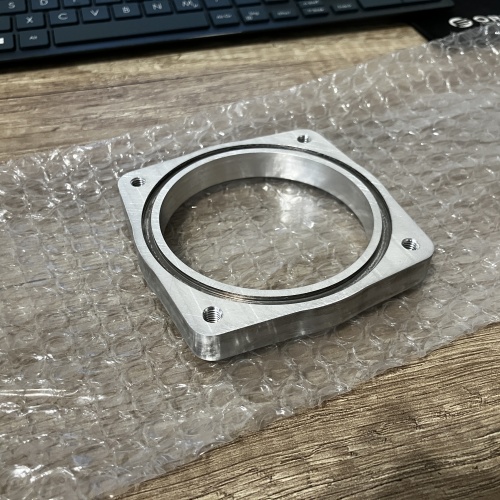
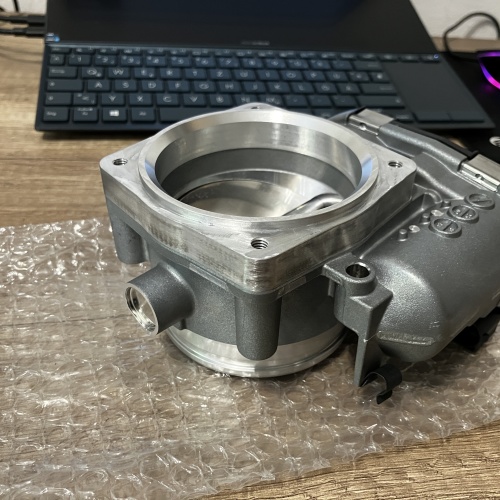
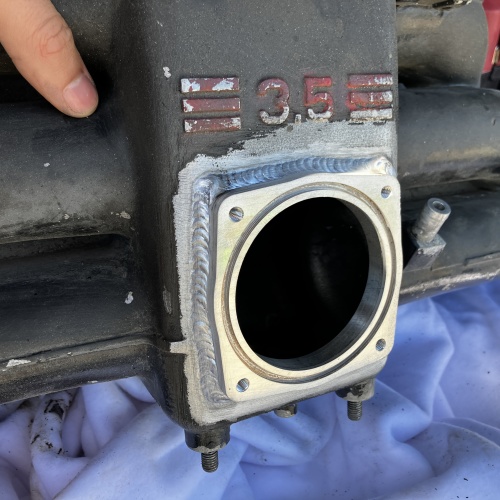
Got the throttle body new from the local parts dealer for quite a steal (120$). I did not like the flanges for sale online, non of them truly matched the shape of the throttle body, so I designed one for myself and got it CNC’d.
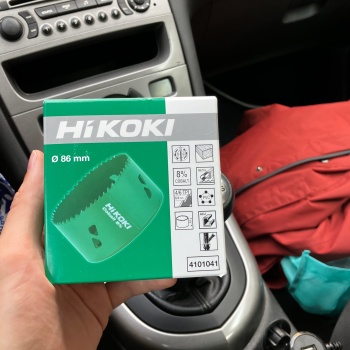
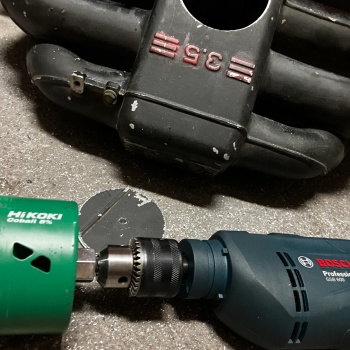
Then, some cutting with this Hikoki circular saw. I now remember why I never buy Hikoki. It was quite a hassle… 0/10. Next time I will do the same method as I did originally: mark it up and use an air grinder.
[I can’t find the pictures right now, I’ll update the post later..]
[Update: pics found]
Any way, it is finally welded up, looks pretty nice if you ask me. I have also added a big chamfer on the inside, it should help with airflow. For sealing, I copied the original (Porsche) design, and made a groove for a Viton O-ring. Reusable, no RTV, easy to work on.
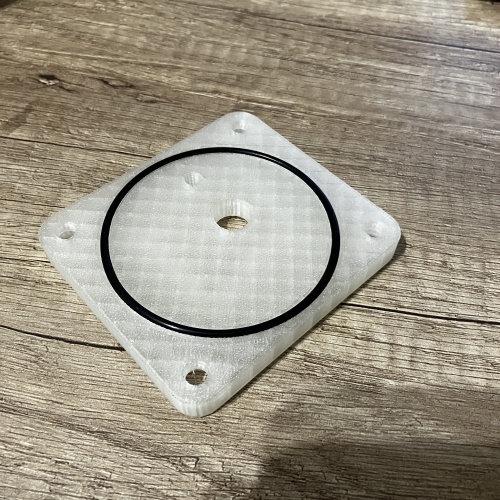
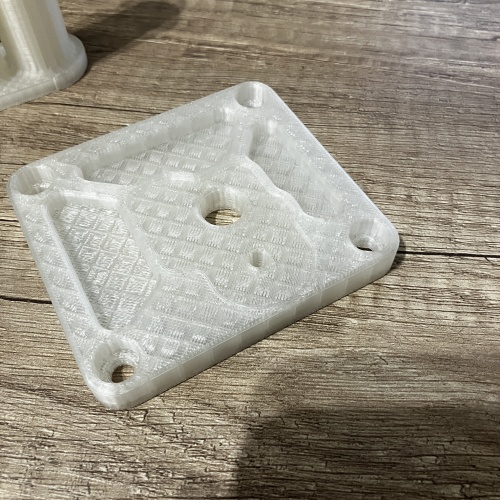
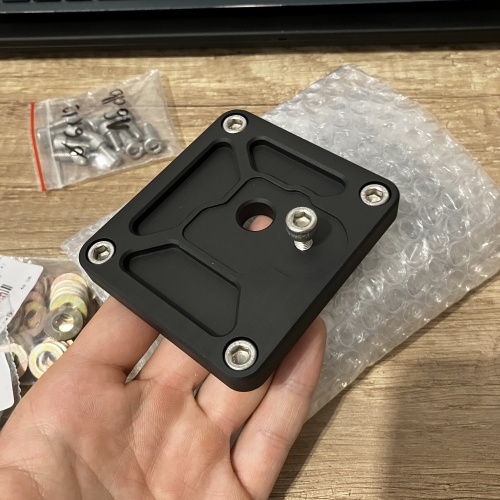
I needed a block-off plate for the other side and I figured this is an ideal location for the BOSCH Motorsport PST1 combined IAT+MAP sensor that I’ll be using. So, again. CAD, 3D printing, testfit, CNC. Turned out pretty nice, and I made a couple more of these, so if anybody wants one, let me know.
That is partly because: I switched to an iPhone (company phone) and it’s an utter piece of crap. No real folder structure, just „albums” that don’t mean a thing, always has problems uploading to google drive… in short, I can’t organise my photos normally and it’s a headache, I have like 2000 pics floating around now.
Second: I’ve been busy… turbocharger gave up on the daily, tranny went out ont he E39, the tractor gave up, had to repair and then gave up again, so had to get a new one. We also bought a flat, so I had to sell my motorcycles, AND of course there’s work and work trips.
But here’s some updates. I don’t even remember what I have/have not posted, so it may be chaotic and I may make multiple posts.. sorry if I’m repeating myself.
1.: Intake system
So, first of all. I have decided to go for a drive-by-wire setup.
„lag” is not really a thing anymore, and it’s actually a cleaner install. TPS + IACV is 3+3 wires, DBW TB is 6 wires, but there’s no throttle cable.
I’m planning to use an E46 accelerator pedal (BOSCH unit, same pinout as the TB) and the 74mm BOSCH Motorsport throttle body. The 82mm is more common but I thought it is too big for my needs.
Got the throttle body new from the local parts dealer for quite a steal (120$). I did not like the flanges for sale online, non of them truly matched the shape of the throttle body, so I designed one for myself and got it CNC’d.
Then, some cutting with this Hikoki circular saw. I now remember why I never buy Hikoki. It was quite a hassle… 0/10. Next time I will do the same method as I did originally: mark it up and use an air grinder.
[I can’t find the pictures right now, I’ll update the post later..]
[Update: pics found]
Any way, it is finally welded up, looks pretty nice if you ask me. I have also added a big chamfer on the inside, it should help with airflow. For sealing, I copied the original (Porsche) design, and made a groove for a Viton O-ring. Reusable, no RTV, easy to work on.
I needed a block-off plate for the other side and I figured this is an ideal location for the BOSCH Motorsport PST1 combined IAT+MAP sensor that I’ll be using. So, again. CAD, 3D printing, testfit, CNC. Turned out pretty nice, and I made a couple more of these, so if anybody wants one, let me know.
Last edited by szacsi72 on Sep 01, 2025 4:31 AM, edited 1 time in total.
Re: szacsi72's 1984 Zinnoberrot 535i Build
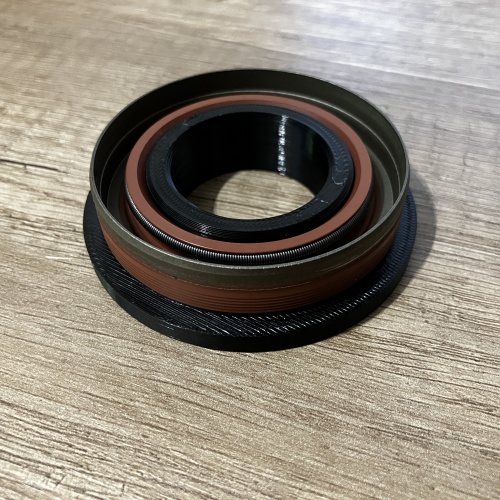
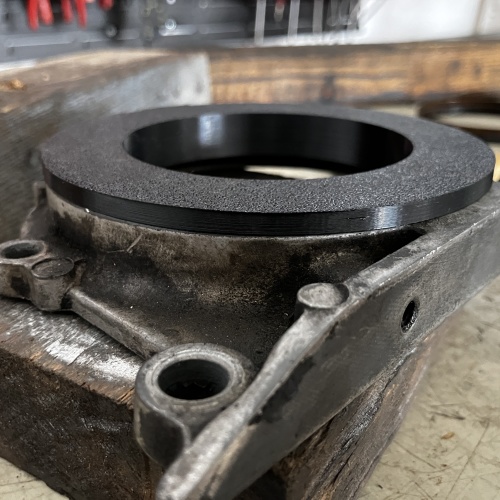
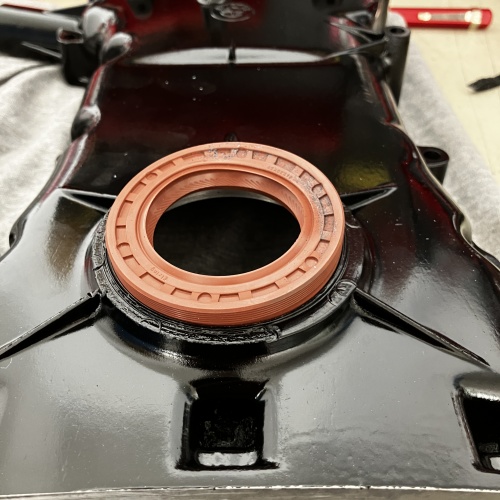
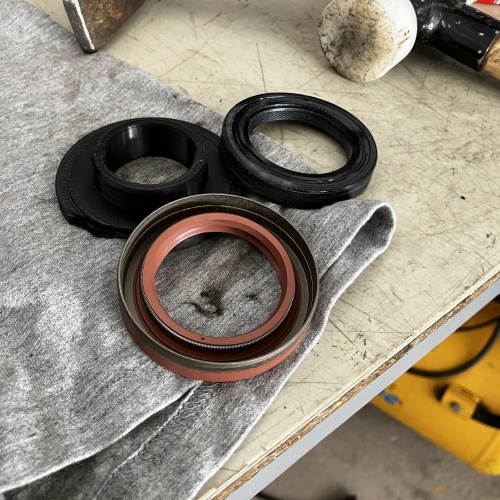
2. Front and rear main seal
I have always installed them with random stuff laying around and never had any issue. But the crank had some wear (grooves), so I thought it's a good idea to design seal drivers specifically for the M30, with 1mm offsets, to allow them to seal against a new surface.
If anybody needs them, they are here:
https://www.thingiverse.com/thing:7071529
Rear main seal installed easily and perfectly:

Aaaand managed to somehow fuck up the front one. As stated, I have always used random objects and never had an issue, then I fuck it up.. Uhh.
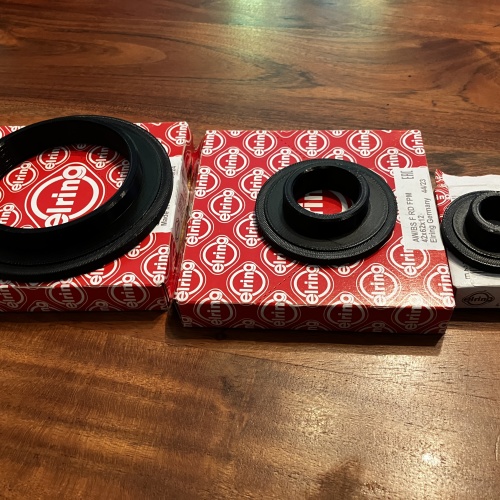
Anyway, ordered a new seal.. but I had to wait 2 weeks. The VITON (FPM?) Elring seal is getting hard to find, most shops only stocked the NBR one. The second one also installed perfectly.


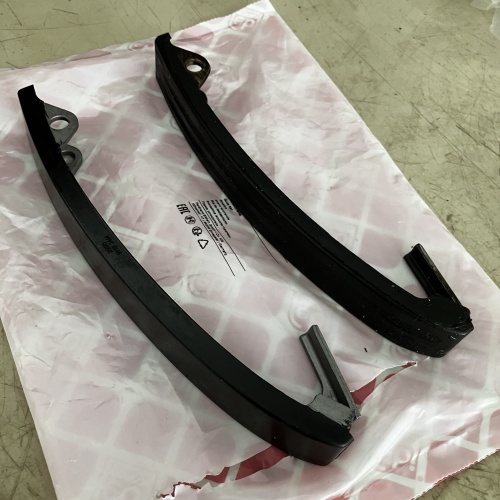
3. Chain Tensioners
Got some new timing chain tensioners from FEBI to replace the heavily worn stock ones. They are basically re-packed SWAG units, quality and fitment was OK.
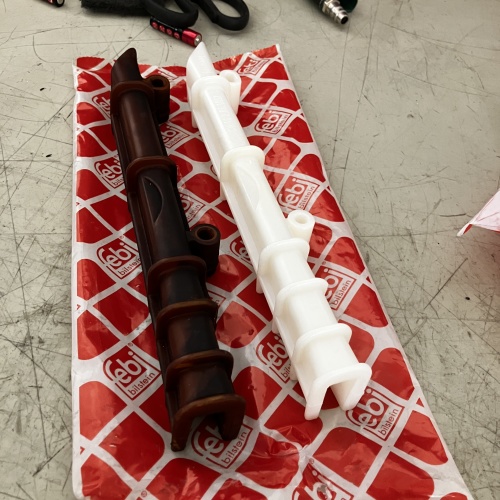
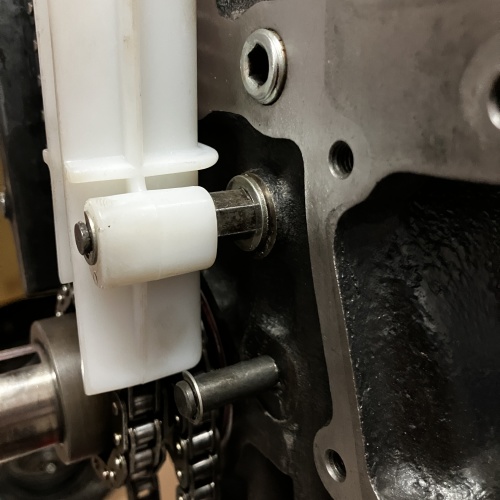
However, I ran into something funny.
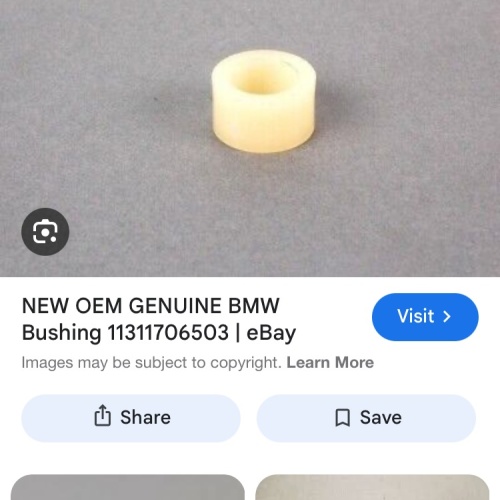
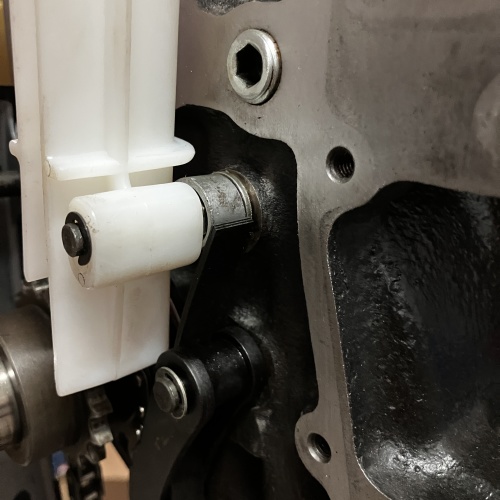
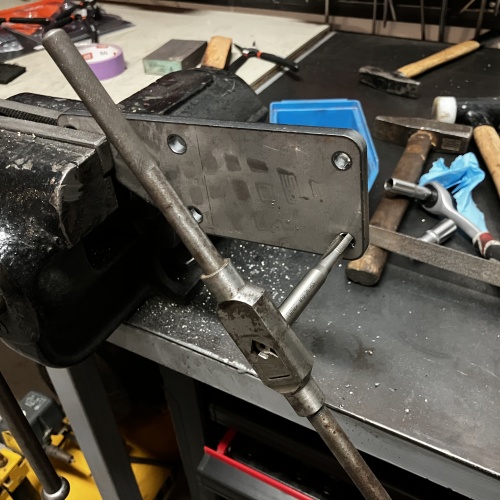
When installing the oil pump chain tensioner, something did not feel right. I checked some google pics, and yup, there we go - previous engine builder forgot to install the "bushings" around the timing chain guide's "hex" thingy...
I had no intention to wait 2 weeks for an OE BMW one so quickly made one from aluminium. Solved!

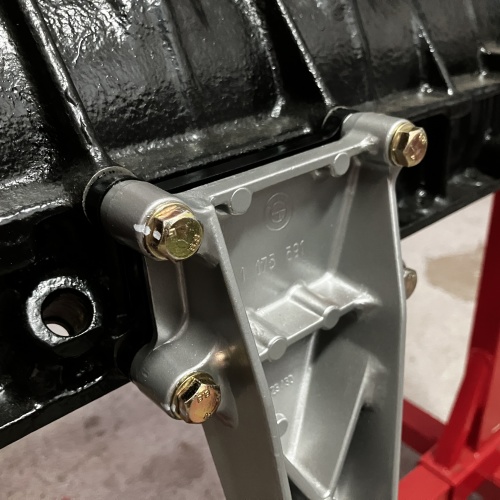
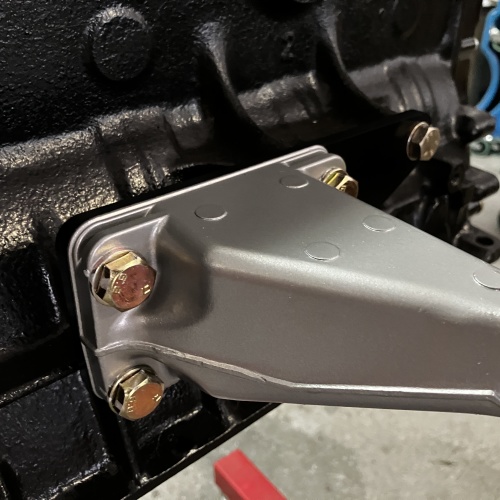
4. Engine Mounts
Adapters cut from 8mm steel, painted black, OEM square motor mounts restored, new yellow zinc plates bolts. Looks pretty nice, and so much better than the previous black colour they had.
I have always installed them with random stuff laying around and never had any issue. But the crank had some wear (grooves), so I thought it's a good idea to design seal drivers specifically for the M30, with 1mm offsets, to allow them to seal against a new surface.
If anybody needs them, they are here:
https://www.thingiverse.com/thing:7071529
Rear main seal installed easily and perfectly:
Aaaand managed to somehow fuck up the front one. As stated, I have always used random objects and never had an issue, then I fuck it up.. Uhh.
Anyway, ordered a new seal.. but I had to wait 2 weeks. The VITON (FPM?) Elring seal is getting hard to find, most shops only stocked the NBR one. The second one also installed perfectly.
3. Chain Tensioners
Got some new timing chain tensioners from FEBI to replace the heavily worn stock ones. They are basically re-packed SWAG units, quality and fitment was OK.
However, I ran into something funny.
When installing the oil pump chain tensioner, something did not feel right. I checked some google pics, and yup, there we go - previous engine builder forgot to install the "bushings" around the timing chain guide's "hex" thingy...
I had no intention to wait 2 weeks for an OE BMW one so quickly made one from aluminium. Solved!
4. Engine Mounts
Adapters cut from 8mm steel, painted black, OEM square motor mounts restored, new yellow zinc plates bolts. Looks pretty nice, and so much better than the previous black colour they had.
Re: szacsi72's 1984 Zinnoberrot 535i Build
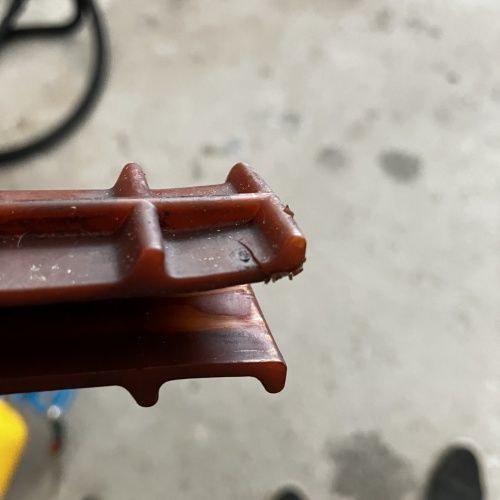
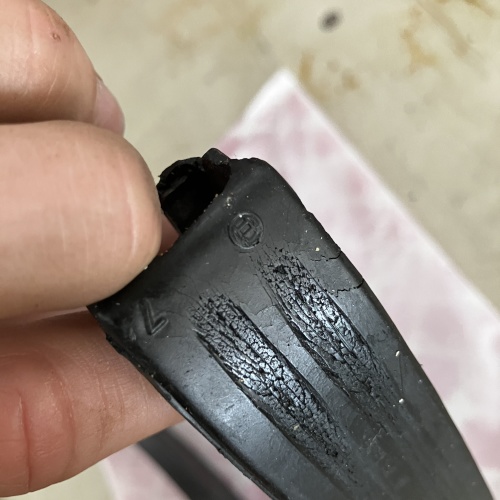
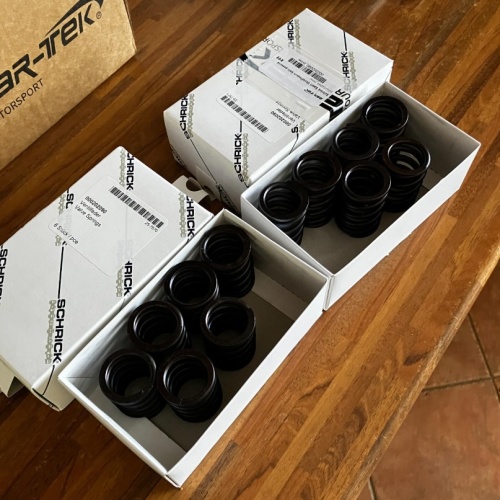
5. Valve springs
I think I forgot to post these beauties!
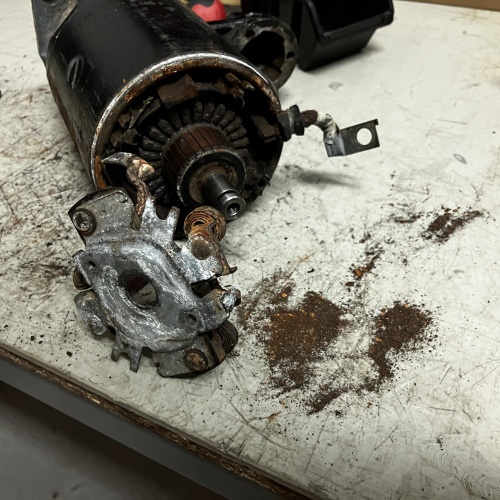
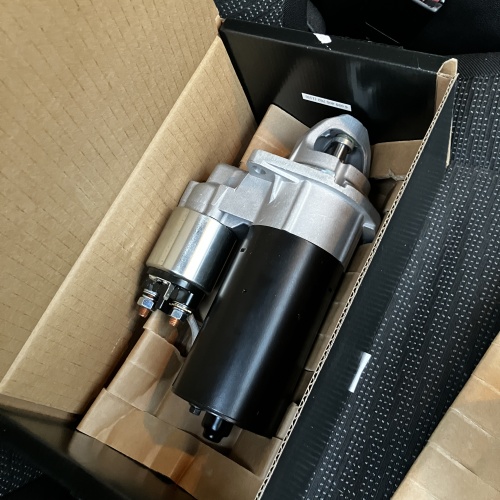
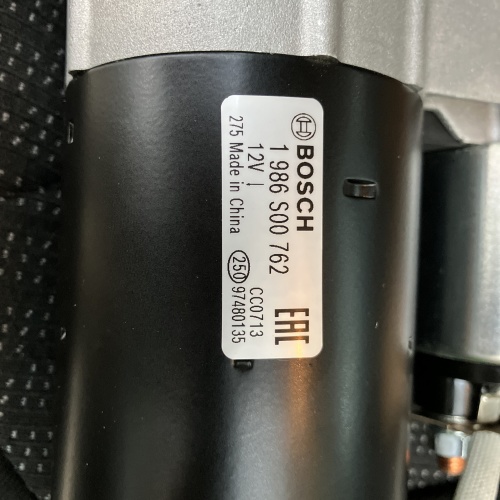
6. Starter motor
Opened up my B34 starter with hopes to rebuild it.. after seeing the condition I decided to put it to the side as a spare that I can rebuild later if needed, and got a new BOSCH B35 starter for ~120USD.
The only thing I don't like is that it's not a reman, and no longer made in Germany.
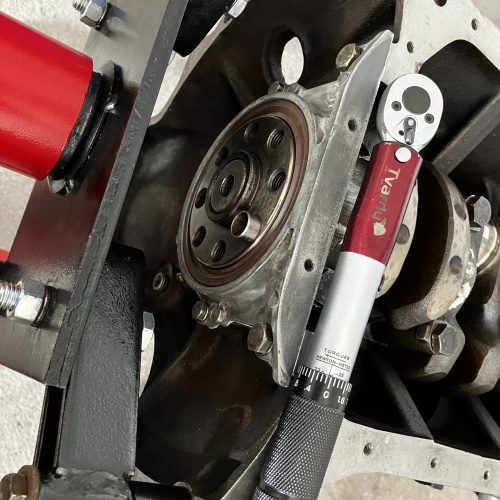
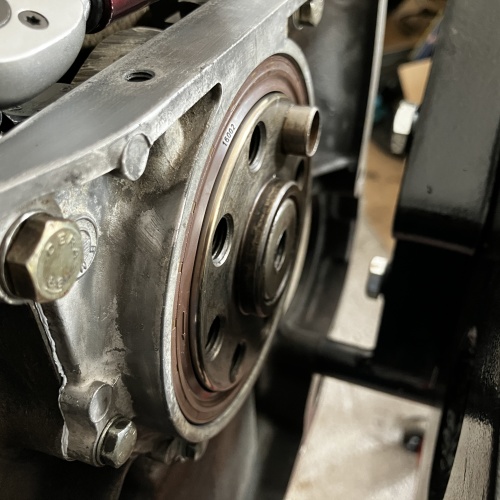
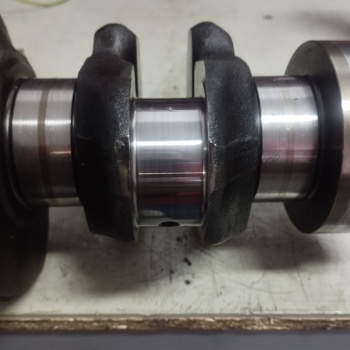
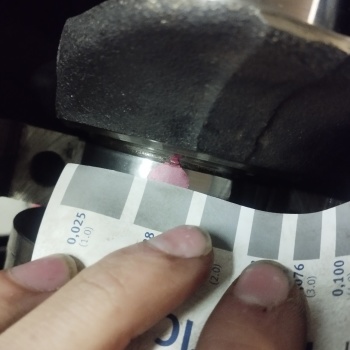
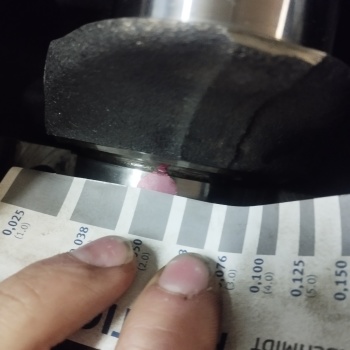
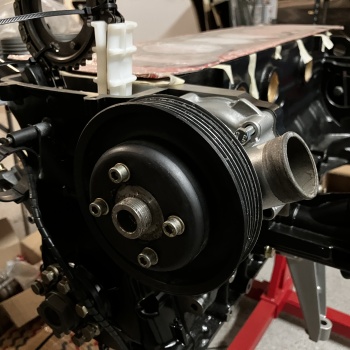
7. Crankshaft
Crankshaft is installed btw!
Polished it up with 4000 grit, WD40 shoelace technique, cleaned, torqued etc - everything is perfect, all the clearances are perfectly in spec so I'm happy.

I think I forgot to post these beauties!
6. Starter motor
Opened up my B34 starter with hopes to rebuild it.. after seeing the condition I decided to put it to the side as a spare that I can rebuild later if needed, and got a new BOSCH B35 starter for ~120USD.
The only thing I don't like is that it's not a reman, and no longer made in Germany.
7. Crankshaft
Crankshaft is installed btw!
Polished it up with 4000 grit, WD40 shoelace technique, cleaned, torqued etc - everything is perfect, all the clearances are perfectly in spec so I'm happy.
Re: szacsi72's 1984 Zinnoberrot 535i Build
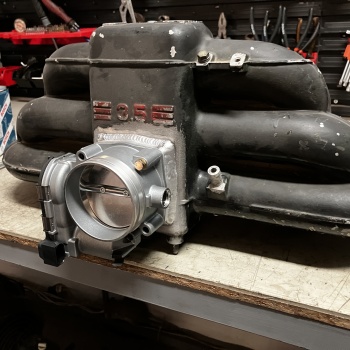
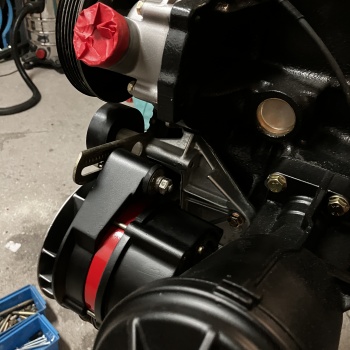
8. Throttle Body (again)
Fits like a glove!
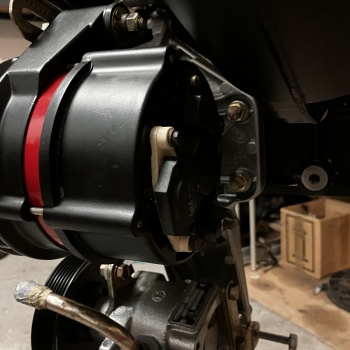
9. Alternator
I have refreshed my 80A alternator. I decided to paint the inner section red, I did not like the original "deep orange" I see often. Just to add a twist, I actually colour matched it to the car itself - it's not just ANY red, it's zinnoberrot.
However, now that it's painted and put together I have realised that the silver fan looks like shit with the black alternator, it's just off. I will try to find a yellow zinc coated steel fan, or repaint the fan black.

10. 6PK Conversion
So here's some updates on the 6Pk conversion.
-I will simply delete the PS pump adjuster bracket and put a fixed bracket to about 1/3 length
-I am going to be using 2x random 70mm BMW idler I had laying around from an N46 (doesn't matter tbh at all, I just had these on-hand)
-For the water pump, I will be using either the M50 132mm or the M54 122mm water pump pulley - it will depend on the final ratios, they are totally interchangable anyway. I need to machine a puck to offset this pulley as it's too much inwards. 3D printed prototype fitted
-I have found an alternator pulley (from an AUDI A4 B7) that is the exact size and offset I need, should come in soon. It cost something like $5, all metal too. Crazy!
-For the PS pump, I am using a pulley from an E90 (I forgot exactly which engine), and I will use this pulley as the base for all the pulleys (they will be offset to line up with this one). Got this locally for like $20 new, and this one is also metal while the OEM was nylon? DEAL!
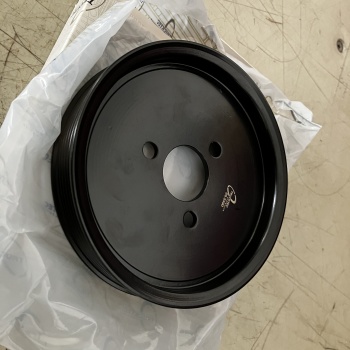
-For the crank pulley --> This is the only part that will be irreversible and not plug and play. I will have the original pulley machined off the OEM harmonic damper, and then I will design and machine a new 6PK pulley that mounts on it. This is pretty much the only part that costs any real money and needs real engineering. I am waiting for the alternator pulley to arrive, then I will start to draw it up and make a 3D printed prototype.
-For now, I will keep mechanical tensioning. Just because it works. May put a hydro damper later, but I want to make progress for now.
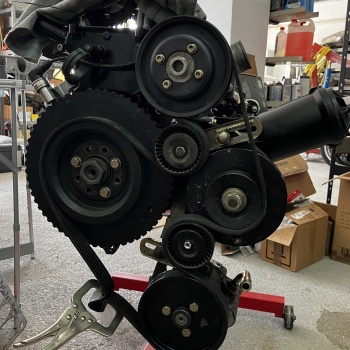
The whole 6PK Conversion will be <300$
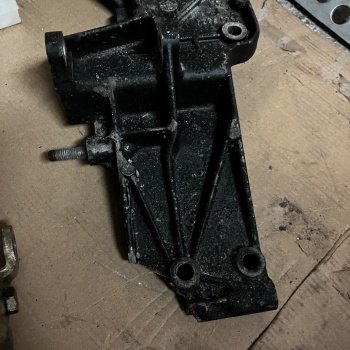
Also, I managed to break the original alt+PS bracket and lost the broken piece, so repairing would have been too much work. I got another one from a guy I know for $50.
OK I think I am up-to-date now with the build....
Fits like a glove!
9. Alternator
I have refreshed my 80A alternator. I decided to paint the inner section red, I did not like the original "deep orange" I see often. Just to add a twist, I actually colour matched it to the car itself - it's not just ANY red, it's zinnoberrot.
However, now that it's painted and put together I have realised that the silver fan looks like shit with the black alternator, it's just off. I will try to find a yellow zinc coated steel fan, or repaint the fan black.
10. 6PK Conversion
So here's some updates on the 6Pk conversion.
-I will simply delete the PS pump adjuster bracket and put a fixed bracket to about 1/3 length
-I am going to be using 2x random 70mm BMW idler I had laying around from an N46 (doesn't matter tbh at all, I just had these on-hand)
-For the water pump, I will be using either the M50 132mm or the M54 122mm water pump pulley - it will depend on the final ratios, they are totally interchangable anyway. I need to machine a puck to offset this pulley as it's too much inwards. 3D printed prototype fitted
-I have found an alternator pulley (from an AUDI A4 B7) that is the exact size and offset I need, should come in soon. It cost something like $5, all metal too. Crazy!
-For the PS pump, I am using a pulley from an E90 (I forgot exactly which engine), and I will use this pulley as the base for all the pulleys (they will be offset to line up with this one). Got this locally for like $20 new, and this one is also metal while the OEM was nylon? DEAL!
-For the crank pulley --> This is the only part that will be irreversible and not plug and play. I will have the original pulley machined off the OEM harmonic damper, and then I will design and machine a new 6PK pulley that mounts on it. This is pretty much the only part that costs any real money and needs real engineering. I am waiting for the alternator pulley to arrive, then I will start to draw it up and make a 3D printed prototype.
-For now, I will keep mechanical tensioning. Just because it works. May put a hydro damper later, but I want to make progress for now.
The whole 6PK Conversion will be <300$
Also, I managed to break the original alt+PS bracket and lost the broken piece, so repairing would have been too much work. I got another one from a guy I know for $50.
OK I think I am up-to-date now with the build....
Re: szacsi72's 1984 Zinnoberrot 535i Build
As usual, amazingly clean work, and kudos on keeping the minimal color palette across components.
Seeing how your throttle body is placed, how are you planning your air intake/air filter/metering device (not sure which one you are leaning to, whether MAF, MAP or other - very early on I recall you stating you would not do the stock AFM), and most importantly which expansion tank do you plan to use and how are you planning to lay out all these components while keeping maintenance access to the oil filter in the M30B35 housing?
Also how do you think your "drive by wire" approach would compare with something like, say, a set of individual throttle bodies from someone like RHD or DBilas or adapted from an S38? I'm assuming that your goal here is to achieve the smoothest possible throttle response, right? Either way you'd have to go with some form of stand-alone engine management, no?
I ask these questions because I think there is way too much talk about "more HP" or "more torque" and never enough about "refined intake air management and throttle response so it is smoooooth and never jerky". Getting (always more, more, more) power out of trusted and tried 1980s powerplants is a very known field. Getting smoothness, throttle accuracy and response out of those same engines is a substantially underrated topics, in my opinion.
Re: szacsi72's 1984 Zinnoberrot 535i Build
Thanks a lot! Yeah, I really like the clean engine bay look. Used to be all-black, but it looked a bit too race-y, if you know what I mean. With some more silver it should look more OEM+Foonfer wrote: Sep 01, 2025 11:19 PM As usual, amazingly clean work, and kudos on keeping the minimal color palette across components.
Awesome questions.Foonfer wrote: Sep 01, 2025 11:19 PM Seeing how your throttle body is placed, how are you planning your air intake/air filter/metering device (not sure which one you are leaning to, whether MAF, MAP or other - very early on I recall you stating you would not do the stock AFM), and most importantly which expansion tank do you plan to use and how are you planning to lay out all these components while keeping maintenance access to the oil filter in the M30B35 housing?
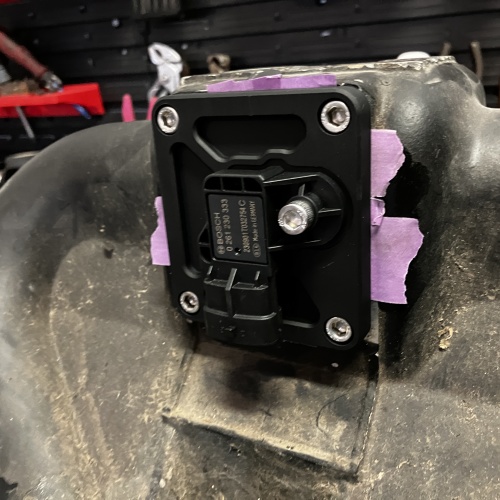
Since I am moving to MegaSquirt MS3, I will not need an AFM or a MAF. I will be running a Bosch Motorsports MAP + IAT Sensor, which I have mounted here:
You can also make a flipped throttle body mod with the stock AFM, I have also done it on my previous engine, here's another guy:
https://www.youtube.com/watch?v=cxyDA_NpEqw
I am planning on using the E34 B35 coolant tank, which I will mount to the firewall similar to how BMW mounted it.
Maintenance wise, nothing should be in the way of the oil filter. Everything will be easy to access, the MAP sensor, throttle body etc; should be easy to change the filter. MegaSquirt also allows me to diagnose problems easily.
Foonfer wrote: Sep 01, 2025 11:19 PM Also how do you think your "drive by wire" approach would compare with something like, say, a set of individual throttle bodies from someone like RHD or DBilas or adapted from an S38? I'm assuming that your goal here is to achieve the smoothest possible throttle response, right? Either way you'd have to go with some form of stand-alone engine management, no?
I ask these questions because I think there is way too much talk about "more HP" or "more torque" and never enough about "refined intake air management and throttle response so it is smoooooth and never jerky". Getting (always more, more, more) power out of trusted and tried 1980s powerplants is a very known field. Getting smoothness, throttle accuracy and response out of those same engines is a substantially underrated topics, in my opinion.
The main point of ITB's is throttle response. Since they are closer to the intake valves, the volume in relative vacuum is much smaller. The plenum is always close to athmospheric pressure. When you open the throttle(s) there is less "vacuum to fill", so the engine reacts faster.
DBW is nothing more than a way to control throttle opening. You can have a single throttle body, or ITBs, both with or without DBW.
Yes, DBW calls for standalone management (or DIY electronics which I will skip).
Most ECU's nowadays support it natively (e.g. MaxxEcu)
The main points of DBW for me is throttle control. It allows me make a custom map for acc pedal position vs throttle opening (%/%). With a 74mm throttle body, which is quite large, it will become very handy. I can make the curve progressive, which in return will give me a more linear engine respone and smoother city driving. If it was cable operated, I would have to fabricate brackets and linkages every time I wanted to change the rate. With this, I can tune it to my liking in a matter of minutes. You can also add tons of features, such as throttle opening limiting (with large throttle bodies sometimes you get more torque down low if they are unopened), of even filtering and damping. Built in cruise control, launch control, traction control, and what-not.
What you are referring to is called driveability in my field and it is something the german cars usually do very well, especially the ones running Bosch engine control systems. Delphi, Valeo or Conti system are always more jerky.