My coupe (caution many photos) update

Show off your E28. Read epic threads of other's builds and projects.
Post Reply
OcCoupe
Posts: 3228
Joined: Aug 21, 2010
Location: Costa Mesa, CA
Contact:

Re: My coupe (caution many photos) update

Post by OcCoupe »

bkbimmer wrote:
OcCoupe wrote:
bkbimmer wrote:Looks nice, what is the brand of the spray on insulation? Quiet car?
It's made by a company named Cascade. They specialize in auto, home, and marine audio. They are based out of Oregon.

Where did you buy it? I didn't see any signs that I could buy directly from them.
Brent, I have been buying it from parts express; but you can find it on Amazon as well.

http://www.parts-express.com/cascade-vb ... l--268-256

I have probably gone a little extreme with what I am doing, I have used about 4 gallons in total at 5 coats per panel. They recommend 3-5 coats, anything else has a diminishing return.

Also it can be applied with a schutz gun which is what I used.
OcCoupe
Posts: 3228
Joined: Aug 21, 2010
Location: Costa Mesa, CA
Contact:

Re: My coupe (caution many photos) update

Post by OcCoupe »

It has been about 3 months since my last update. Things have been going slowly mainly due to time constraints. I have been ordering parts and having things plated. I decided a while back that anything that was safety related would get new hardware, nuts, bolts, etc... Also anything relating to cosmetics and mechanical unless they are NLA in which case I would have them plated such as door lock, trunk lock and hood latch mechanisms.

This past Labor Day weekend was spent assembling sub frames, and struts. The differential was rebuilt and I finished assembling it last week. Everything went rather smoothly with Saturday being the most productive. It has been nearly 5 years since Darin and I disassembled the coupe so my memory isn't very fresh and how everything came apart. Fortunately I have the orange parts books, the blue shop binders, and realoem to lean on. Gathering the parts is always a challenge, you think you have everything until everything starts coming together. I had everything for the sub frames, I ended up having to order to spring pads for the rear springs and had to run to the hardware store for 2 washers. I guess this wasn't too bad in the grand scheme of things.

After assembling the differential I mounted the rear sub frame to it then moved it closer to the car where I installed the trailing arms and the sway bar. I installed an adjustable rear camber kit and adjustable toe kit to the sub frame prior to powder coating.

Image

Image

Image

Filling the diff with vital fluids.

Image

Here's a better shot.

Image

One more.

Image

I had to finish off the fuel lines prior to installing the differential and sub frame.


Image


Before the rear sub frame.

Image

And after.

Image

Adjustable rear sway bar.

Image

Strut assembly. If you look closely you can see that the spring perch has been separated from the housing and a threaded collar has been welded in . This along with a collar nut makes the perch height adjustable so I can fine tune the ride height.

Image

The weekend in a nutshell.

Image

Image

Image

Later this week I will install the front sub frame, front wheel bearings, rotors and eventually all 4 calipers.

I picked out the leather last week, 6 hydes of something reminiscent of oxblood red.

Image

I am having a hard time capturing a good photograph of the leather/color. It would be helpful if I could actually use a camera. It is hard trying to capture the color against the car. I'll take a better picture eventually. The color on the blue swatch is not as dark as the color of the car.

Image

This really doesn't depict either color very well.

Image
Last edited by OcCoupe on Sep 08, 2015 8:44 PM, edited 4 times in total.
wkohler
Posts: 50939
Joined: Oct 05, 2006
Location: Phönix, Arizona, USA
Contact:

Re: My coupe (caution many photos) update

Post by wkohler »

Looks fantastic. Eagerly awaiting seeing that car on it's wheels again.
tig
Posts: 9593
Joined: Mar 18, 2013
Location: Durango
Contact:

Re: My coupe (caution many photos) update

Post by tig »

Win. Win. Win.

My favorite pic:

Image

It must feel great seeing that sub-frame attached.

I sure like seeing these pictures. I've never seen an E9 diff before. Very steampunk.
OcCoupe
Posts: 3228
Joined: Aug 21, 2010
Location: Costa Mesa, CA
Contact:

Re: My coupe (caution many photos) update

Post by OcCoupe »

cek wrote: It must feel great seeing that sub-frame attached.

I sure like seeing these pictures. I've never seen an E9 diff before. Very steampunk.
It is a fantastic feeling and I am very happy to see some progress.

The e9 diff is the same as e12 and early e24. The canister set up is not for an e9 rather an e12 m535i or e24 m635, they came on the 3.07 differential. This is a 3.45lsd, I opted to add the canister for reasons I still do not know.
wkohler
Posts: 50939
Joined: Oct 05, 2006
Location: Phönix, Arizona, USA
Contact:

Re: My coupe (caution many photos) update

Post by wkohler »

It looks cool though you Lost your fill plug.
1st 5er
Posts: 21966
Joined: Jun 13, 2008
Location: Cypress
Contact:

Re: My coupe (caution many photos) update

Post by 1st 5er »

Lookin' awesome dad.
Karl Grau
Posts: 9738
Joined: Mar 10, 2006
Location: 1930's Germany

Re: My coupe (caution many photos) update

Post by Karl Grau »

Wow! I have serious wood.
tig
Posts: 9593
Joined: Mar 18, 2013
Location: Durango
Contact:

Re: My coupe (caution many photos) update

Post by tig »

Image

What are the top hat thingies on the TAs?
leadphut
Posts: 4499
Joined: Feb 12, 2006
Location: Portland, OR

Re: My coupe (caution many photos) update

Post by leadphut »

I wouldn't expect anything less.
wkohler
Posts: 50939
Joined: Oct 05, 2006
Location: Phönix, Arizona, USA
Contact:

Re: My coupe (caution many photos) update

Post by wkohler »

cek wrote:
What are the top hat thingies on the TAs?
Spring perches.
OcCoupe
Posts: 3228
Joined: Aug 21, 2010
Location: Costa Mesa, CA
Contact:

Re: My coupe (caution many photos) update

Post by OcCoupe »

wkohler wrote:
cek wrote:
What are the top hat thingies on the TAs?
Spring perches.
The shocks and springs are mounted separately.

Image
stoney
Posts: 119
Joined: Aug 22, 2015
Location: Coffs Harbour, NSW, Aus

Re: My coupe (caution many photos) update

Post by stoney »

Closer related to the E30 design.

Good to see you are doing this job with complete attention to detail, love the fact you have added smaller details like the adjustable rear end and height adjustable spring perches, just gives it that little something extra.

Have you decided on a wheel choice? I think it could make or break such a beautiful car.
vinceg101
Posts: 5119
Joined: Jun 20, 2007
Location: Los Angeles, CA

Re: My coupe (caution many photos) update

Post by vinceg101 »

So THAT'S what you were working on this weekend in between the texts.

Bravo, sir. Bravo.

I'm "dyeing" to see how your interior comes out.
OcCoupe
Posts: 3228
Joined: Aug 21, 2010
Location: Costa Mesa, CA
Contact:

Re: My coupe (caution many photos) update

Post by OcCoupe »

stoney wrote:Have you decided on a wheel choice? I think it could make or break such a beautiful car.
Either 14" or 16" open Alpina wheels. I have both so I can see which one I like best.

I really love the way this car looks. It sits nicely, and doesn't look over done. The Alpinas look great and aren't over the top. I have seen style 32s and RC090s on coupes before and it's too much.

Image
Karl Grau
Posts: 9738
Joined: Mar 10, 2006
Location: 1930's Germany

Re: My coupe (caution many photos) update

Post by Karl Grau »

What do Coupes do for a parking brake? Is there something missing in this pic?
OcCoupe wrote: Image
tig
Posts: 9593
Joined: Mar 18, 2013
Location: Durango
Contact:

Re: My coupe (caution many photos) update

Post by tig »

OcCoupe wrote:
stoney wrote:Have you decided on a wheel choice? I think it could make or break such a beautiful car.
Either 14" or 16" open Alpina wheels. I have both so I can see which one I like best.

I really love the way this car looks. It sits nicely, and doesn't look over done. The Alpinas look great and aren't over the top. I have seen style 32s and RC090s on coupes before and it's too much.

Image
I would do unnatural acts for an E9 with 16" Alpinas like that.
ElGuappo
Posts: 8138
Joined: Feb 12, 2006
Location: Sacramento, CA
Contact:

Re: My coupe (caution many photos) update

Post by ElGuappo »

vinceg101 wrote:So THAT'S what you were working on this weekend in between the texts.

Bravo, sir. Bravo.

I'm "dyeing" to see how your interior comes out.
THIS^, sans terrible pun...
This build makes me tingly... :oops:
OcCoupe
Posts: 3228
Joined: Aug 21, 2010
Location: Costa Mesa, CA
Contact:

Re: My coupe (caution many photos) update

Post by OcCoupe »

Karl Grau wrote:What do Coupes do for a parking brake? Is there something missing in this pic?
OcCoupe wrote: Image
Yes, the brakes...

I figured it would be easier and lighter to install the brakes after the sub frames were in the car. The brake lines are in place, I just need to install them and the parking brake cable.

Here is a shot of the driver's side parking brake after I installed it yesterday, I also installed the corresponding cable:

Image

And the half shaft:

Image

Sorry for the bad lighting.

I am hoping to have the front sub frame installed tomorrow.
Karl Grau
Posts: 9738
Joined: Mar 10, 2006
Location: 1930's Germany

Re: My coupe (caution many photos) update

Post by Karl Grau »

I'm impressed with how much you're getting done in this heat. I'll be lucky to manage sitting in the Laz E Boy drinking beer while watching my Alma Mater get their asses kicked by Cal.
OcCoupe
Posts: 3228
Joined: Aug 21, 2010
Location: Costa Mesa, CA
Contact:

Re: My coupe (caution many photos) update

Post by OcCoupe »

Karl Grau wrote:I'm impressed with how much you're getting done in this heat. I'll be lucky to manage sitting in the Laz E Boy drinking beer while watching my Alma Mater get their asses kicked by Cal.

We talked about installing a/c in the shop, I wish we had done more than just talk.
wkohler
Posts: 50939
Joined: Oct 05, 2006
Location: Phönix, Arizona, USA
Contact:

Re: My coupe (caution many photos) update

Post by wkohler »

Welcome to my life in my 106°garage.
ldsbeaker
Posts: 6134
Joined: Mar 25, 2007
Location: Slicktop City, AZ
Contact:

Re: My coupe (caution many photos) update

Post by ldsbeaker »

Awww come on, you guys are WAY too cool to complain.

Mike, it looks so much more impressive as an assembly, but I have to say, it is a modern marvel to get all of the 1000s of pieces of a BMW in "as new" condition. By hook or crook!
davintosh
Posts: 13964
Joined: Jan 28, 2009
Location: Sioux Falls, SD
Contact:

Re: My coupe (caution many photos) update

Post by davintosh »

Looking good, Miguel! Keep up the good work, and let me know when you're ready to deliver.

Image
Owndapwn
Posts: 486
Joined: May 18, 2014
Location: Kansas City, MO

Re: My coupe (caution many photos) update

Post by Owndapwn »

davintosh wrote:With all that insulation on there, how will you tell if the floor pans start to rust?
;)
The man's brake calipers are spotless. I'm pretty sure at that point, it's the rust/grime's job to avoid him.
ElGuappo
Posts: 8138
Joined: Feb 12, 2006
Location: Sacramento, CA
Contact:

Re: My coupe (caution many photos) update

Post by ElGuappo »

davintosh wrote:Looking good, Miguel! Keep up the good work, and let me know when you're ready to deliver.

Image
I also think this.
GaAlpinaOwner
Posts: 1123
Joined: Feb 12, 2006
Location: Atlanta Georgia USA

Re: My coupe (caution many photos) update

Post by GaAlpinaOwner »

Wow Mike just gorgeous....wait I see a dust spot :laugh:
OcCoupe
Posts: 3228
Joined: Aug 21, 2010
Location: Costa Mesa, CA
Contact:

Re: My coupe (caution many photos) update

Post by OcCoupe »

GaAlpinaOwner wrote:Wow Mike just gorgeous....wait I see a dust spot :laugh:
Thank you, I took care of the dust spot. :oops:
OcCoupe
Posts: 3228
Joined: Aug 21, 2010
Location: Costa Mesa, CA
Contact:

Two-part update Part 1

Post by OcCoupe »

Thank you for the kind words. Here are a few more pictures:


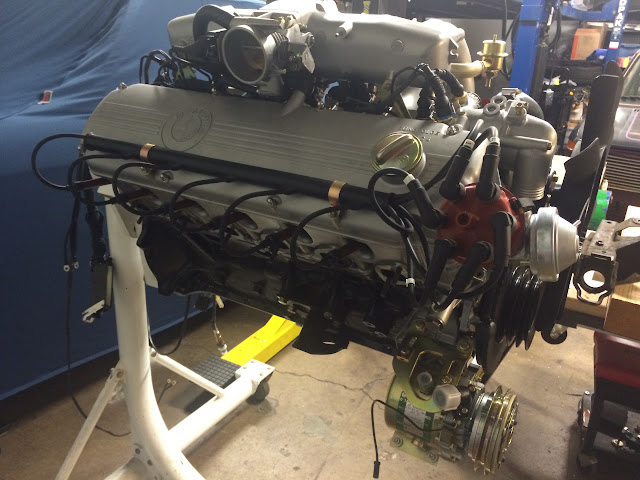
Here's the engine on the stand before Chris and I landed it on to the dolly/sub frame
Image

Image

Image

I lowered the car on to the dolly, undid all the bolts and ended up with the sub frame on the dolly.

Image

We had to take off the intake plenum to clear the chains. That's HBChris in the red and blue.
Image

Image

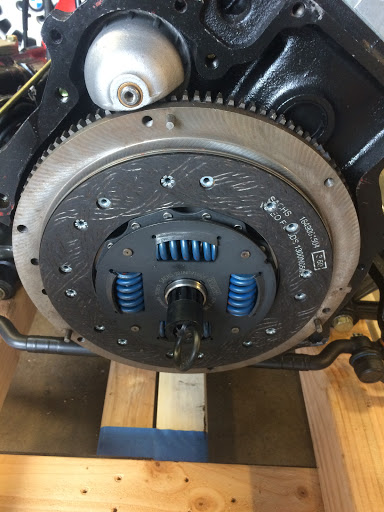
Installed the clutch.
Image

Then started landing the engine.
Image

Image

Here she comes!
Image

Image

And there she sets.
Image

Image

Image

Image

The engine dolly really helped make the process much easier as did the MaxJax. Once everything was in place we jacked up the 4x4s to raise the front a couple of inches so the sub frame was at the same angle as frame rails.

The struts and brakes are back on the car and it is now on the ground on all four wheels. Fuel lines are in and so are the hydraulic lines.
OcCoupe
Posts: 3228
Joined: Aug 21, 2010
Location: Costa Mesa, CA
Contact:

And part Deux

Post by OcCoupe »

Yesterday was a good day. I ran in to a bit of a hiccup that I should have figured out before the engine went in the car. Fortunately with the help of Paul (he did all the figuring) and Chris who helped with the install we overcame the issue. Since the engine is a 3.8 litre it needs to breath a bit more than a 3.0 so I went on the hunt for a nice header solution. I wanted something that BMW made so I purchased a new set of M88 headers, the challenge is that the M88 headers are for a 4 valve engine so the flange is completely different. I figured we could modify the headers by grafting in a new 2 valve flange. I ended up finding a set of Alpina E34/B10 headers that are nearly identical to the M88 headers; but are for an M30 engine.

A big THANK YOU to Ivo for sourcing these headers!

Image
Image
Image

This however created another problem. The headers are a straight forward bolt on; but the #2 pipe interferes with the passenger side motor mount; so we had to modify the factory motor mount by moving it forward with an adapter.

The forward header interferes with the mounting holes for the bracket.

Image

This is an adapter that fits over the mount on the subframe.
Image

This combined with a modified bracket moves the mount forward allowing enough space for the headers. Fortunately the M90 block has two additional M10 bosses which we utilized for the bracket.
Image

Now I can have the headers coated!

I also redid the heater box. Someone had sprayed some sort of undercoating on the box which was hard and brittle. I had to scrape then sand the heck out of the box. I also took the whole box apart so that I could clean the inside and replace on the foam on the flaps.

Image

I cleaned the old foam off the flaps and replaced them with new foam. It's a bit of a bear doing this with just two hands. The foam goes around the top of the flaps and attaches on the other side. Two of the flaps utilize rivets as well as glue.

Image

Image

Image

I lubricated and adjusted all the cables so the flaps open and close properly and shut tightly.

Heater box cover after dent removal.
Image

The seats are finished and now Juan is getting ready to start work on the door panels.

Here is one of the front seats.
Image

Image

Image

Juan inspecting his work.
Image

And the rear seats.
Image
The rear armrests are finished, I just can't find the picture.

I haven't installed the overflow tank yet; but I got most of the dents out and then filled the rest. I had the tank pressure tested prior to doing the cosmetics.
Image

And the hood insulation is in.
Image
Last edited by OcCoupe on Feb 27, 2016 3:57 PM, edited 1 time in total.
Post Reply