

Exactly. That 3M strip caulk works really well for holding and sealing the vapor barrier, and since it never gets hard you can get back into the door later if necessary without any problem.dsmith wrote:For vapor barriers, I use these 2 items:
http://www.homedepot.com/p/Husky-3-ft-x ... /202328867#
http://www.amazon.com/3M-08578-Black-St ... B000PEZ1L4
External links now open in a new browser tab - turn this off in your UCP - Read more here.
535i "Project Sepang" build -08/05/18 update
-
stuartinmn
- Posts: 9633
- Joined: Feb 12, 2006 12:00 PM
- Location: Minneapolis
-
John in VA
- Posts: 5329
- Joined: Feb 12, 2006 12:00 PM
- Location: Leesburg, VA
Yet it seems every other E39 & E46 owner has problems with the vapor barriers not sticking to the butyl caulk,allowing water to leak from the doors into the interior & soaking the carpet. It might be due to the foam-like barrier panels used in those cars, but 3M spray adhesive and plastic sheeting have never failed me.stuartinmn wrote:...That 3M strip caulk works really well for holding and sealing the vapor barrier, and since it never gets hard you can get back into the door later if necessary without any problem.
-
GaAlpinaOwner
- Posts: 1122
- Joined: Feb 12, 2006 12:00 PM
- Location: Atlanta Georgia USA
I would modify the Hartge Its fiberglass any way. Other wise the rear and side skirts don't make since.Murfinator wrote:I agree with the above sentiment. I'd run the Hartge spoiler to match the rear valance which appears to be Hartge(?). There is a version with a cut-out for an oil cooler. I believe it would provide a much more finished look.Coldswede wrote:I would be tempted to just leave the inter cooler radiator exposed just like it is.
Great build.
-
Nebraska_e28
- Beamter

- Posts: 9099
- Joined: Apr 13, 2006 11:18 PM
- Location: Council Bluffs, IA
- Contact:
Nothing major at all, but I made a little more progress with some shiny bits that I decided to put on... before the real work begins with my 'expert' helpers scheduled to come out after the holidays. It sure feels great to add each little part and see it taking shape 
I installed fresh rubber stops and the newly re-chrome door handles, the front grill, and the rear taillights. Took some Sil-Glyde to get those little rubber bits to get in the holes... impossible without it.
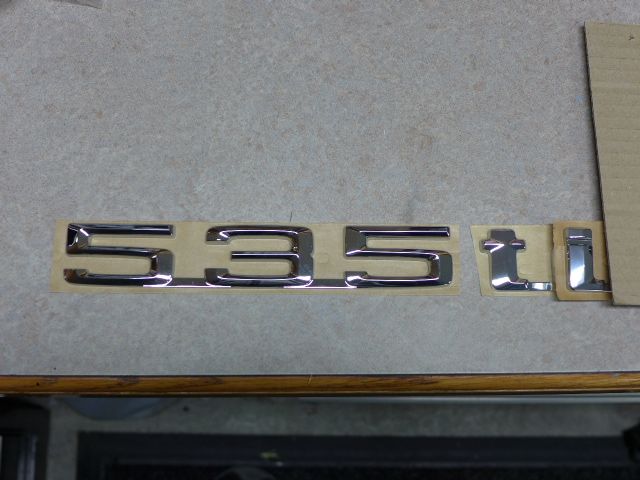
Also, I picked up the emblems for the rear of the car.. I'm combining a couple letter emblems (after the 535) to reflect that it's a turbo... somewhat subtle, but still tasteful, I think.
Here are the pics.
BTW, had a nice visit at the end of last week with Nebraska_28 on his trip to VT to "pick up some property" He's a turbo guy, so the project car was right up his alley. Oh, and his "property" looked quite nice
-RoyW
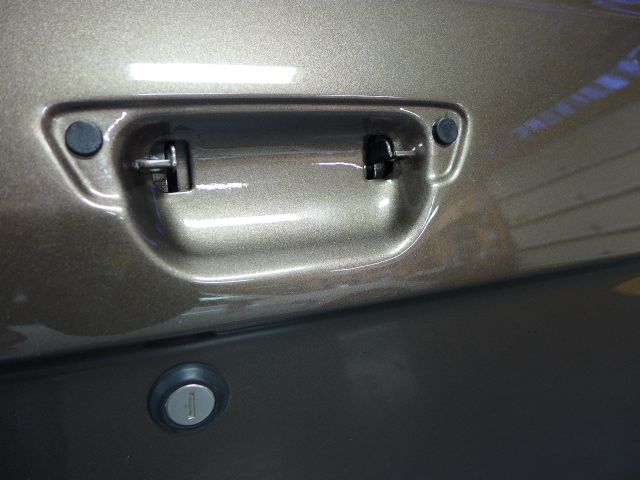
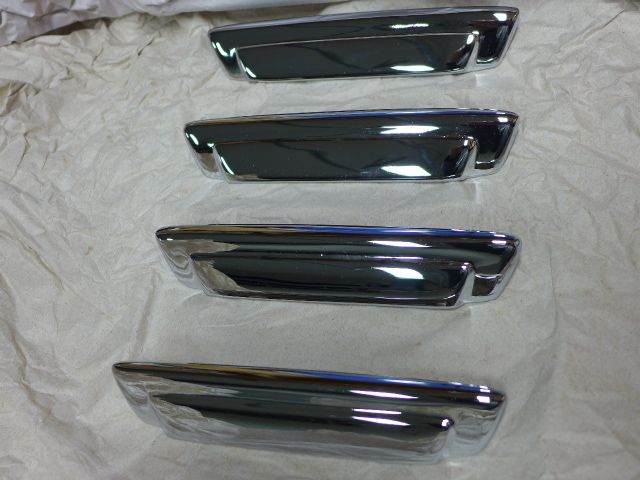
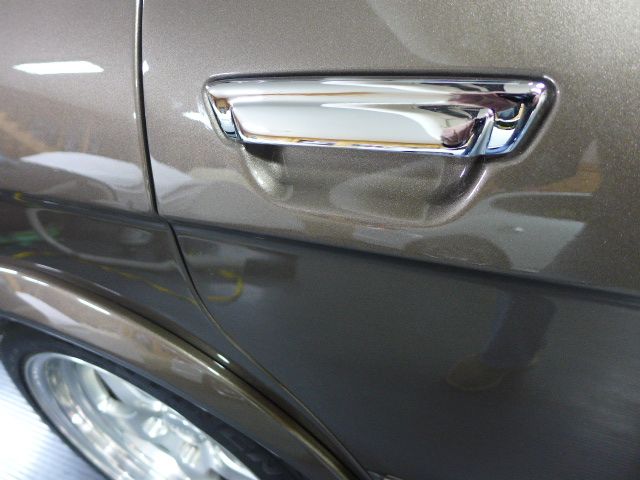
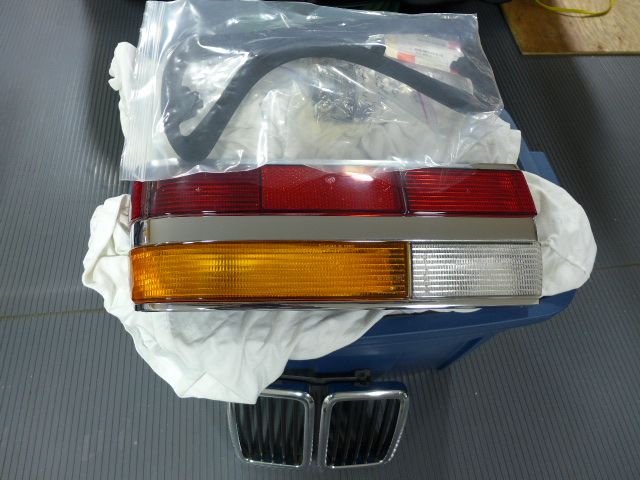
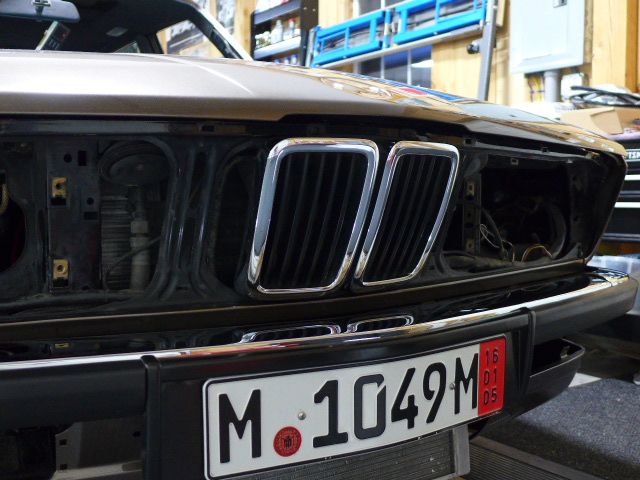
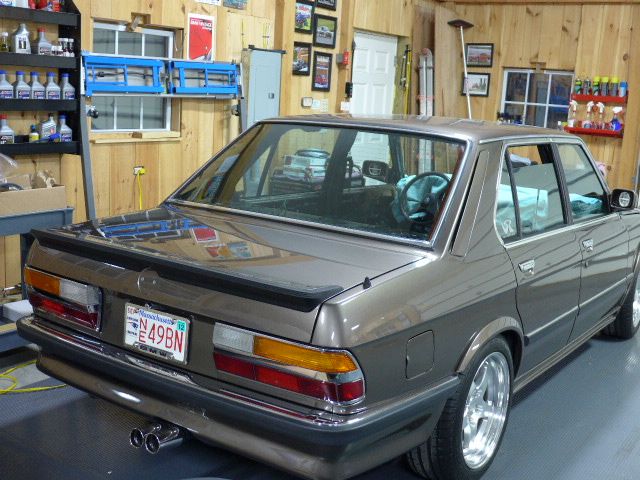
I installed fresh rubber stops and the newly re-chrome door handles, the front grill, and the rear taillights. Took some Sil-Glyde to get those little rubber bits to get in the holes... impossible without it.
Also, I picked up the emblems for the rear of the car.. I'm combining a couple letter emblems (after the 535) to reflect that it's a turbo... somewhat subtle, but still tasteful, I think.
Here are the pics.
BTW, had a nice visit at the end of last week with Nebraska_28 on his trip to VT to "pick up some property"
-RoyW


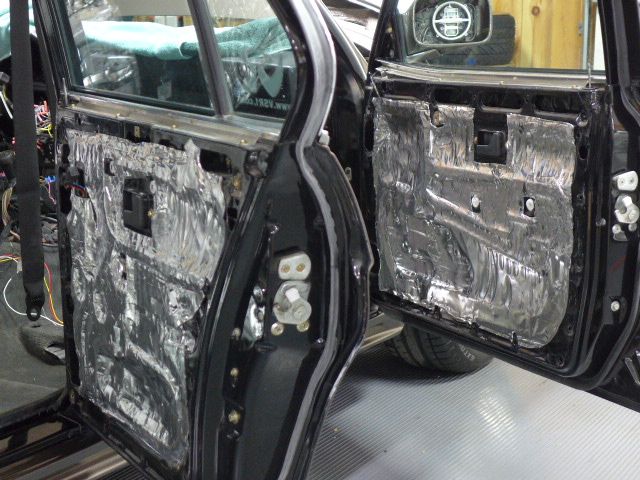
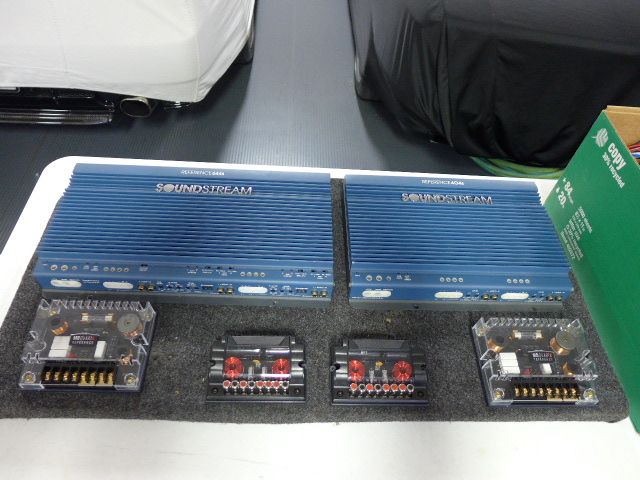
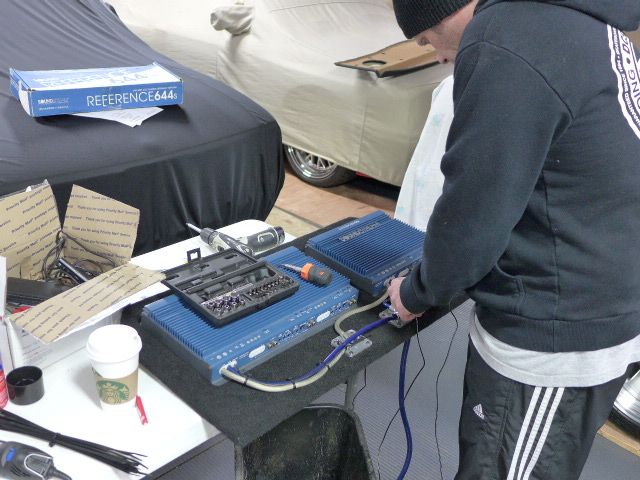
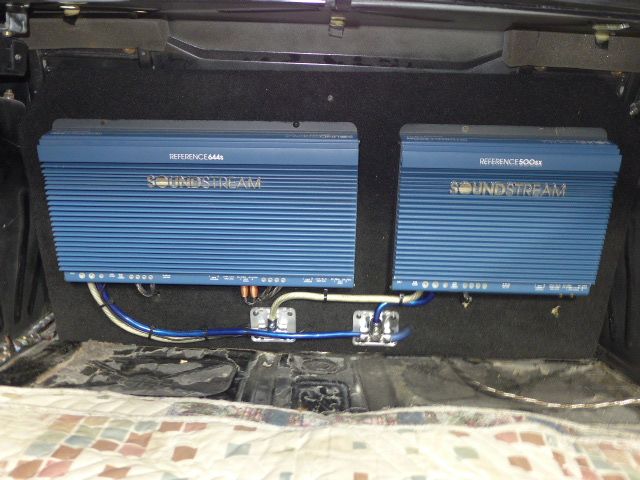
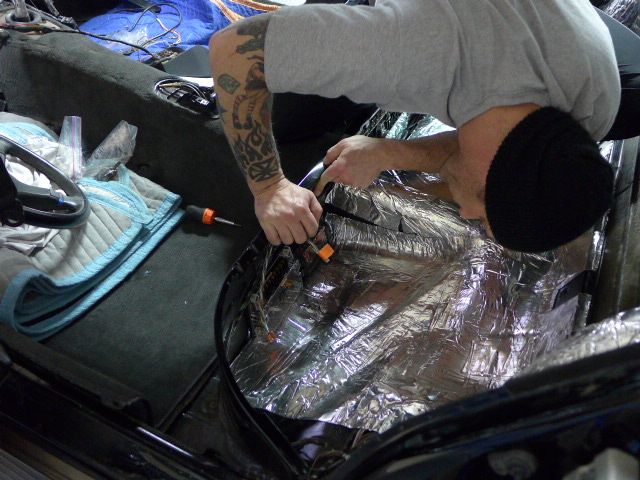
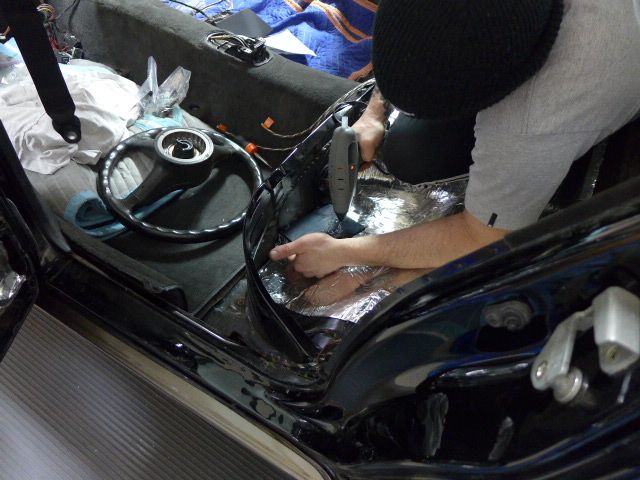
Since the project car's interior is currently wide-open and apart (nothing in the way), a little stereo system planning and installing was started today with my good friend Ian (a sound system giant ). First we used a dynamat-like product that I had left over from a previous install and did up the doors and rear seat/floor area. Then we laid the amps and x-overs out on a custom board that I had removed a few years ago from a previous e28 I had (I bought the amps on this Forum).
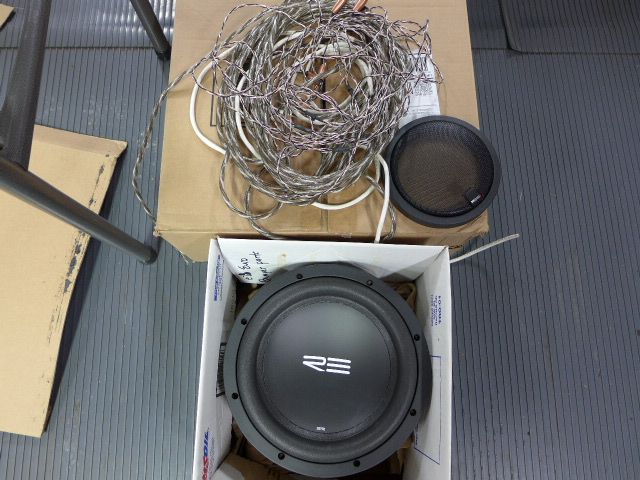
The board will be mounted in the trunk against the back of the rear seat with a 10" sub/box also located there. We will be porting to the trunk area with a small 6" opening In the center of the rear shelf with a grill to cover it We decided to cut the rear shelf hole next session, and, Ian will take the board, amps, and x-overs home to mount, wire-up, etc., and test on this "stereo system test bed" (want to be sure the amps are in good working order before proceeding with installation). He will also build an enclosure for the sub.
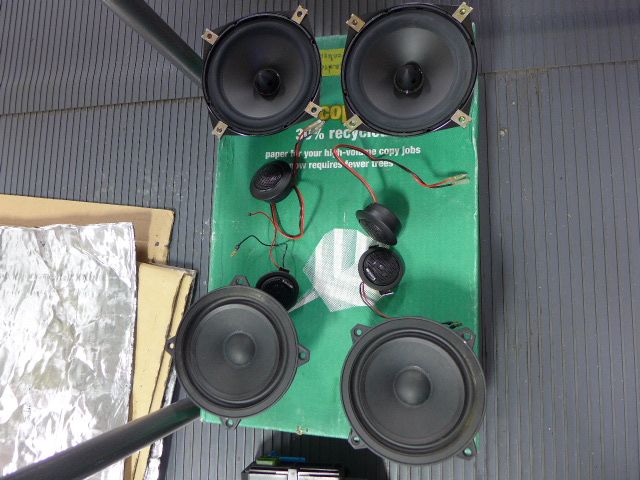
Additionally, we did a little planning for the installing of the front kick panel speakers (probably some custom fiberglass enclosures?) and discussed the choice of the head to be used. Since this is going to be old school stuff (note the old Soundstream amps, Hertz, and MB Quart speakers, etc.), I'll be looking ideally for a Pioneer Premier unit or an older Nakamichi head unit.
Next session is planned for Jan 11th. In addition to doing some more stereo system install work, we're hoping to get the UUC shortshift kit installed, complete some other engine & turbo system mechanical and electrical items, and, start putting the dash area back together.
Here's a few pics from today's effort.
-RoyW


The board will be mounted in the trunk against the back of the rear seat with a 10" sub/box also located there. We will be porting to the trunk area with a small 6" opening In the center of the rear shelf with a grill to cover it We decided to cut the rear shelf hole next session, and, Ian will take the board, amps, and x-overs home to mount, wire-up, etc., and test on this "stereo system test bed" (want to be sure the amps are in good working order before proceeding with installation). He will also build an enclosure for the sub.
Additionally, we did a little planning for the installing of the front kick panel speakers (probably some custom fiberglass enclosures?) and discussed the choice of the head to be used. Since this is going to be old school stuff (note the old Soundstream amps, Hertz, and MB Quart speakers, etc.), I'll be looking ideally for a Pioneer Premier unit or an older Nakamichi head unit.
Next session is planned for Jan 11th. In addition to doing some more stereo system install work, we're hoping to get the UUC shortshift kit installed, complete some other engine & turbo system mechanical and electrical items, and, start putting the dash area back together.
Here's a few pics from today's effort.
-RoyW


Spent the day working on the project car today since my friend Steve was available to lead the way. Made some good progress, but nothing much picture-worthy. Anyway, here what was accomplished today:
- Resolved the "no power to the coil" issue, which wasn't allowing us to start the car without jumping power to the coil from the battery. Turned out to be a 2V voltage drop on the power wire from the MSD box to the Blaster coil. Ran a new and bigger gauge wire. Can now starts off the key every time
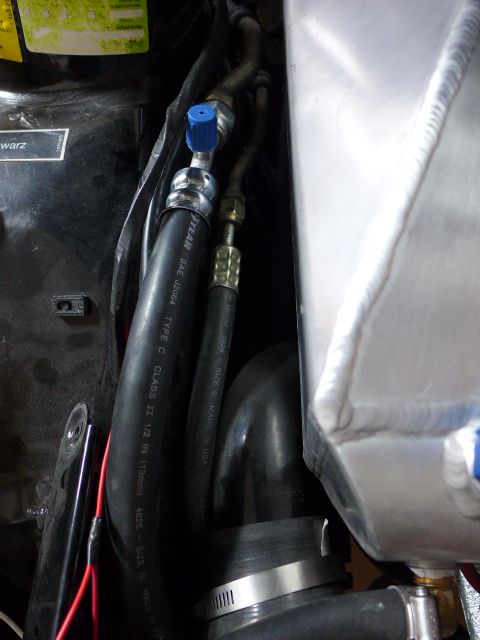
- installed shortened new A/C line and re-routed (for better asthetics)
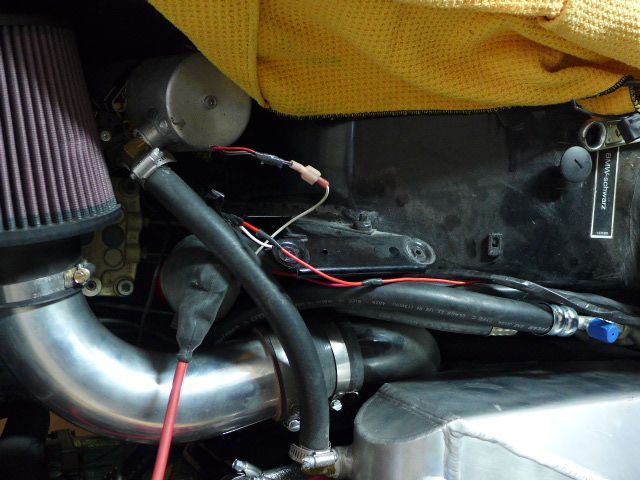
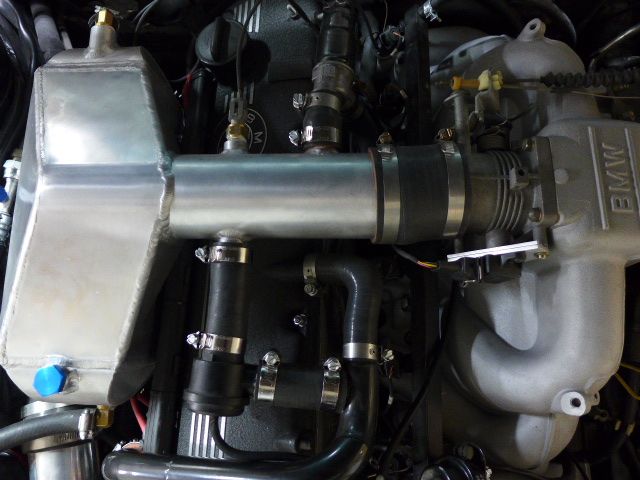
- re-positioned and re-installed inter-cooler pump with new band clamp.
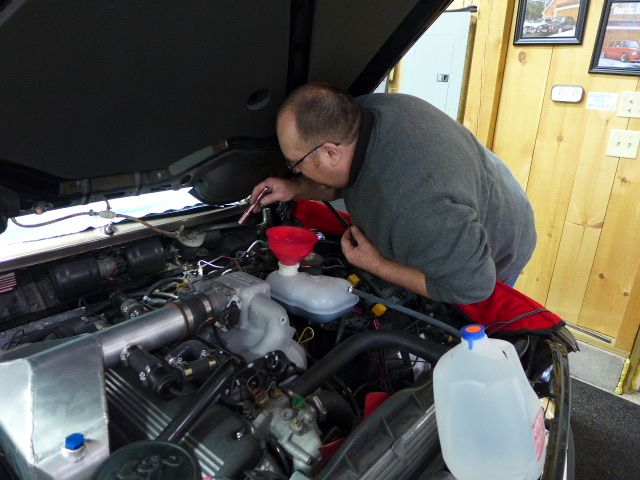
- put new and matching hose clamps on all hoses. Installed new vacuum lines and "T" connection. Tightened all clamps and connections in engine area
- re-solved "no power" to the sun roof panel and power windows
- drilled 3/8' hole in firewall and installed 3/8" grommet needed to routed appropriate Megasquirt, etc.,wires into dash area
- tested both fan motors and fan switch (all good) before going any further with putting dash area, etc., back together. Connected some under dash parts back into place
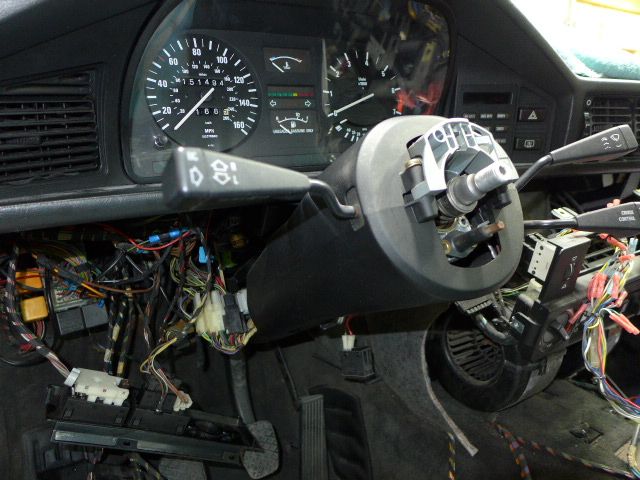
- remove steering wheel (have Mtech II to replace it) and installed instrument cluster. Tested cluster, but have no tachometer function (will need to trouble shoot... probably a Magasquirt issue?) I had replaced all the cluster bulbs earlier
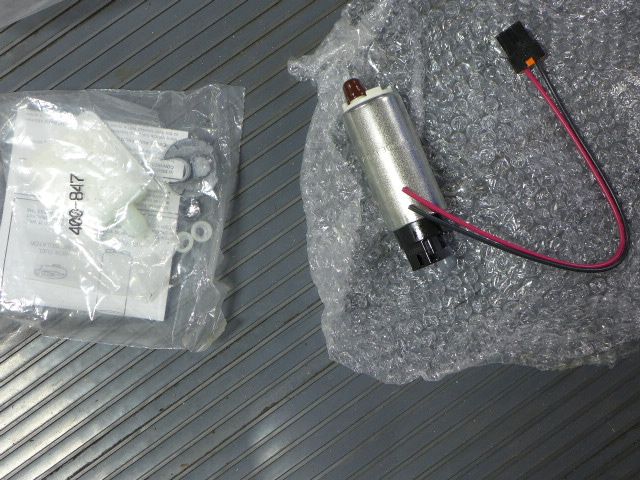
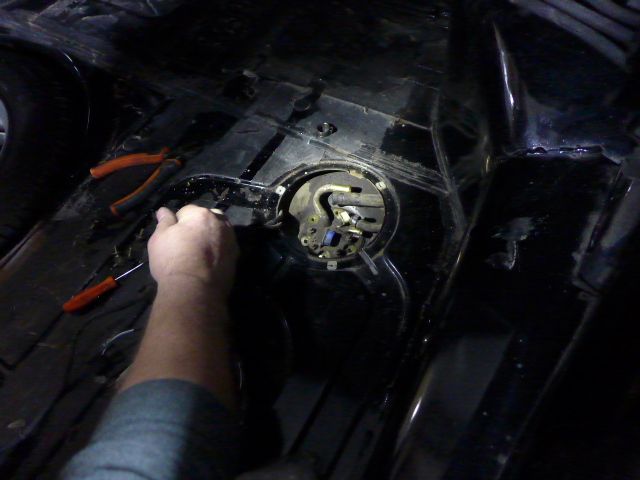
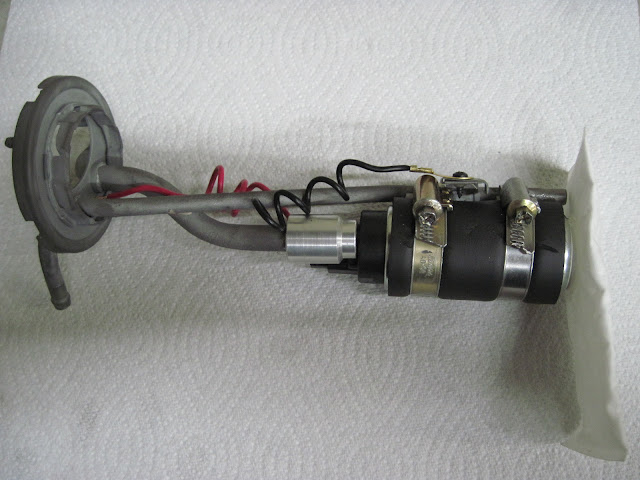
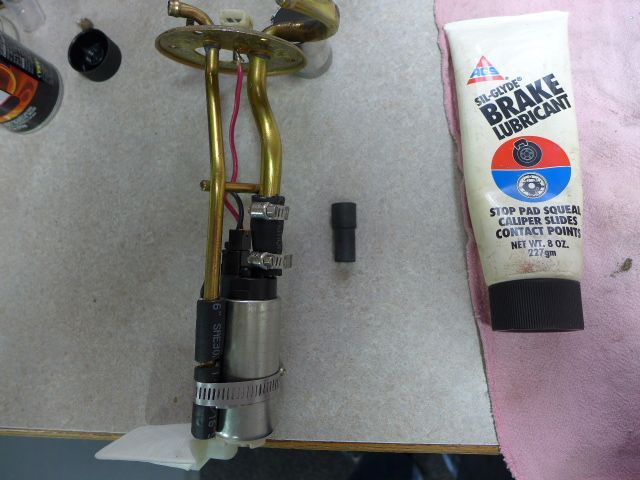
- removed fuel pump and started installation of new, higher flow one (need some solder for wiring to complete)
Plan to be back at it either next Sat or the one after that
Here are few pictures from today.
-RoyW


- Resolved the "no power to the coil" issue, which wasn't allowing us to start the car without jumping power to the coil from the battery. Turned out to be a 2V voltage drop on the power wire from the MSD box to the Blaster coil. Ran a new and bigger gauge wire. Can now starts off the key every time
- installed shortened new A/C line and re-routed (for better asthetics)
- re-positioned and re-installed inter-cooler pump with new band clamp.
- put new and matching hose clamps on all hoses. Installed new vacuum lines and "T" connection. Tightened all clamps and connections in engine area
- re-solved "no power" to the sun roof panel and power windows
- drilled 3/8' hole in firewall and installed 3/8" grommet needed to routed appropriate Megasquirt, etc.,wires into dash area
- tested both fan motors and fan switch (all good) before going any further with putting dash area, etc., back together. Connected some under dash parts back into place
- remove steering wheel (have Mtech II to replace it) and installed instrument cluster. Tested cluster, but have no tachometer function (will need to trouble shoot... probably a Magasquirt issue?) I had replaced all the cluster bulbs earlier
- removed fuel pump and started installation of new, higher flow one (need some solder for wiring to complete)
Plan to be back at it either next Sat or the one after that
Here are few pictures from today.
-RoyW


-
Kyle in NO
- Posts: 17638
- Joined: Feb 12, 2006 12:00 PM
- Location: Nasty Orleans------> Batten-Rooehjch------>More Souther LA
-
GaAlpinaOwner
- Posts: 1122
- Joined: Feb 12, 2006 12:00 PM
- Location: Atlanta Georgia USA
I didn't even catch that. Seeing the clamps, I thought it was hose, then I noticed the step. That piece isn't reinforced with anything to withstand the pressure. Kyle is definitely right on.RoyW wrote:Thanks for the tip Kyle.... will do.Kyle in NO wrote:Roy, just a tip. If that is the original rubber connection between the new in-tank pump and hard line, it WILL split and lose fuel pressure. BTDT. You really need to replace it with fuel injection hose and quality clamps.
-Roy
Of course, I don't know how it will work since the E28 uses a 12x18 feeder hose and an E30 uses a 8x13. Paul M. made me a super slick adapter using o-rings.
I couldn't use those big clamps around the pump though since they wouldn't fit through the much smaller hole on Euro cars.
We worked on the car again today, and I had lots of help from my most proficient and talented friends, Steve and Ian. Steve continued work on all the mechanical items of putting this car back together again and Ian was building and installing the sound system. I did a few minor things and helped where I could. It's funny how even adding the smallest thing, e.g., new Roundel on the trunk lid, can feel so good as you watch things slowly come together
Anyway, here's what was accomplished today:
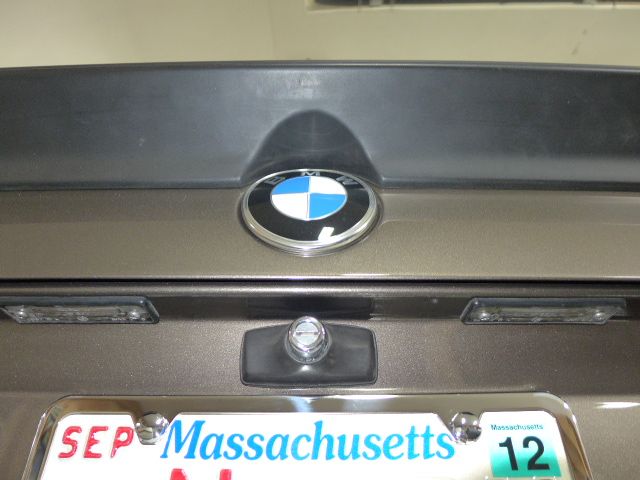
- installed license plate lights and new trunk Roundel
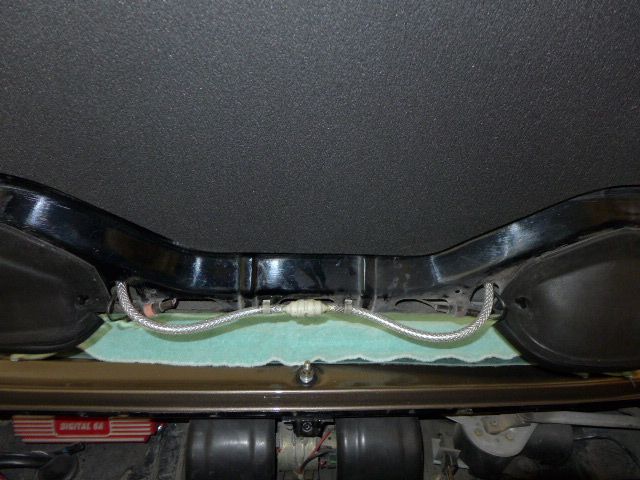
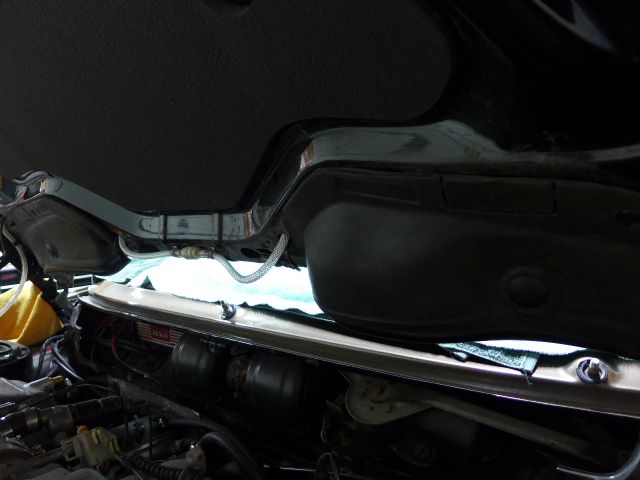
- installed new sound deadening covers and edge moldings on hood scoops at back underside of hood
- installed new windshield washer hoses
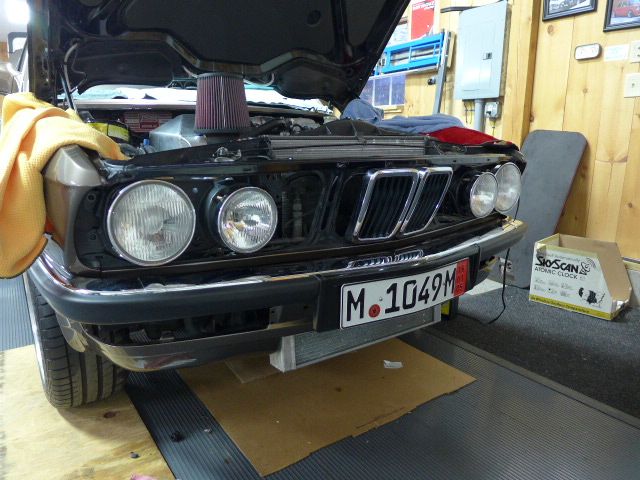
- installed and wired euro headlights (with city lights)
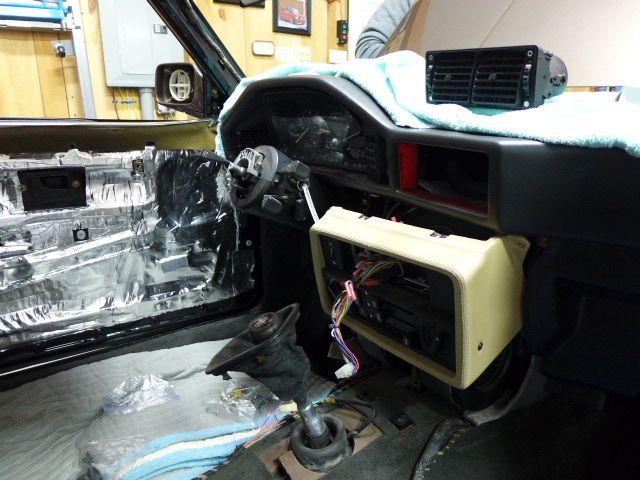
- installed a few more under-dash parts
- filled cooling system with BMW anti-freeze and distilled water
- completed install of fuel pump with new gaskets and replaced original short hose with fuel injection hose (as advised herein)
- fired the engine up (started instantly) to check fuel pump and coolant level... she sounded awesome and loud with incomplete exhaust system
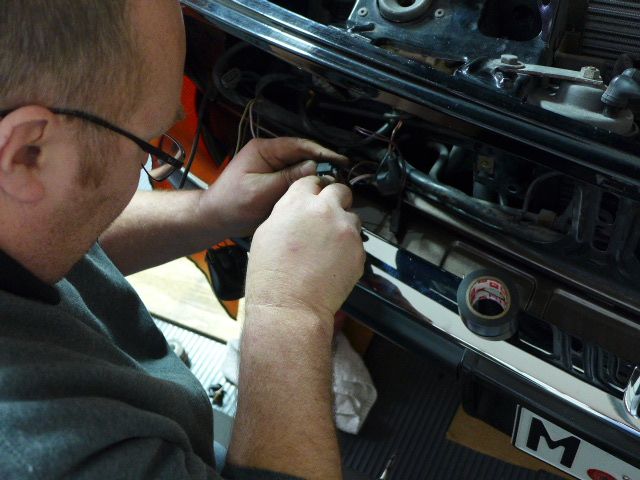
- soldered up numerous wires & connectors in engine area
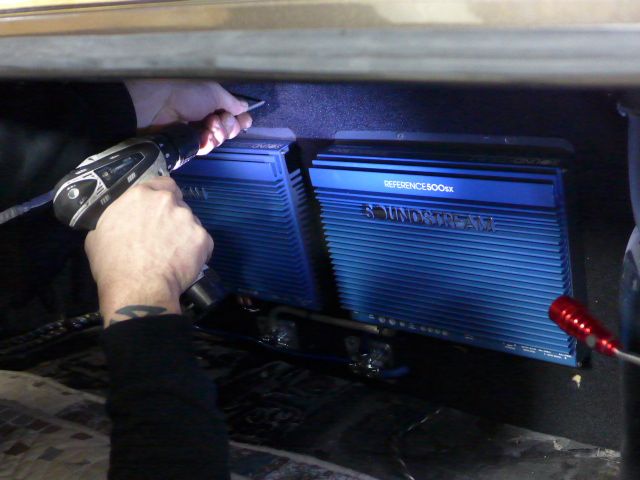
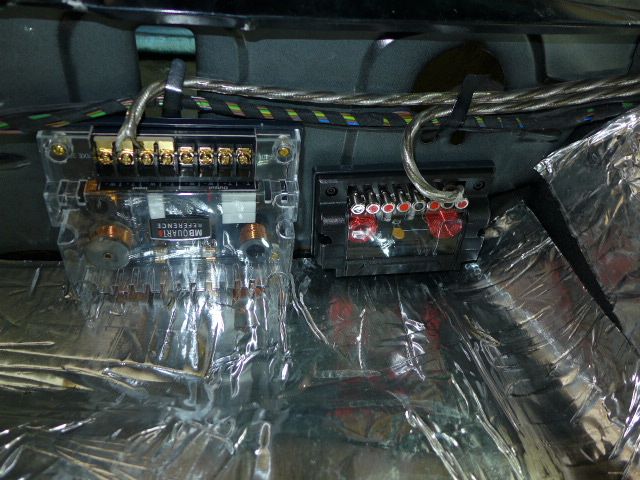
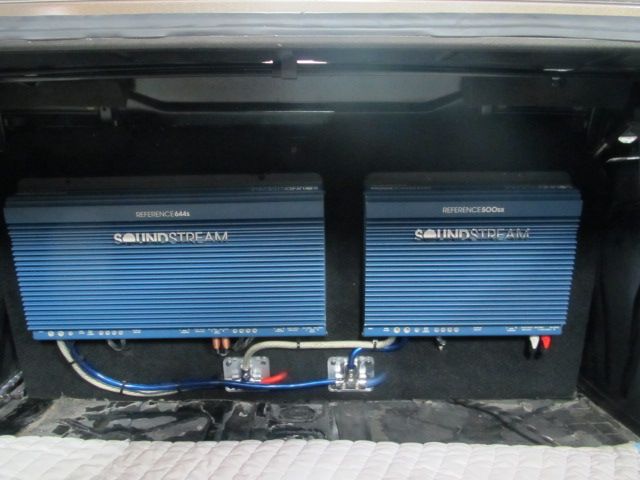
- mounted amps to board and connected power, RCA, and speaker wiring to amps for trunk installation. Installed board in trunk
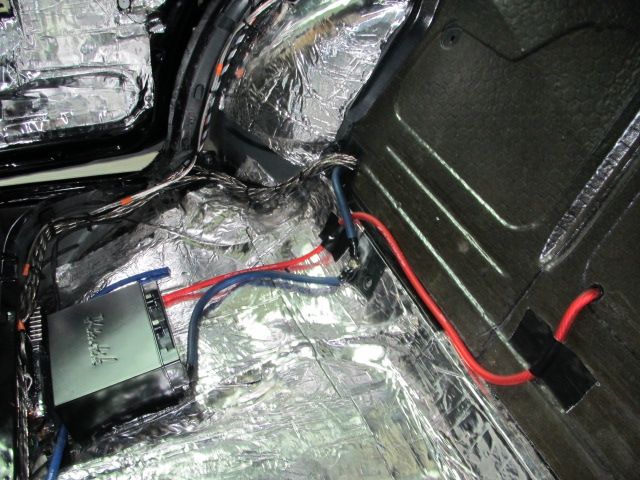
- installed cross-overs and wired them up to amp (installed them under the rear seat)
- ran sound system wiring to front dash area and speaker locations
- took measurements and discussed modifications to washer tank (it won't fit as-is in standard location, due to pump for inter-cooler being in the way). We plan to reduce it's size and plastic weld it back together... this could be interesting
- discussed changing the position of the intercooler radiator, i.e., move up slightly and angle same as front apron. Then plan to cover all with Hartge front valance (getting for Paul L)
Next major work day will be in early Feb... hoping to then complete sound system install, e.g., head unit, sub, separates in front and back, port in rear parcel shelf for sub sound to cabin, etc. Then get the rest or the dash area together and begin on the remaining interior install, e.g., seats, console, glove box, center panel, door panels, etc. Meanwhile, I'll get the wipers on, grills on, and any other small items.
The remaining big items that will be left for Spring up at VSR will include: windshield install, completion of exhaust system (I'm having Burns Stainless make a "Y" pipe for the transition from the turbo manifold downpipe to the dual pipes on the SuperSprint exhaust (muffler and resonator). Then off to see Peter Florence for the MegaSquirt tune.
Still hopeful for a mid-Spring completion...we'll see.
-RoyW

Anyway, here's what was accomplished today:
- installed license plate lights and new trunk Roundel
- installed new sound deadening covers and edge moldings on hood scoops at back underside of hood
- installed new windshield washer hoses
- installed and wired euro headlights (with city lights)
- installed a few more under-dash parts
- filled cooling system with BMW anti-freeze and distilled water
- completed install of fuel pump with new gaskets and replaced original short hose with fuel injection hose (as advised herein)
- fired the engine up (started instantly) to check fuel pump and coolant level... she sounded awesome and loud with incomplete exhaust system
- soldered up numerous wires & connectors in engine area
- mounted amps to board and connected power, RCA, and speaker wiring to amps for trunk installation. Installed board in trunk
- installed cross-overs and wired them up to amp (installed them under the rear seat)
- ran sound system wiring to front dash area and speaker locations
- took measurements and discussed modifications to washer tank (it won't fit as-is in standard location, due to pump for inter-cooler being in the way). We plan to reduce it's size and plastic weld it back together... this could be interesting
- discussed changing the position of the intercooler radiator, i.e., move up slightly and angle same as front apron. Then plan to cover all with Hartge front valance (getting for Paul L)
Next major work day will be in early Feb... hoping to then complete sound system install, e.g., head unit, sub, separates in front and back, port in rear parcel shelf for sub sound to cabin, etc. Then get the rest or the dash area together and begin on the remaining interior install, e.g., seats, console, glove box, center panel, door panels, etc. Meanwhile, I'll get the wipers on, grills on, and any other small items.
The remaining big items that will be left for Spring up at VSR will include: windshield install, completion of exhaust system (I'm having Burns Stainless make a "Y" pipe for the transition from the turbo manifold downpipe to the dual pipes on the SuperSprint exhaust (muffler and resonator). Then off to see Peter Florence for the MegaSquirt tune.
Still hopeful for a mid-Spring completion...we'll see.
-RoyW


-
Chimi-Changa
- Posts: 1709
- Joined: Nov 08, 2011 11:02 PM
- Location: Massachusetts
That's the plan... Hotel reservation has been made, so we'll hope to see you there!RoyW wrote:Yep, it's in the plans. Will you be, Dave??? If so, that would be great... I owe you a dinner, or at least a beer or two for your hospitality a few years ago when my wife and I crashed your 4th of July BBQdavintosh wrote:Awesome stuff, Roy. Will this car be at Vintage?
-Roy
Finally got back to work on the car and made some progress over the past couple weeks. First, I found a local custom exhaust shop that will be making the "Y" pipe to go from the single turbo manifold downpipe to the twin pipes of the SuperSprint exhaust... I'll pick it up this Tuesday. They will also be shortening the twin pipes exiting the muffler so they don't stick out so far under the euro rear bumper. The complete exhaust system will be fitted up and finalized in the Spring when I bring it back up to VSR for that job and the windshield install.
Over the last couple weeks I did the following:
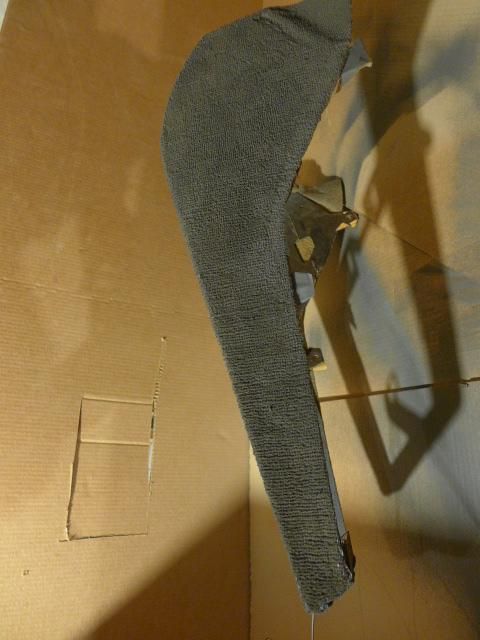
- installed new wheel housing covers (in fender area behind the front wheels)
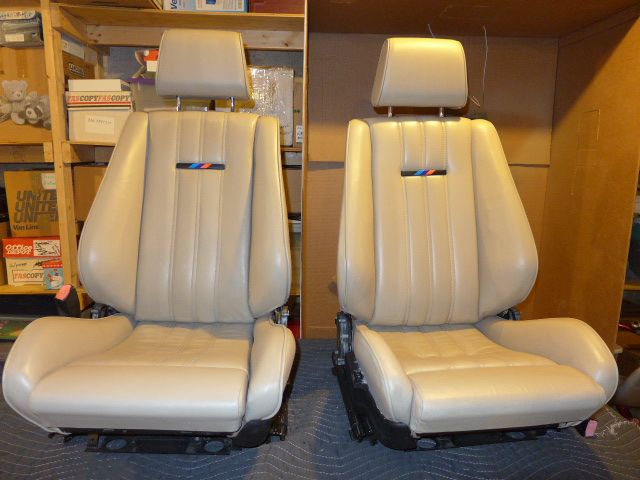
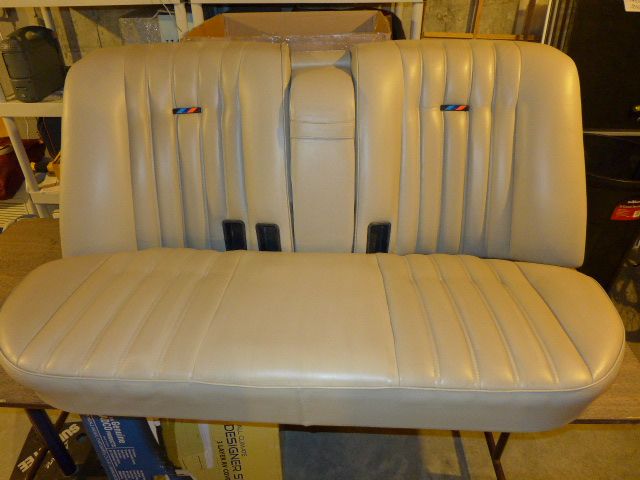
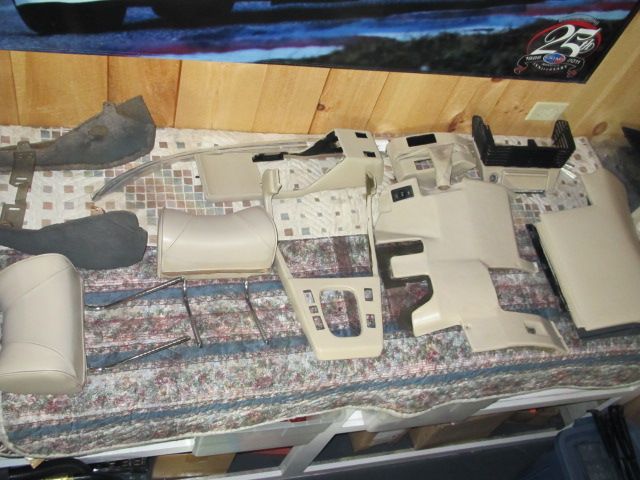
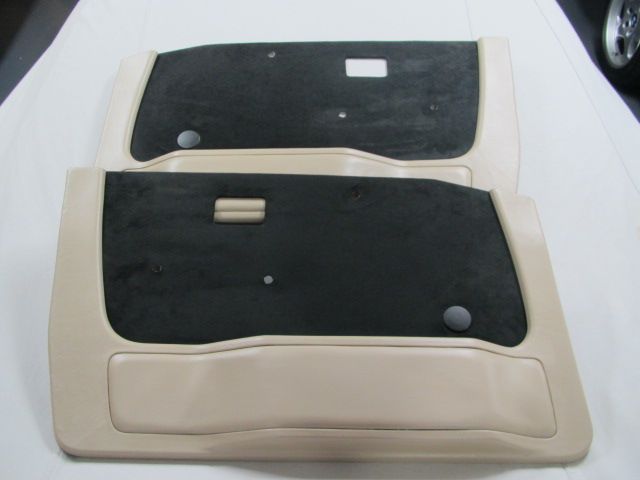
- dyed the e28 M5 door panel that I'll be using, to match up with the e28 M5 seats and other M5 dash area parts that I dyed sometime last year (light beige). And, I installed the new M color badges to the seats
- dyed the carpeted piece that goes just under the center console to match the floor carpet color. It was an M5 piece and was Natur in color
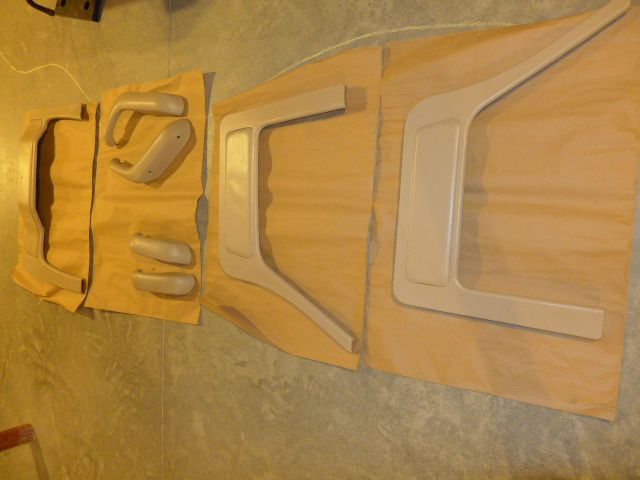
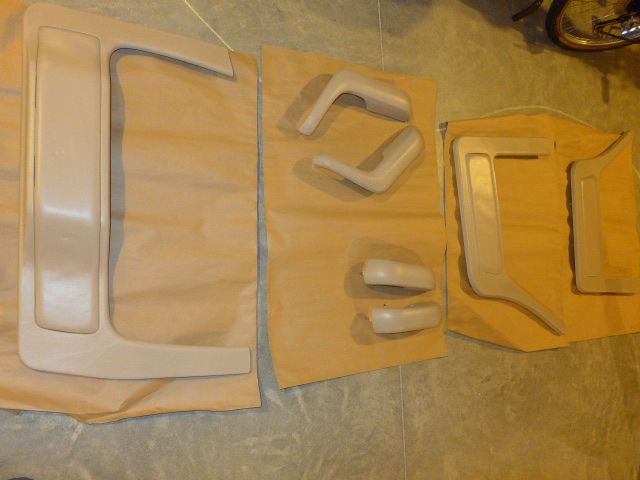
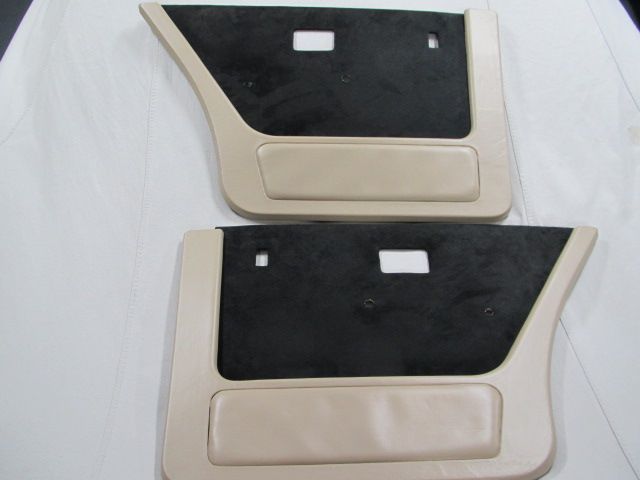
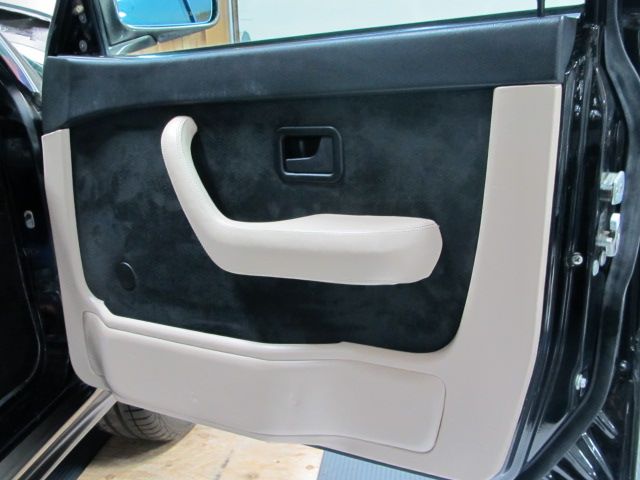
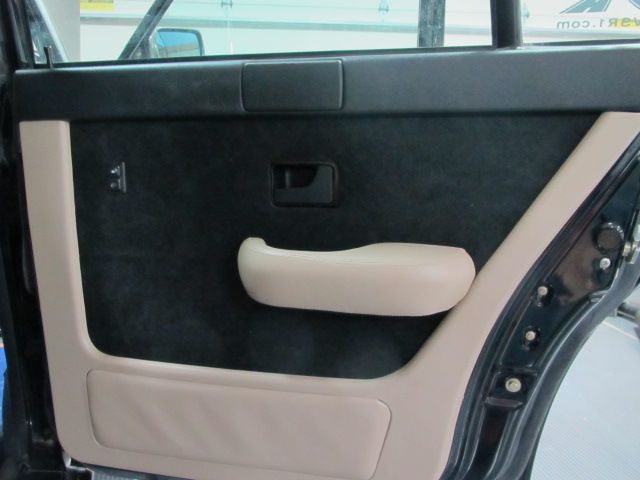
- since I had a bunch of the Alcantra cloth left over from the headliner job on this car, I decided to take another set of e28 door cards I had, and cover the inner sections with the Alcantra cloth and then put them with the M5 door panel frames (if I don't like the look when the interior is all back together, I can always put the dyed M5 inner panels back into the frames).
This Saturday my friend, and expert stereo installer, Ian, came over and we spent 4.5 hours as follows:
- completed all the wiring to the amps
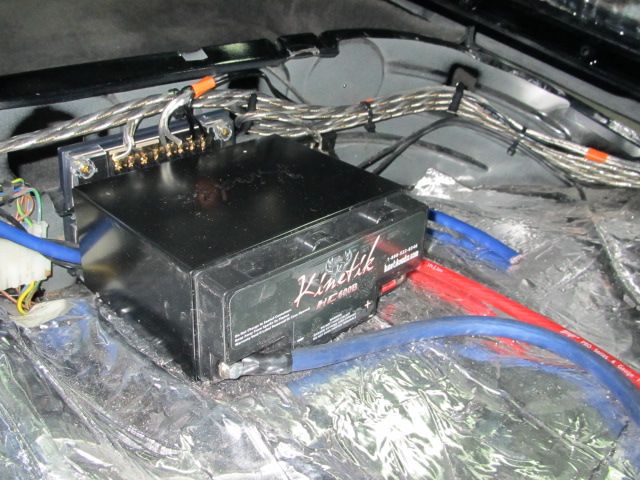
- installed a secondary battery (for the sound system)
- ran a power wire from the main battery to a secondary battery installed under back seat, and installed a ground wire for that battery
- cut 5" hole in rear deck and rear parcel shelf for sub-woofer port (to trunk)
- installed MB Quart separates in rear speaker enclosures and mounted to rear shelf
- installed rear shelf into car with MB Quart grill cover over the subwoofer port
- wired rear speakers to system's rear cross-overs
- ran all RCA cables, etc., to center dash area
Below are some pictures of the work described above. I'll post the muffler and Y pipe pics later.
This coming Saturday, my friend Steve will be by to lead the charge in completing much of the interior/dash area install, as well as the M5 lower front valance install. We'll probably have to move the inter-cooler radiator up and angle it a bit to work with this valance... but, the goal is to have it be not visible. I looked at other third-party lower valances, e.g., Hartge, etc.,but decided the euro M5 one required the least work to fit properly over the euro front apron, turn signals and fogs, and the inter-cooler radiator... we'll see
-RoyW
Over the last couple weeks I did the following:
- installed new wheel housing covers (in fender area behind the front wheels)
- dyed the e28 M5 door panel that I'll be using, to match up with the e28 M5 seats and other M5 dash area parts that I dyed sometime last year (light beige). And, I installed the new M color badges to the seats
- dyed the carpeted piece that goes just under the center console to match the floor carpet color. It was an M5 piece and was Natur in color
- since I had a bunch of the Alcantra cloth left over from the headliner job on this car, I decided to take another set of e28 door cards I had, and cover the inner sections with the Alcantra cloth and then put them with the M5 door panel frames (if I don't like the look when the interior is all back together, I can always put the dyed M5 inner panels back into the frames).
This Saturday my friend, and expert stereo installer, Ian, came over and we spent 4.5 hours as follows:
- completed all the wiring to the amps
- installed a secondary battery (for the sound system)
- ran a power wire from the main battery to a secondary battery installed under back seat, and installed a ground wire for that battery
- cut 5" hole in rear deck and rear parcel shelf for sub-woofer port (to trunk)
- installed MB Quart separates in rear speaker enclosures and mounted to rear shelf
- installed rear shelf into car with MB Quart grill cover over the subwoofer port
- wired rear speakers to system's rear cross-overs
- ran all RCA cables, etc., to center dash area
Below are some pictures of the work described above. I'll post the muffler and Y pipe pics later.
This coming Saturday, my friend Steve will be by to lead the charge in completing much of the interior/dash area install, as well as the M5 lower front valance install. We'll probably have to move the inter-cooler radiator up and angle it a bit to work with this valance... but, the goal is to have it be not visible. I looked at other third-party lower valances, e.g., Hartge, etc.,but decided the euro M5 one required the least work to fit properly over the euro front apron, turn signals and fogs, and the inter-cooler radiator... we'll see
-RoyW


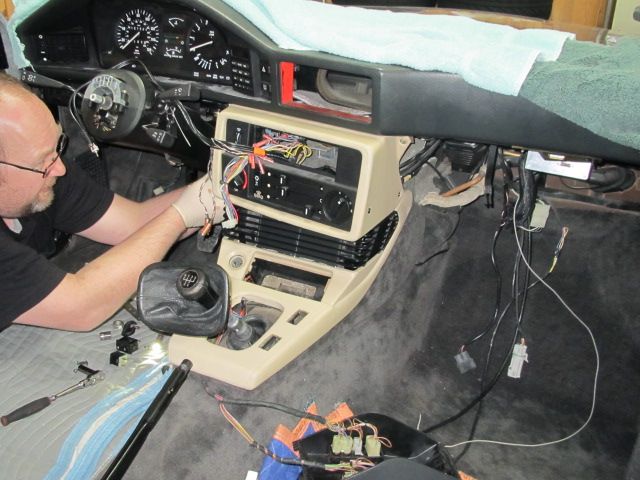
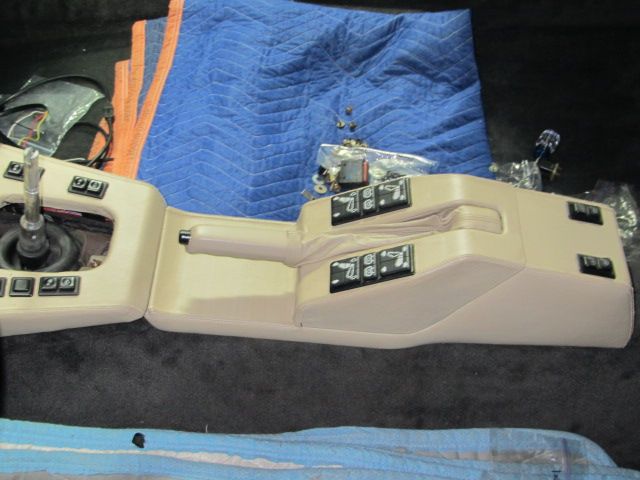
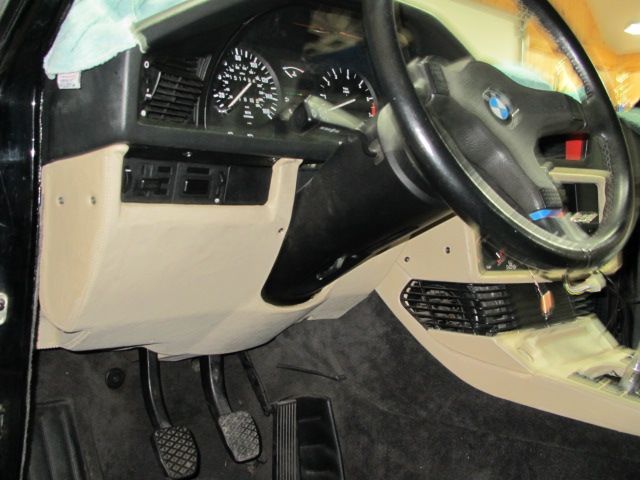
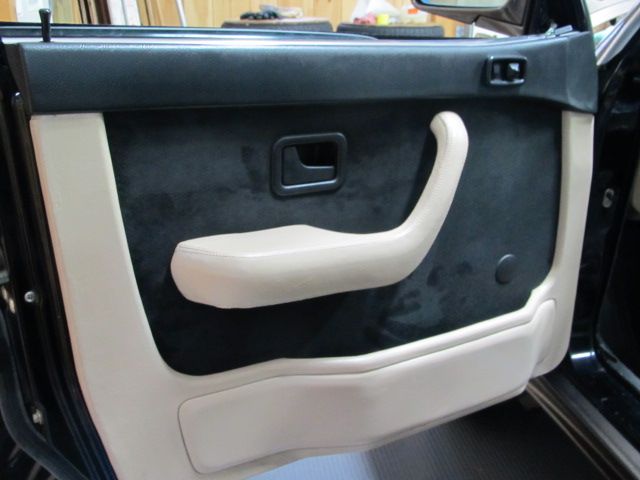
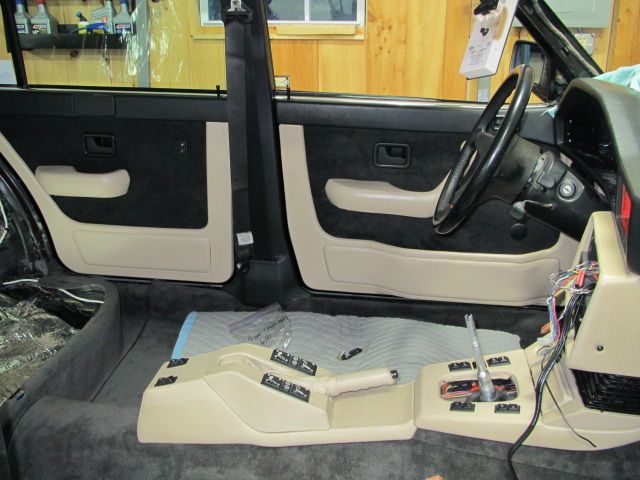
Made more progress on the car yesterday with my friend Steve leading the way. We worked mainly on the lower dash and center console area, but also got the doors together. The biggest issue and time sync is finding all the right fasteners, screws, etc., located in the plastic sandwich bags full of such items It took more time than we thought, as the leather covered M5 parts didn't obviously come out of this car and the fitment was therefore a bit of a challenge on some parts. We were unable to install the glove box, as I can't seem to find the hinge for it... I'll continue the search for that part this week or find a used one for sale.
Additionally, we installed the e-brake handle assembly that was missing many of it's parts, but, thanks to "ahab" bringing me a complete one last week (he was skiing in VT and swung by to drop it off. Thanks Aaron! ...the Mye28 family at its best. ) we were able to get it together and put it in the car.
We also solved the windshield washer tank issue (the standard one wouldn't fit, as the pump for the inter-cooler sits in the space where the bottom half of the tank needs to go. Originally I was going to cut the old one up and try to make it smaller, then plastic weld it...but, that idea didn't pan out. So, a few weeks ago I was doing something in the engine bay of the Alpina and noticed that it's washer tank was a dual tank with a small and separate upper one, I decided that since it was a little discolored and the lower mounting tab was broken anyway, to order a new one for the Alpina and simply cut the small upper tank off the old one and use it on the project 535... voila!! It fits fine, and probably only holds a pint, but will serve the purpose. We'll fab-up a brace it at the bottom of the tank to keep it from sliding down, and we'll need to mount the pump externally... both should be no problem.
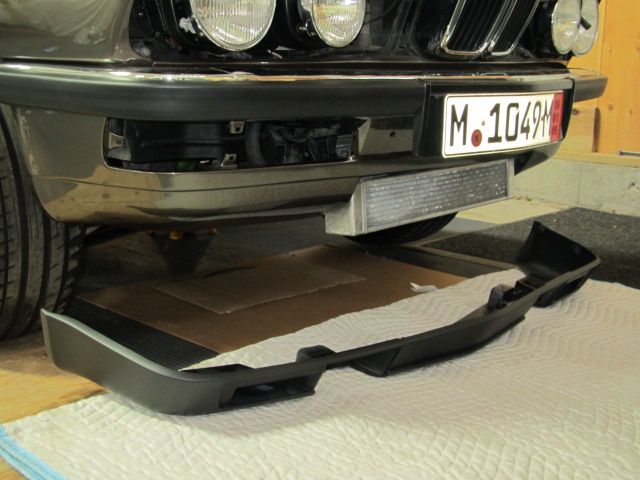
Additionally, we did a fitment test with the euro M5 lower valance and determined exactly what needs to done to the positioning of the inter-cooler radiator. Steve will fabricate some small brackets that will allows us to move it up and angle it slightly (top tilted forward) so it is at a similar slope as the bottom of the metal apron. Then the M5 euro valance should completely hide it and the center openings in the valance will provide the needed air flow.
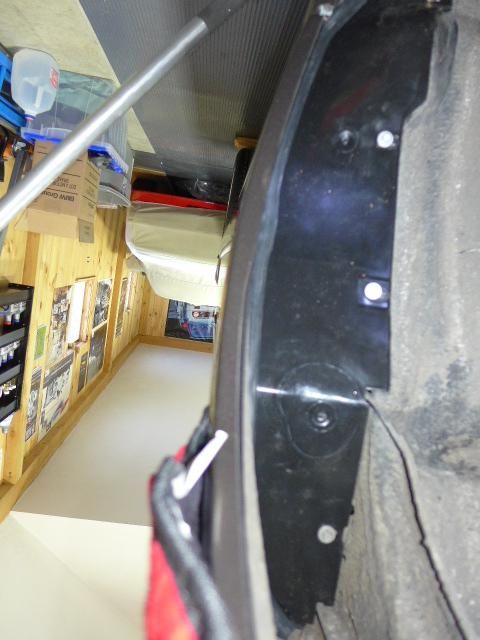
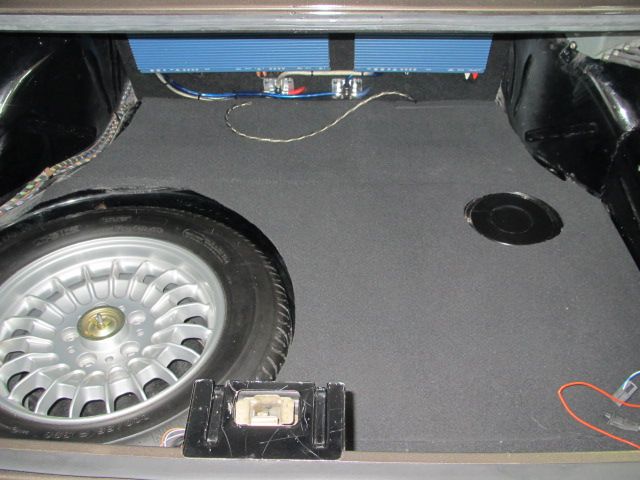
Last week, I also glued down some 3/8" dense foam on the trunk floor that I had cut out earlier. It replaces the nasty material that was originally on the trunk floor that I had scraped off during de-constuction. It came out pretty nice, so this week I'll be putting all the trunk carpet pieces back in place. I'll also be putting the brighter and additional bulbs in the tail-light assemblies this week, so I can then button the trunk area up completely
Next steps will be to finish the interior install, e.g., all seats, pillar trim panels, overhead trim panel, shift boot & knob, gauges set, etc. Then fit and install the lower front valance and a number of other small things that I'm sure I'm currently forgetting
Here are some pictures of yesterday work.
-RoyW
]

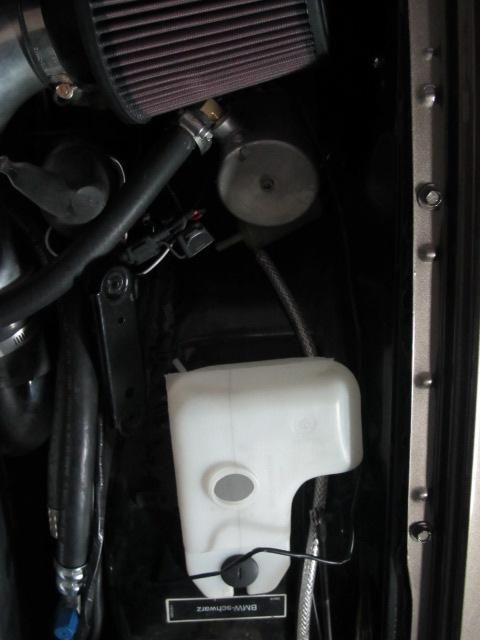
Here the new washer tank installed in the Alpina. The little upper tank is what I cut off the old one and the installed in the 535

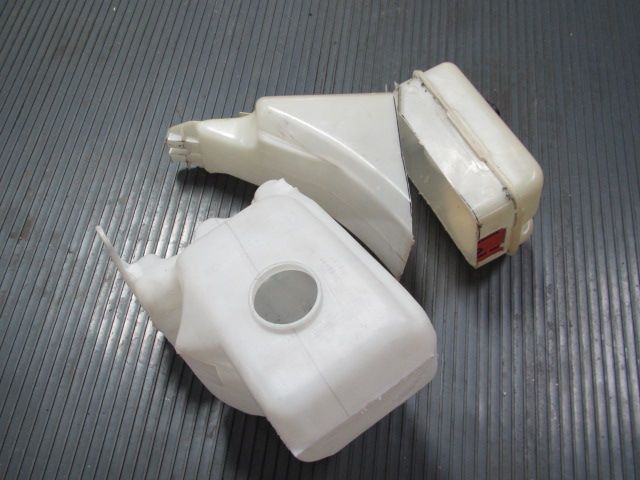
Here is the original tanks I cut up. The original one from the 535, which I was going to try to make a small version of, and the one out of the Alpina after I cut the small tank off it
Additionally, we installed the e-brake handle assembly that was missing many of it's parts, but, thanks to "ahab" bringing me a complete one last week (he was skiing in VT and swung by to drop it off. Thanks Aaron! ...the Mye28 family at its best. ) we were able to get it together and put it in the car.
We also solved the windshield washer tank issue (the standard one wouldn't fit, as the pump for the inter-cooler sits in the space where the bottom half of the tank needs to go. Originally I was going to cut the old one up and try to make it smaller, then plastic weld it...but, that idea didn't pan out. So, a few weeks ago I was doing something in the engine bay of the Alpina and noticed that it's washer tank was a dual tank with a small and separate upper one, I decided that since it was a little discolored and the lower mounting tab was broken anyway, to order a new one for the Alpina and simply cut the small upper tank off the old one and use it on the project 535... voila!!
Additionally, we did a fitment test with the euro M5 lower valance and determined exactly what needs to done to the positioning of the inter-cooler radiator. Steve will fabricate some small brackets that will allows us to move it up and angle it slightly (top tilted forward) so it is at a similar slope as the bottom of the metal apron. Then the M5 euro valance should completely hide it and the center openings in the valance will provide the needed air flow.
Last week, I also glued down some 3/8" dense foam on the trunk floor that I had cut out earlier. It replaces the nasty material that was originally on the trunk floor that I had scraped off during de-constuction. It came out pretty nice, so this week I'll be putting all the trunk carpet pieces back in place. I'll also be putting the brighter and additional bulbs in the tail-light assemblies this week, so I can then button the trunk area up completely
Next steps will be to finish the interior install, e.g., all seats, pillar trim panels, overhead trim panel, shift boot & knob, gauges set, etc. Then fit and install the lower front valance and a number of other small things that I'm sure I'm currently forgetting
Here are some pictures of yesterday work.
-RoyW
]


Here the new washer tank installed in the Alpina. The little upper tank is what I cut off the old one and the installed in the 535


Here is the original tanks I cut up. The original one from the 535, which I was going to try to make a small version of, and the one out of the Alpina after I cut the small tank off it


-
CubbyChowder
- Posts: 7
- Joined: Feb 28, 2014 12:54 AM