

Ok, so the harvested resistor ohmed out to spec. Removal of the firewall cover confirmed my suspicions. The lower middle screw , the PITA behind the head was missing. Also the left blower housing cover was adrift. I was following the unknown mechanic again. The Behr blower motor was in bad, but not terminal condition. The right side bushing had seized to the shaft and was spinning in its retainer. More on this later. With difficulty, I freed the resistor array.
Ohming it out showed the low speed resistance at .5 ohms instead of the specced 2.5 ohms. This puzzled me, how can a ni-chrome wire resistor fail partially? I rigged a bench test using a battery charger as power source. Because I'm an idjit, I rigged the circuit backward.with the resistor on the hot side instead of to ground. When I plugged in the charger, nothing happened. I dug out the ETM, and located the relevant digram, 6413-0. I rigged the circuit properly and discovered that my harvested resistor pack was behaving exactly like the original. .5 ohms . not the expected 2.5 WTF!
Then I noticed the contact points in parallel to the resistor were closed on the 2.5 and open on the still functioning .75 ohm medium speed. Well duh, that is just what fig. 6413-0 shows."safety switches CLOSE when resistors over heat." Not open, like a thermistor or a circuit breaker, but closed to create a shunt around the resistor Those effen elves. Not only is this cheap ass approach counter-intuitive, it masks the real problem in the circuit, ie, the sick motor. They built in a partial safety that basicly just moves the problem to a different location. The 1/2 ohm drop at the points, combined with a sick motor. allows the motor to drag along. appearing to function almost normally..This explains the melted plastic around the contacts so common on fuses 14 and 17. I had suspected a similar scenario re fuse 17 and the aux fan, but this finding confirms it for me. It aint the fuse contacts fault. The fix was simple, I opened the points and they stayed open
Back to the real culprit. I freed up the seized bushing. I clamped the motor in my vise by the shaft and started to prick punch the bushing retainer to secure the errant bushing. The 3rd hit, sheared the shaft off in the vise . Dumbass, had I clamped the motor housing instead, I prolly coulda saved it. So that ended that. I dug out a re- lubed AC motor and pressed it into service. 1st try, and the right squirrel cage was rubbing. I pulled the blower and checked the outside measurement. 11 3/16 " Wide by an 1/8 A few taps with a plastic hammer closed the span to 11 1/16. Perfect.
The fuse box is in good working order. I previously took pains to re-lube the aux fan motor and it draws nowhere near the 25 amps the fuse allows for. Today's voyage of discovery makes me confident that it will remain good for some time.
External links now open in a new browser tab - turn this off in your UCP - Read more here.
Htr Blower resistors, Part II
The heat blower has been the most annoying part of the 2 e28s i had owned. I cant even count high enough to count the times ive had it in and out. Then my dad finally killed it when i SPECIFICALLY told him not to over use it. So what does he do, let the car warm up for 25 mins every morning on full speed.
Find a AC motor and swap the cages. Soak the bushings in oil whilst the cages are off. It will love you long time. Ive been running a re-lubed AC motor in the Borman6 for about 6 yrs nowPat wrote:The heat blower has been the most annoying part of the 2 e28s i had owned. I cant even count high enough to count the times ive had it in and out. Then my dad finally killed it when i SPECIFICALLY told him not to over use it. So what does he do, let the car warm up for 25 mins every morning on full speed.
-
fission_chips
- Posts: 54
- Joined: Feb 12, 2006 12:00 PM
Resistor in heater box?
Hey, a:
Your post on your blower motor troubleshooting is quite good but I can't locate this component, the "heater blower resistor." Did you have to discharge the AC like Bentley says? I'm new at this one and have replaced the blower motor, AC switch and fuse 14, which contacts were a little melty. This is on a 1986 524td.
Do I have to do some major digging to get to this thing (open heater box)? Did you have the engine out when you were doing this? Was your AC discharged already? I appreciate any answers you could give me; I've done a lot of searching here and in my manuals prior to asking about this. Thanks in advance.
Mike
-
stuartinmn
- Posts: 9593
- Joined: Feb 12, 2006 12:00 PM
- Location: Minneapolis
Re: Resistor in heater box?
Getting to the heater blower resistor pack is fairly simple. You have to remove the heater blower, which is accessed through that panel on the firewall under the hood. Once the blower is out of the way, the resistor pack should be right there behind it.fission_chips wrote:Hey, a:
Your post on your blower motor troubleshooting is quite good but I can't locate this component, the "heater blower resistor." Did you have to discharge the AC like Bentley says? I'm new at this one and have replaced the blower motor, AC switch and fuse 14, which contacts were a little melty. This is on a 1986 524td.
Do I have to do some major digging to get to this thing (open heater box)? Did you have the engine out when you were doing this? Was your AC discharged already? I appreciate any answers you could give me; I've done a lot of searching here and in my manuals prior to asking about this. Thanks in advance.
Mike
I think there's an article in the tech FAQ section about removing the blower, or it should be in your service manual.
-
Nebraska_e28
- Beamter

- Posts: 9081
- Joined: Apr 13, 2006 11:18 PM
- Location: Council Bluffs, IA
- Contact:
NE, take a measurement of the outside to outside span of the cages. It should be about 11 1/16" Carefully twist 'em off. One will come off , then clamp that shaft in a vise with the motor horizontal not vertical. I found out which plane was correct when I set it vertically. and punched myself in the nose with the fan when it let go.Nebraska_e28 wrote:I'm going to give the "oil soak" thing a try on my blower motor and to see if it can be rejuvenated this weekend! Thanks!
-
Nebraska_e28
- Beamter
- Posts: 9081
- Joined: Apr 13, 2006 11:18 PM
- Location: Council Bluffs, IA
- Contact:
Could you describe your soon to be patented 'soaking' process. Just as there is good technique to developing moonshine, I'm sure there is an effective method to this as well! Thanks again!a wrote:NE, take a measurement of the outside to outside span of the cages. It should be about 11 1/16" Carefully twist 'em off. One will come off , then clamp that shaft in a vise with the motor horizontal not vertical. I found out which plane was correct when I set it vertically. and punched myself in the nose with the fan when it let go.Nebraska_e28 wrote:I'm going to give the "oil soak" thing a try on my blower motor and to see if it can be rejuvenated this weekend! Thanks!
It isnt my creation. I got the idea from Ron Webster
My latest refinement is to use a 12 oz clear plastic bottle with the top cut off it. Place the motor in it to note where to fill it so that that the bushing is immersed in oil, Best is a light machine oil suitable for electric motors. Power steering fluid is ok
. I cut it with Marvel Mystery Oil. ATF should be fine too.
What you are trying to do is to re-lube the sintered bronze bushings with oil. The bushings are porous and will absorb it. Also there is a felt washer that holds a good amount of oil. I'm sure the factory prolly used some pressure to aid the process, but an over night treatment to both bushings has lasted 6 yrs so far.
-
Nebraska_e28
- Beamter
- Posts: 9081
- Joined: Apr 13, 2006 11:18 PM
- Location: Council Bluffs, IA
- Contact:
Perhaps this is another ingenious manifestation from the collective & creative e28 minds? We should have a little black book of all the tricks that have been devised!RonW wrote:I honestly don't remember suggesting that. All I do is dribble oil on the bushings once in a while.a wrote:It isnt my creation. I got the idea from Ron Webster
-
fission_chips
- Posts: 54
- Joined: Feb 12, 2006 12:00 PM
Hmmm
OK. This thread has become completely hijacked. I've got a brand new motor and I'm looking for the devices in the title of this thread, "Heater Blower Resistors." Not looking for a blower motor lube clinic. 
I took pictures and will post them: I may even give a cash award to anyone who can SEE the resistors in the picture.
Suffice it to say, in the 524td blower motor compartment there are NO RESISTOR PACKS. I followed the wire through the mounting tray and then followed it from the selector switch on the dash. It is WAY the hell up inside the dash/heater box.
I'll post pics to show this. Sure wish this was easier.
Also: why is everyone so intent on breathing all of these various lube fumes? This blower fan blows everything right into the interior - why hasn't anyone mentioned they would rather breathe FRESH, CLEAN air from their blower motors? I'm chemically sensitive, so 200 bucks for a new, balanced fan is not unreasonable. Some may evaporate, but this seems to be a procedure for purposely dosing yourself with solvent fumes until the entirely evaporate. Yuck.
This is not easy on the 524td. I'm going to button it up and forget about it until I can learn how to take the damn dash out. Hard to see any other way on this. I'll do this to my parts car first. This has to be the most boneheaded design quirk I've found on this damn car. Amazing something this simple is so difficult, but the thing is, these blower motors are practically sitting outside they are so exposed to the elements. Not something I'd expect to run forever.
Mike
fission chips, I love the smell of MMO.  The resistor pack is in the plenum under the htr blower motor. With the blower removed , it is in the space directly under the blower. you can feel the housing , its full of holes like a cheese grater. I t is clipped in some how. I would expect the 524 to have the same set up. This is the heater fan, which is accessable from the engine bay. I have no clue where the pack for the AC fan lives.
-
fission_chips
- Posts: 54
- Joined: Feb 12, 2006 12:00 PM
Thanks
Hey, a:
OK. This is adds up to maybe the td being different. I can't see anything resembling what you've described. The black plastic housing that the motor is strapped to is solid. No holes/perforations and mounted in a fashion that I can't pry apart.
Here's more: the leads from the blower motor run directly into the plastic housing. Reaching around and feeling the length of the wire, it continues far into the dash. No solid state devices of ANY kind near this motor. It appears to be down inside.
I am hoping that by buttoning it back up I can make any loose contacts good again. I imagine that the slightly melted plastic would indicate that temps climbed enough to possibly trip these resistors in the shorted fashion you discovered.
I have taken pictures of the blower compartment sans resistors and will post them in a little bit to show this. I'm pretty burned-out on this as you can imagine. I really appreciate your answering my question, though!
best,
Mike
You cannot get to the resistors without removing the blower Then you reach behind and down into the ducting. I found it with my fingertips before I realized what it was. And it lides in and out of a slot. It was a pita to get out and I gave up trying to reinstall it. I left it dangling. The leads from the switch and the motor meet at it. The resistors are on the ground side of the motor leads
I cant see why a 524 would have a different HVAC than a gasser. Is yours a Behr or a Sofica, unit? Maybe that is the issue. I have a Behr.
I cant see why a 524 would have a different HVAC than a gasser. Is yours a Behr or a Sofica, unit? Maybe that is the issue. I have a Behr.
-
fission_chips
- Posts: 54
- Joined: Feb 12, 2006 12:00 PM
OK. . . .
Hey:
OK. This makes sense in that this matches up with the ETM: the wire from the blower goes directly to this resistor pack - the connections I'm seeing under the dash are connected to interstitial wires. So your suggestion of the "fingertips" may actually make the difference here (!) I hope I have enough slack in the lead to pull it out; it is really down in there. . .
It's chilly out but it's in the garage so I've got to go give this another look. This is a moment where small hands would help a ton!
Thanks, your help is really appreciated.
Mike
PS I forgot to add that this was a Behr system.
-
fission_chips
- Posts: 54
- Joined: Feb 12, 2006 12:00 PM
Wow!
Holy crap!
I got it out! You are right - your description was perfect! The perforations gave it away. It is extremely corroded and was difficult to get off of the connectors, but it hasn't done its little bypass trick. . . It really is pretty rusty so I think I will replace it. I really paid attention to how it is mounted in there and I'll give it a shot at re-seating a new one.
I will post a pic in a day or two of this stuff. This was a really tricky part to remove as I couldn't see it at all. The key was to look DIRECTLY under the center of the motor mount, NOT where the leads went, off to the passenger side.
Thanks again for your description, a; clearly, I needed it broken down for me. I have to admit that this was a real puzzler and I'm no stranger maintenance work of all kinds. I'm pretty stoked to have accomplished this! Banana time!
Mike
Re: Wow!
I had the advantage of being able to play with an engineless hulk. > Even so, I NEVER would have found it if Stuart in MN had tipped me off. After bench testing the pack with a blower hitched to it, I understood why it is in such an awkward spot. It needs a constant airflow to keep it from melting. The rust is a result of it heat cycling As long as the resistors are intact and the contact points in the shunts are OPEN ,it is a functional unit.fission_chips wrote:Holy crap!
I got it out! You are right - your description was perfect! The perforations gave it away. It is extremely corroded and was difficult to get off of the connectors, but it hasn't done its little bypass trick. . . It really is pretty rusty so I think I will replace it. I really paid attention to how it is mounted in there and I'll give it a shot at re-seating a new one.
I will post a pic in a day or two of this stuff. This was a really tricky part to remove as I couldn't see it at all. The key was to look DIRECTLY under the center of the motor mount, NOT where the leads went, off to the passenger side.
Thanks again for your description, a; clearly, I needed it broken down for me. I have to admit that this was a real puzzler and I'm no stranger maintenance work of all kinds. I'm pretty stoked to have accomplished this! Banana time!
Mike
-
fission_chips
- Posts: 54
- Joined: Feb 12, 2006 12:00 PM
Aha! I knew it! You didn't have a damn engine in the way!!!
This is what was required to access this part:
1.) Place left foot on ground on front passenger corner of car.
2.) Swing right leg out and over the engine bay
3.) Both arms extended above my head, now looking like I'm trying to fly into the windshield. . .
4.) Using BOTH HANDS, insert into each side of the blower duct openings. . .
5.) Using fingertips to recognize the perforations, gasp and then try imagining how in the world it is going to come out.
6.) Wiggle in every direction. Continue this with patience.
7.) I believe I pulled it ever-so-slightly forward out of a clip. In inspecting the resistor mount, it appears to slide in ~2/3 of an inch and stop.
I'll take a photo of this little beast and then I think I'll slam it all back together. I'm thinking the connection to the fan selector switch may have been loose and that was the source of the problems. . . I am now doing a major clean-up of the blower compartment - there's about 20+ years of grunge in there.
Thanks again for your help, a; it was exactly what I needed to finish this job. Pulling the blower motor, after several times, becomes like butta. But, boy, that first time is a real joy! I am really surprised to find that this operation is so little-known and virtually undocumented here. With this finished, though, I feel like a real stallionaire. I will be happy to post a few explanatory pics as I can be certain that it will help folks out a TON when they tackle this. Also, it was really nice to see fuse 14's contacts in my second car look perfect - that should be a quick motor swap. Finally, in inspecting this resistor pack, it is an extremely rugged unit and its design appears to back up your assessments completely: that puppy gets hot and it needs some really solid air-flow. Man, this has been interesting!
Hot damn! Thanks again, buddy!!!
Mike
-
stuartinmn
- Posts: 9593
- Joined: Feb 12, 2006 12:00 PM
- Location: Minneapolis
If I recall correctly, I figured out where it was when I took the time to fish some leaves and similar trash out of there while replacing the blower fan. I don't remember that it was that hard to get to, but I do have long arms. 
It is pretty typical on most cars to hide the resistor pack in the ductwork as they do get real hot without airflow over them.
It is pretty typical on most cars to hide the resistor pack in the ductwork as they do get real hot without airflow over them.
-
fission_chips
- Posts: 54
- Joined: Feb 12, 2006 12:00 PM
Heater Blower Motor Resistor Pack pics
Alright. I have a couple of photos that should illustrate where this resistor pack is located and what it looks like. First, a photo that was taken in frustration: an up-close view of the blower compartment:
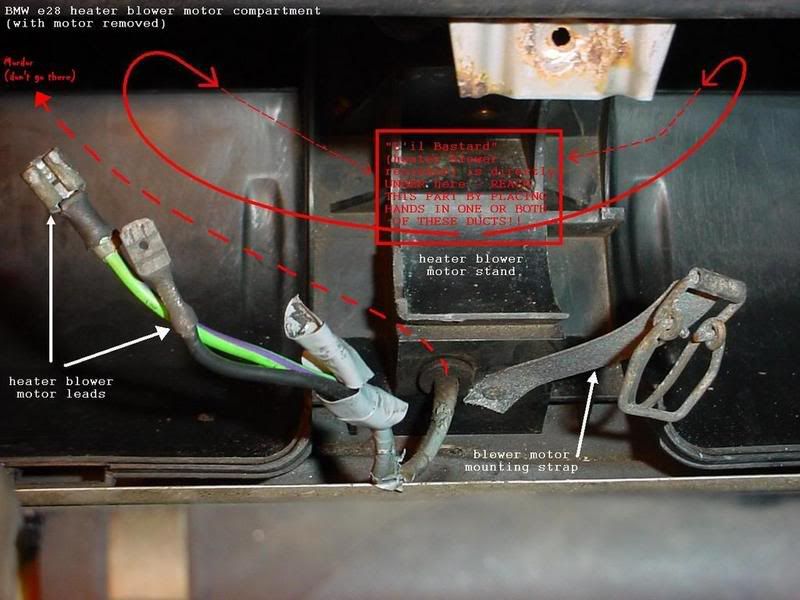
Now a photo of "Li'l Bastard" himself. All captions are capitalized because royalty is a proper noun and this was an absolutely certified royal pain in the ass:
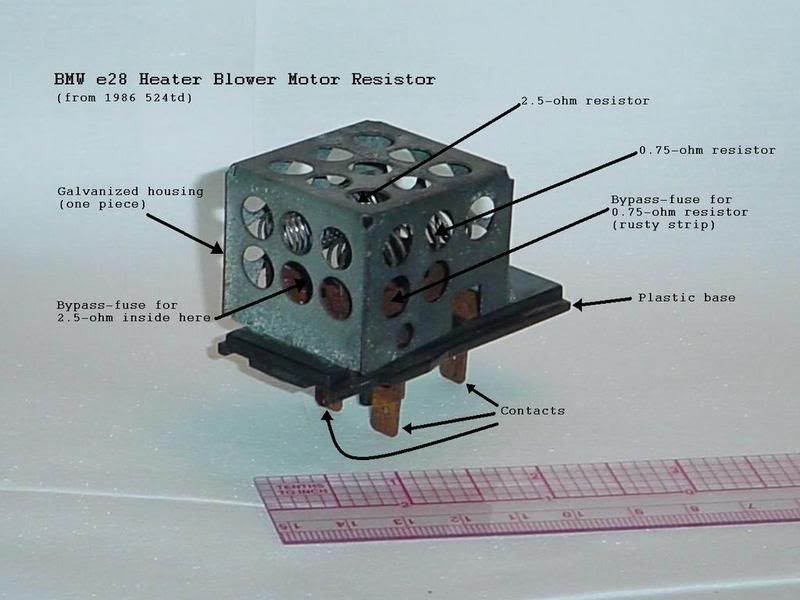
Even though this was not the culprit to my motor woes, my curiosity, and the facts surrounding this issue demanded that I examine this device to rule it out. Thanks for the help with this, everyone.
best,
Mike
Alright. I have a couple of photos that should illustrate where this resistor pack is located and what it looks like. First, a photo that was taken in frustration: an up-close view of the blower compartment:
Now a photo of "Li'l Bastard" himself. All captions are capitalized because royalty is a proper noun and this was an absolutely certified royal pain in the ass:
Even though this was not the culprit to my motor woes, my curiosity, and the facts surrounding this issue demanded that I examine this device to rule it out. Thanks for the help with this, everyone.
best,
Mike
-
Nebraska_e28
- Beamter
- Posts: 9081
- Joined: Apr 13, 2006 11:18 PM
- Location: Council Bluffs, IA
- Contact:
I hope a doesn't mind another brief intercept in this thread. 
I did the oil soak thing on my bearing yesterday and my squeaking is cured. It took a couple of minor adjustments in getting the motor centered so the fans didn't hit, but not too difficult. With the motor out I noticed there is a ton of shaft play 1/4" perhaps. This is not side to side but rather up & down along Y-axis. It's present at both ends of the shaft & I'm wondering if this is normal or are the bearings totally shot? TIA
I did the oil soak thing on my bearing yesterday and my squeaking is cured. It took a couple of minor adjustments in getting the motor centered so the fans didn't hit, but not too difficult. With the motor out I noticed there is a ton of shaft play 1/4" perhaps. This is not side to side but rather up & down along Y-axis. It's present at both ends of the shaft & I'm wondering if this is normal or are the bearings totally shot? TIA
End play, in and out, is ok, when the motor is running , the magnets hold it centered. Up and down, or side play isnt good. When you had the fans off did the bushing bores look oval? The bore should be round. Im having trouble with terms, so I hope this is coherentNebraska_e28 wrote:I hope a doesn't mind another brief intercept in this thread.
I did the oil soak thing on my bearing yesterday and my squeaking is cured. It took a couple of minor adjustments in getting the motor centered so the fans didn't hit, but not too difficult. With the motor out I noticed there is a ton of shaft play 1/4" perhaps. This is not side to side but rather up & down along Y-axis. It's present at both ends of the shaft & I'm wondering if this is normal or are the bearings totally shot? TIA
-
Nebraska_e28
- Beamter
- Posts: 9081
- Joined: Apr 13, 2006 11:18 PM
- Location: Council Bluffs, IA
- Contact:
Very little play in/out. The magnets do hold it center I guess since the cages don't scrape when operating. Up/down/side/side, it has all this.a wrote:End play, in and out, is ok, when the motor is running , the magnets hold it centered. Up and down, or side play isnt good. When you had the fans off did the bushing bores look oval? The bore should be round. Im having trouble with terms, so I hope this is coherentNebraska_e28 wrote:I hope a doesn't mind another brief intercept in this thread.
I did the oil soak thing on my bearing yesterday and my squeaking is cured. It took a couple of minor adjustments in getting the motor centered so the fans didn't hit, but not too difficult. With the motor out I noticed there is a ton of shaft play 1/4" perhaps. This is not side to side but rather up & down along Y-axis. It's present at both ends of the shaft & I'm wondering if this is normal or are the bearings totally shot? TIA