I think I recognize those seats. Those two-tone red and black seats in the pictures were done up here SF at several wrenchfests by someone who was right around 17 at the time. He was really trying it out as an experiment. It looked much better in person. His next project car after that E28 was a Miura so it's hard to question his taste.
Red interior is a polarizing issue. The first time I saw a red interior was in a red on red Ferrari 308. I got to drive this thing and the whole time I was thinking about how bad it looks (I was 22 at the time). 20 years later, I have a red and black M5 now.
The shade of red you choose really makes all the difference. Stick with the darker shades if you're going to cover a lot of the interior in red.
The wiring for the memory seats shouldn't be that hard to figure out. There is member here who drives around with a thermoelectrically cooled memory seat from an Infinity in his Dodge Ram. It took about a day to get it adapted.
External links now open in a new browser tab - turn this off in your UCP - Read more here.
Vlad's Interior Upgrade Thread
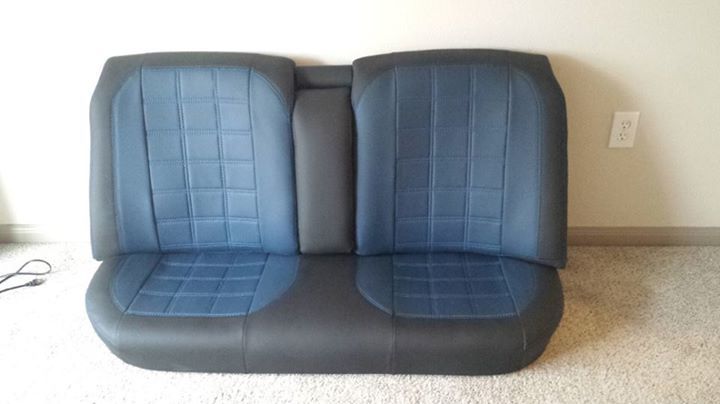
TSMacNeil's old car had the center sections replaced with those from an E34 rear seat. I would suggest going that route versus recovering unless you decide to recover everything.
Devinder, the kid you were thinking of is psportveloce. He sold his car on eBay to help pay for going to Stanford but then his parents saw how sad he was so they cancelled the sale. Buyer was fine with it.
Devinder, the kid you were thinking of is psportveloce. He sold his car on eBay to help pay for going to Stanford but then his parents saw how sad he was so they cancelled the sale. Buyer was fine with it.
-
UveBeenRobd
- Posts: 182
- Joined: Feb 02, 2011 6:03 AM
- Location: Houston, Texas
OP, excuse my rant for a moment but I promise I will interject soem feedback that you may or may not find useful towards your project.
Guys I think some (most) of you lose sight of what owning & customizing/modifying a car is about and why websites like this exsist. I find it ironic that BMW owners are often touted as refined, mature & purists yet judging from a lot of the responses in this thread I sense the same undertones that you can find on non-BMW related forums.
The ability to be opinionated isn't restricted to a make, model or age group because any asshole can have one; as the responses in this thread have clearly demonstrated. However, the ability to give CONSTRUCTIVE CRITICISM without making someone feel belittled, berated or unworthy is a skill that seems to escape a great many of us in the car enthusiast community. The OP didn't ask our opinions on whether we thought he was an idiot, he didn't ask if we thought it would undermine the overall value of his car, heck he didn't even ask if we thought it was thought he should do it. What he did say was that he had made a decision to do it & just wanted some simple feedback on color/pattern ideas he was kicking around. Is it so hard to give recommendations within those parameters without acting like total ass clowns? I find it particularly interesting where some of the replies associated his desired outcome along the lines of a 17 y/o designing an interior; while the reply in itself was something of a 17 year olds response.
Understand that just because it's not something you would do to your car doesn't mean it's distasteful, stupid, trashy or that it makes him/her a 'ricer' or 'non-purist.'What it doesn mean is that they are going a direction with their car to express their own tastes & that should be respected. The fact that they are willing to venture out here & share their ideas & thoughts while seeking little bit of guidance or feedback shouldn't be met with the level of disrespect & immaturity that has been displayed. Grow up & grow the community.
To the OP:
I journeyed down this same path three times already & here are some things that I took away from the efforts:
1. A lot of thought is put into how a car maunfacturer designs the seats aesthetically & functionally. In the 80s mostly everything was straight rigid lines & single color. As enthusiasts it's not really something we think about until we get into it & often times it's too late to turn back so we press on in an effort to refuse defeat. What usually happens is a product that cost 3 times what we had ventured out to do but less pleasing than anticipated. So in my opinion unless you are going with an upholstery refresh/refurb, using stock seats to accomplish a two tone interior proves difficult because the rigid lines of the seats don't lend itself to a fluid transfer of colors. Instead it ends up looking like flat color swatches being forced to lay side by side. One alternative if you insist on using stock seats would be to use a different material to represent the seat centers as this is an age appropriate approach and it actually livens up what you can do with the design while keeping it classy.
2. Avoid a two tone approach to your dash components in an effort to show a connection. However, if your heart is set on it, I'd reccomend keeping the color of the dash the same color as the door card trim pieces so that visually it ties those pieces together and creates a single line from dash to door. I would then tie in the door card color themselves to the color used for the center of the seats.
3. Any quality upholstery shop will be willing to sketch out a few differnt setups using your selected seat. Those are worth it's weight in gold mainly because looking an interior and seat options online can be overwhelming & until you can visulaize your exact seat with selected colors it all looks fantastic.
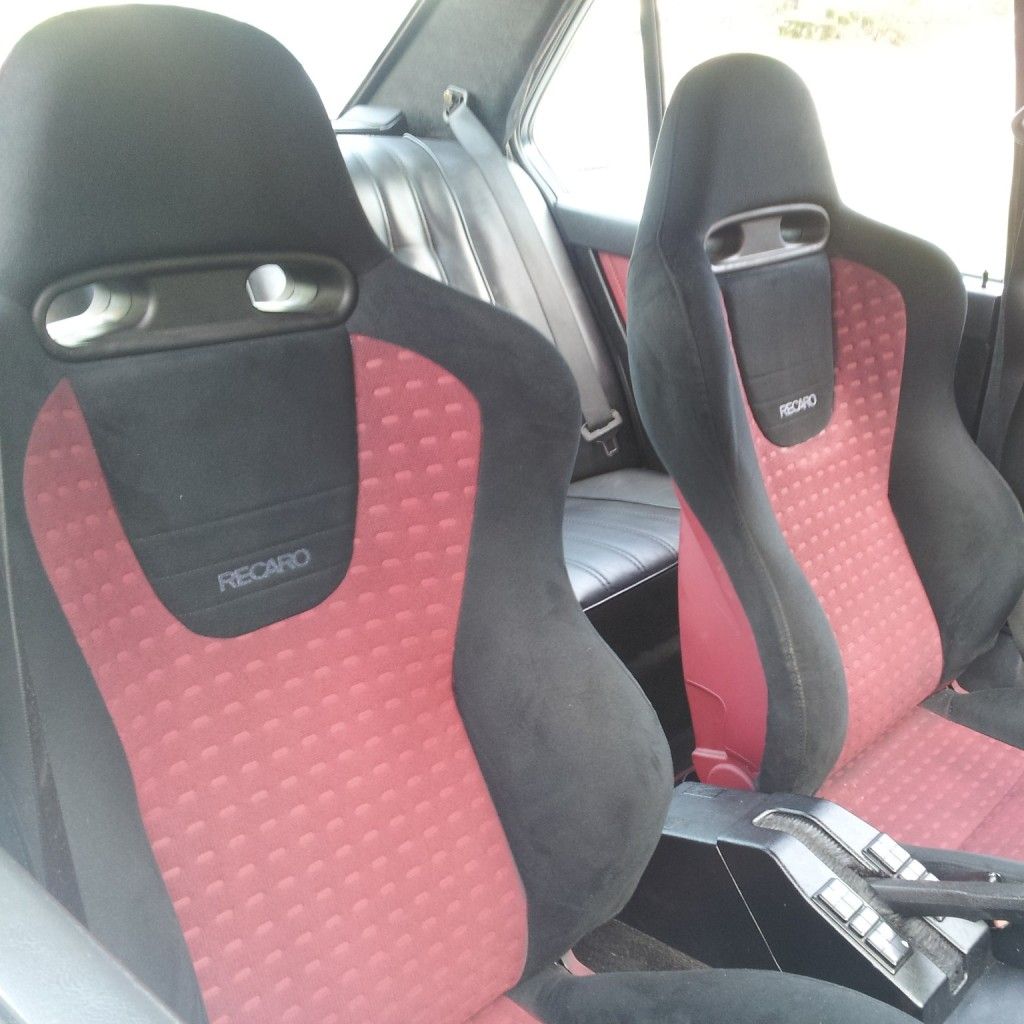
The first picture you posted isn't too bad. The color of red is beautiful but really isn't age or model appropriate to the car. Also, the pattern of the floormats take away from the quality of the seat work & the red carpeting on the door pockets doesn't tie into the carpeting throughout the car. The bottom dash & center console pieces should match or blend instead of contrast. Overall this interior gives me Michael Jackson Thriller video flashbacks...lol
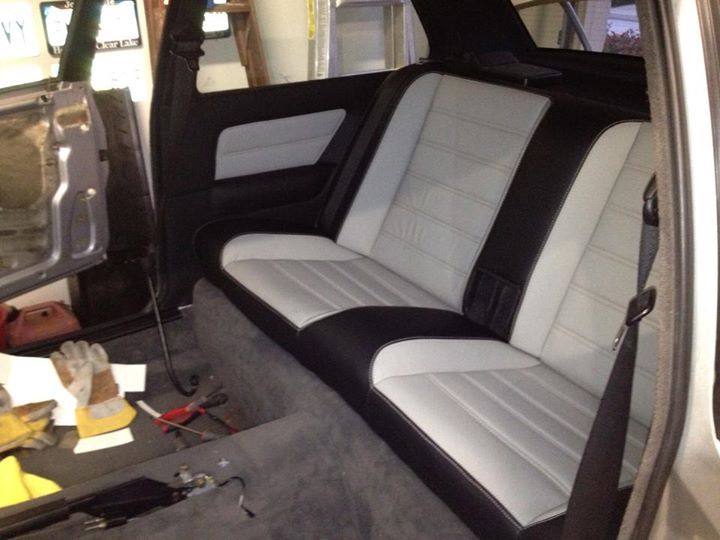
The second picture is spot on with the vintage BMW colors and is a pretty good example of not overdoing the basic two-tone approach. It just flows well for the age of the car.
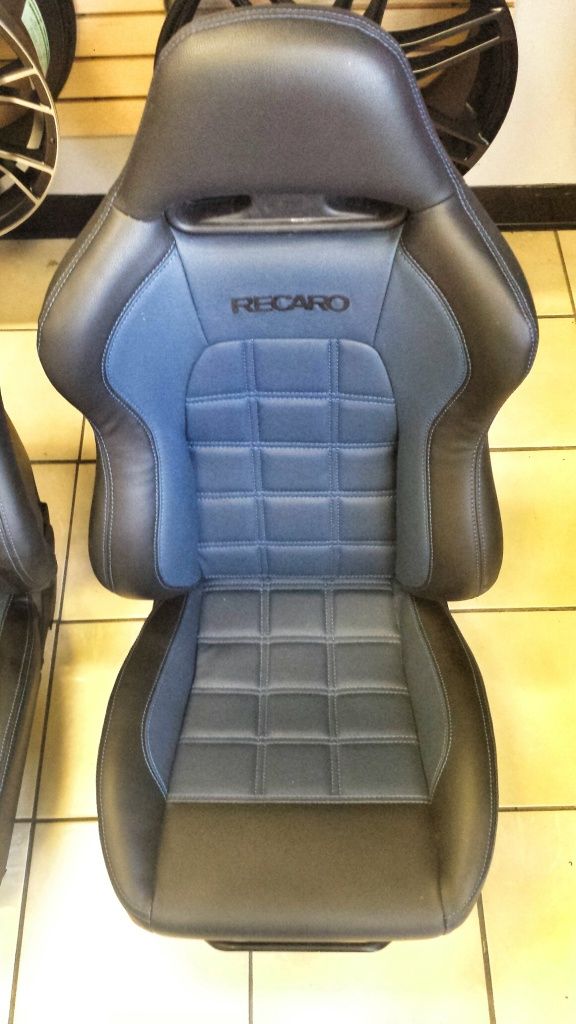
The next batch of pictures, the main issue I see is the random bits of red on the console pieces in an effort to 'tie' it all together. It gives more of a feeling of indecision. In my opinion the seats are good example of what I mentioned above...too rigid of lines to pull off this look, to me it just looks flat.
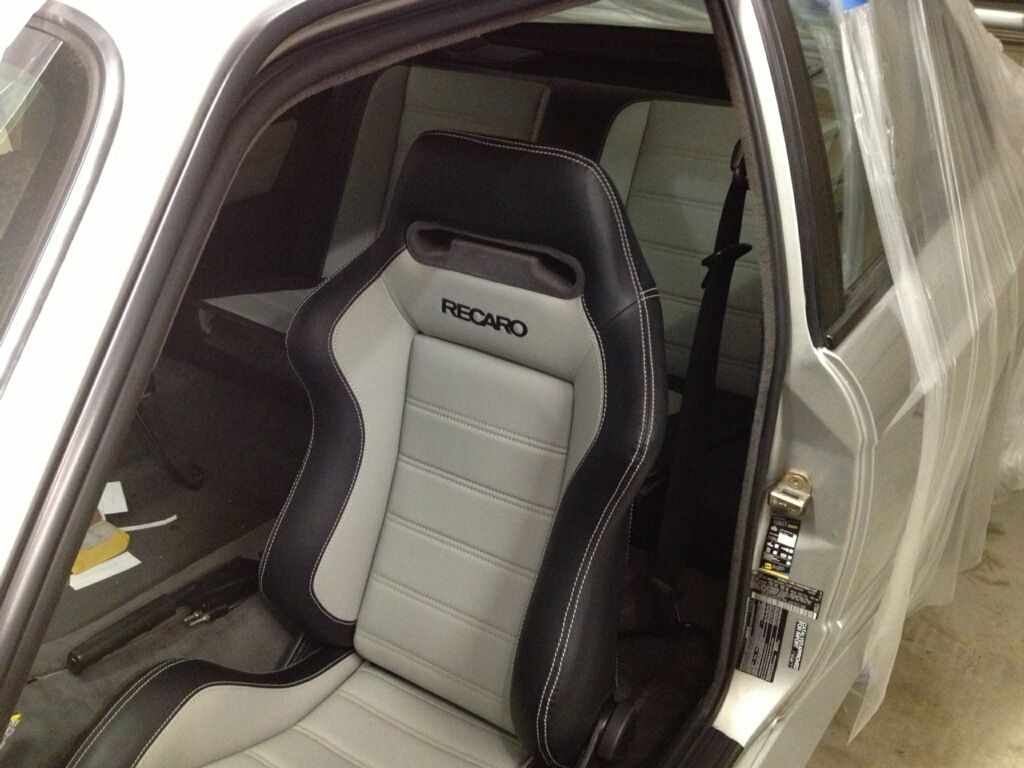
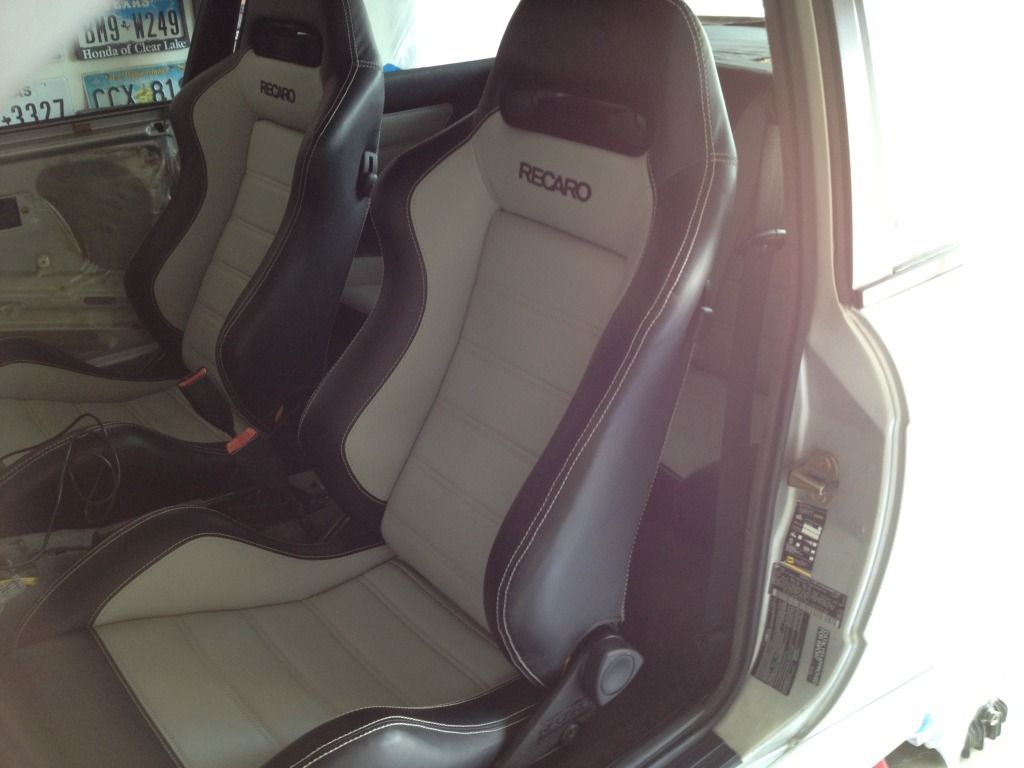
Here are some pictures to lead you in the direction me & my buddy just went with our interior builds that suited what we wanted to accomplish:
His is an E30 M3 with custom done recaro speeds & a stock rear seat:
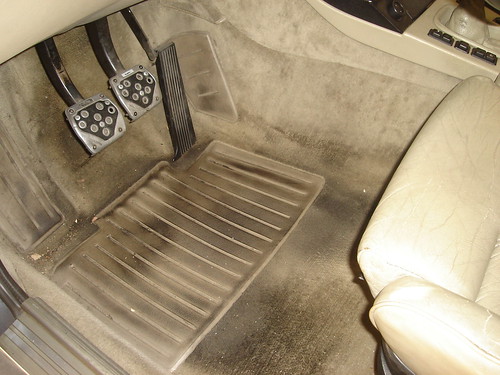
Here is what my interior started as:
Driver side
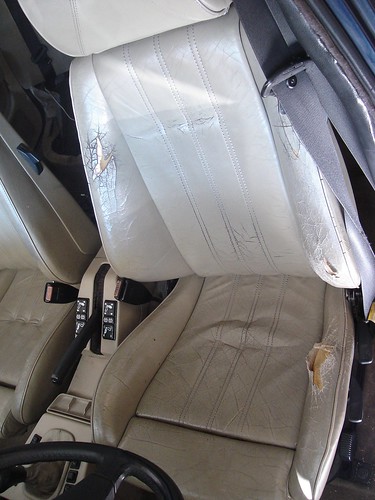
Driver Seat
Driver rear

Passenger rear

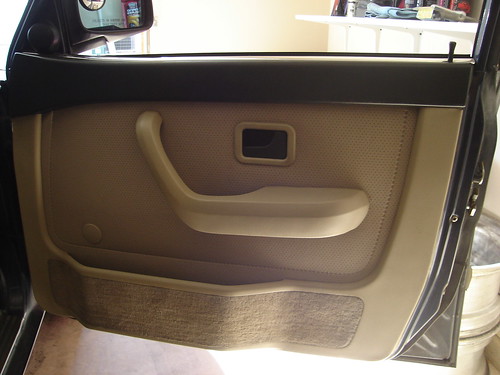
All the door cards are in the same condition which is pretty great. I need to track down some plastic door handle trip trim pieces but nothing alarming.
Here is where I took it:


And this is what is waiting to be put back into the car:

Some food for thought overall. Build your car for you, while we can give you some guidance and feedback at the end of the day you need to be happy with the product as you're the one driving it. I've put a lot of thought into my car build & for as many people that love it, there are that many BMW 'purists' that hate everything about it. Good luck & I hope you can find soemthing of use in what I've shared.
Guys I think some (most) of you lose sight of what owning & customizing/modifying a car is about and why websites like this exsist. I find it ironic that BMW owners are often touted as refined, mature & purists yet judging from a lot of the responses in this thread I sense the same undertones that you can find on non-BMW related forums.
The ability to be opinionated isn't restricted to a make, model or age group because any asshole can have one; as the responses in this thread have clearly demonstrated. However, the ability to give CONSTRUCTIVE CRITICISM without making someone feel belittled, berated or unworthy is a skill that seems to escape a great many of us in the car enthusiast community. The OP didn't ask our opinions on whether we thought he was an idiot, he didn't ask if we thought it would undermine the overall value of his car, heck he didn't even ask if we thought it was thought he should do it. What he did say was that he had made a decision to do it & just wanted some simple feedback on color/pattern ideas he was kicking around. Is it so hard to give recommendations within those parameters without acting like total ass clowns? I find it particularly interesting where some of the replies associated his desired outcome along the lines of a 17 y/o designing an interior; while the reply in itself was something of a 17 year olds response.
Understand that just because it's not something you would do to your car doesn't mean it's distasteful, stupid, trashy or that it makes him/her a 'ricer' or 'non-purist.'What it doesn mean is that they are going a direction with their car to express their own tastes & that should be respected. The fact that they are willing to venture out here & share their ideas & thoughts while seeking little bit of guidance or feedback shouldn't be met with the level of disrespect & immaturity that has been displayed. Grow up & grow the community.
To the OP:
I journeyed down this same path three times already & here are some things that I took away from the efforts:
1. A lot of thought is put into how a car maunfacturer designs the seats aesthetically & functionally. In the 80s mostly everything was straight rigid lines & single color. As enthusiasts it's not really something we think about until we get into it & often times it's too late to turn back so we press on in an effort to refuse defeat. What usually happens is a product that cost 3 times what we had ventured out to do but less pleasing than anticipated. So in my opinion unless you are going with an upholstery refresh/refurb, using stock seats to accomplish a two tone interior proves difficult because the rigid lines of the seats don't lend itself to a fluid transfer of colors. Instead it ends up looking like flat color swatches being forced to lay side by side. One alternative if you insist on using stock seats would be to use a different material to represent the seat centers as this is an age appropriate approach and it actually livens up what you can do with the design while keeping it classy.
2. Avoid a two tone approach to your dash components in an effort to show a connection. However, if your heart is set on it, I'd reccomend keeping the color of the dash the same color as the door card trim pieces so that visually it ties those pieces together and creates a single line from dash to door. I would then tie in the door card color themselves to the color used for the center of the seats.
3. Any quality upholstery shop will be willing to sketch out a few differnt setups using your selected seat. Those are worth it's weight in gold mainly because looking an interior and seat options online can be overwhelming & until you can visulaize your exact seat with selected colors it all looks fantastic.
The first picture you posted isn't too bad. The color of red is beautiful but really isn't age or model appropriate to the car. Also, the pattern of the floormats take away from the quality of the seat work & the red carpeting on the door pockets doesn't tie into the carpeting throughout the car. The bottom dash & center console pieces should match or blend instead of contrast. Overall this interior gives me Michael Jackson Thriller video flashbacks...lol
The second picture is spot on with the vintage BMW colors and is a pretty good example of not overdoing the basic two-tone approach. It just flows well for the age of the car.
The next batch of pictures, the main issue I see is the random bits of red on the console pieces in an effort to 'tie' it all together. It gives more of a feeling of indecision. In my opinion the seats are good example of what I mentioned above...too rigid of lines to pull off this look, to me it just looks flat.
Here are some pictures to lead you in the direction me & my buddy just went with our interior builds that suited what we wanted to accomplish:
His is an E30 M3 with custom done recaro speeds & a stock rear seat:
Here is what my interior started as:
Driver side
Driver Seat
Driver rear
Passenger rear
All the door cards are in the same condition which is pretty great. I need to track down some plastic door handle trip trim pieces but nothing alarming.
Here is where I took it:
And this is what is waiting to be put back into the car:
Some food for thought overall. Build your car for you, while we can give you some guidance and feedback at the end of the day you need to be happy with the product as you're the one driving it. I've put a lot of thought into my car build & for as many people that love it, there are that many BMW 'purists' that hate everything about it. Good luck & I hope you can find soemthing of use in what I've shared.
Last edited by UveBeenRobd on Oct 15, 2013 10:11 AM, edited 3 times in total.
I agree. He should go for the yellow.
Visually, the E28 seats look much better in an E28 than the E34 seats do. Part of it is the design of the seat, particularly the seat back where the headrests meets it. Also, all that plastic around the bottom is stupid. Comfort-wise, the E34 seats are hard to beat. The extra lumbar support is one of the biggest things you notice. That said, I wouldn't go through the trouble of swapping them into an E28 of my own, but I think that if the color treatment is done correctly, these will look pretty good, and be comfortable at the same time.BimmerSultan wrote:^^^Yes. I will also say that I am confident that "I" would still like the e28 seat best, no question.
-
BimmerSultan
- Posts: 1387
- Joined: Dec 17, 2011 8:46 PM
- Location: Wilmington, NC
Can't argue anything there. For me, I'd love to build a nice e32 5-speed with those seats. I'm probably in a small circle of people who still appreciate that chassis quite a bit. Would be a fun car with a mild turbo build, but I digress. Dream ends there for now.wkohler wrote:Visually, the E28 seats look much better in an E28 than the E34 seats do. Part of it is the design of the seat, particularly the seat back where the headrests meets it. Also, all that plastic around the bottom is stupid. Comfort-wise, the E34 seats are hard to beat. The extra lumbar support is one of the biggest things you notice. That said, I wouldn't go through the trouble of swapping them into an E28 of my own, but I think that if the color treatment is done correctly, these will look pretty good, and be comfortable at the same time.
-
m5chaser83
- Posts: 522
- Joined: May 05, 2010 12:29 PM
- Location: san rafael ca
Having an e38 with a manual and wanting to mod it warrants an even smaller group.BimmerSultan wrote:Can't argue anything there. For me, I'd love to build a nice e32 5-speed with those seats. I'm probably in a small circle of people who still appreciate that chassis quite a bit. Would be a fun car with a mild turbo build, but I digress. Dream ends there for now.wkohler wrote:Visually, the E28 seats look much better in an E28 than the E34 seats do. Part of it is the design of the seat, particularly the seat back where the headrests meets it. Also, all that plastic around the bottom is stupid. Comfort-wise, the E34 seats are hard to beat. The extra lumbar support is one of the biggest things you notice. That said, I wouldn't go through the trouble of swapping them into an E28 of my own, but I think that if the color treatment is done correctly, these will look pretty good, and be comfortable at the same time.

-
unt0uchable
- Posts: 2265
- Joined: Jul 21, 2011 8:05 PM
- Location: Rochester Hills, Michigan
- Contact:
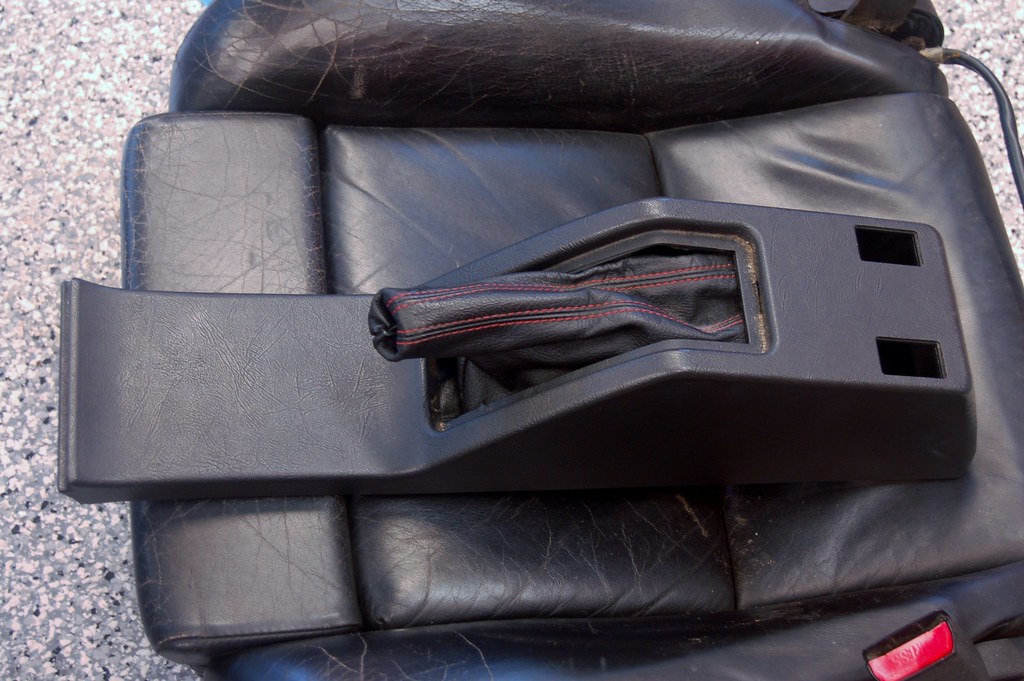
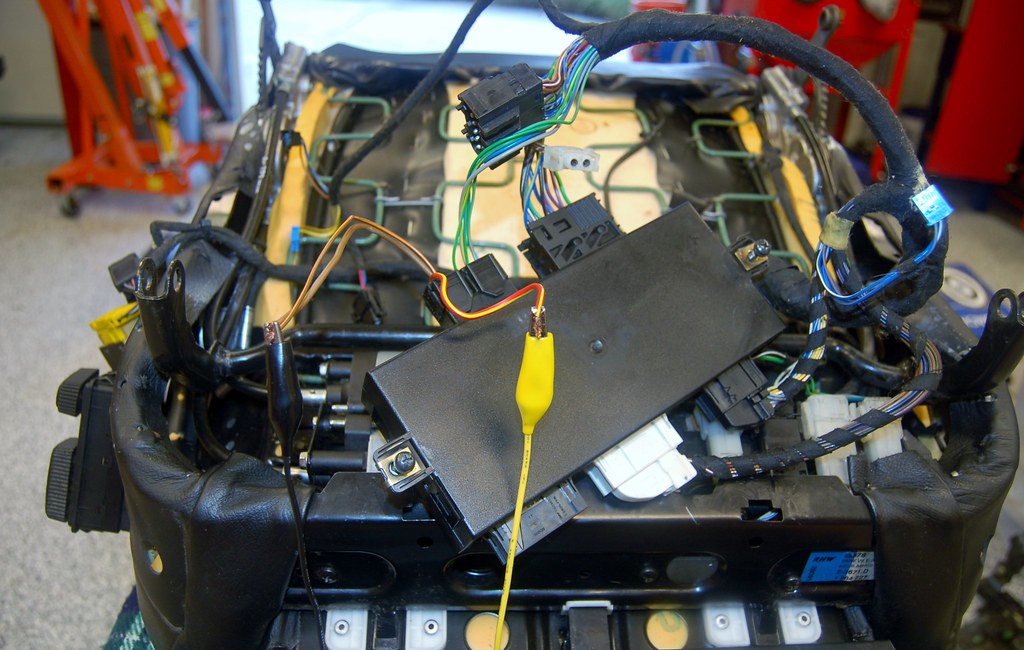
I've not read anywhere that the memory module will just plug in and work. I've got e34 comfort memory seats in mine and I followed this thread here for some install info:
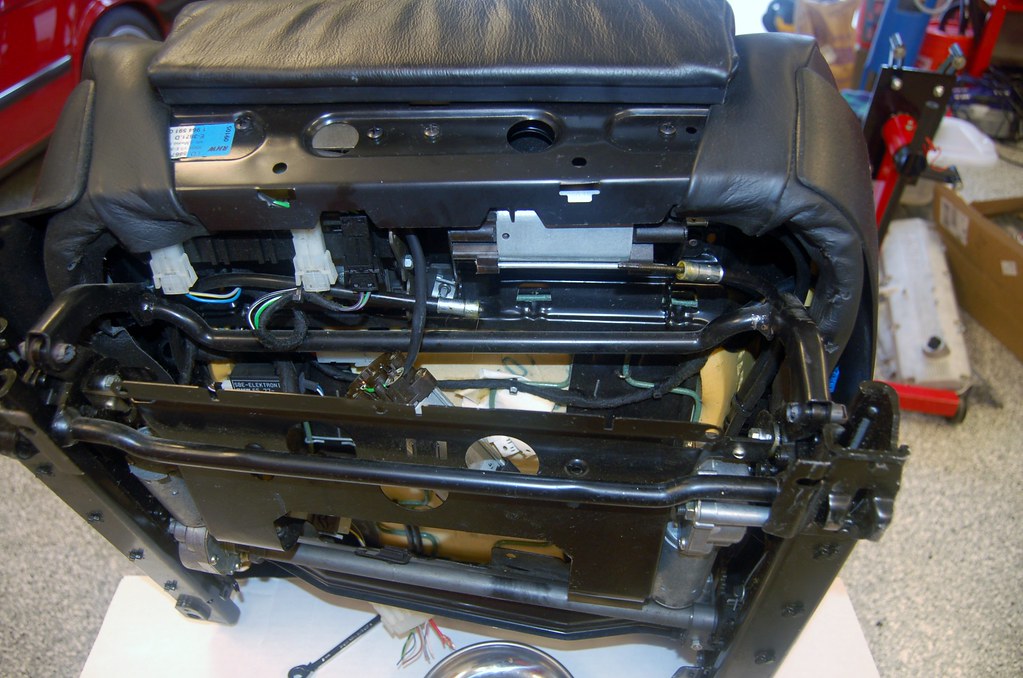
Also, this single photo below helped me with the wiring. That's all it took to get them power. No idea if the memory works with this, but everywhere I have read is saying no...

Also, this single photo below helped me with the wiring. That's all it took to get them power. No idea if the memory works with this, but everywhere I have read is saying no...
That pic is not from an E34 seat.unt0uchable wrote:I've not read anywhere that the memory module will just plug in and work. I've got e34 comfort memory seats in mine and I followed this thread here for some install info:
Also, this single photo below helped me with the wiring. That's all it took to get them power. No idea if the memory works with this, but everywhere I have read is saying no...
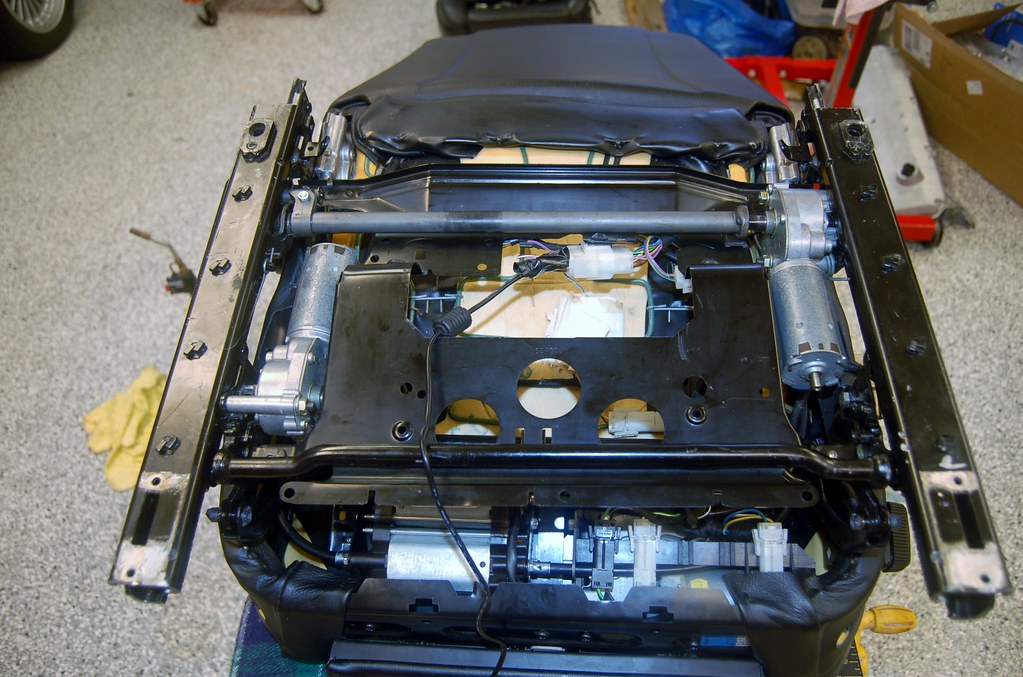
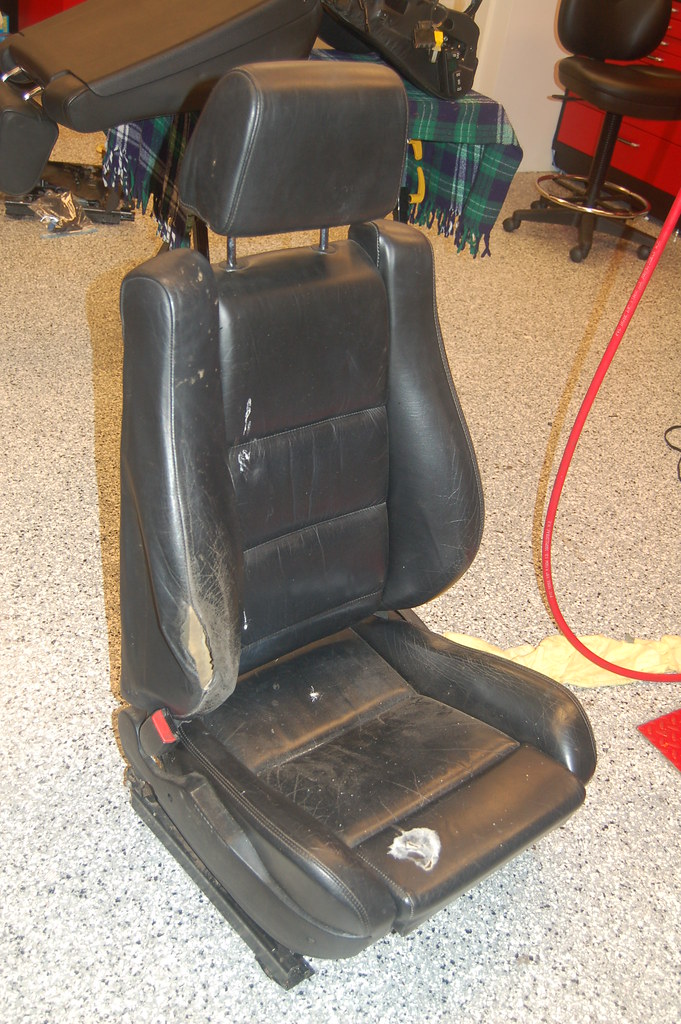
Today I dug into the passenger seat. I figured since it has power I could make progress on it quickly and then I'd have more experience and confidence to deal with the driver's. Note I actually have another set of seats inbound and I plan on restoring both sets to like new condition. I'll keep one set for Vlad (the better pair :-)) and then sell the 2nd one. Given how hard these seats are to find, I'm pretty sure I can recoup a lot of my cost by selling the 2nd set.
The first task to was to fix the twist in the seat. I searched the interwebs and found several Youtube videos that show how to "untwist" E34 seats. Also this link: http://bellsouthpwp.net/m/i/miales/seatcablesfix.htm
It turns out the cluprit are the cables from the motors to the actuators. Over time the rubber/plastic of the cable sheath expands, lengthening the sheath. This causes the inner wire that actually does the work to be too short, pulling out of either the motor or actuator.
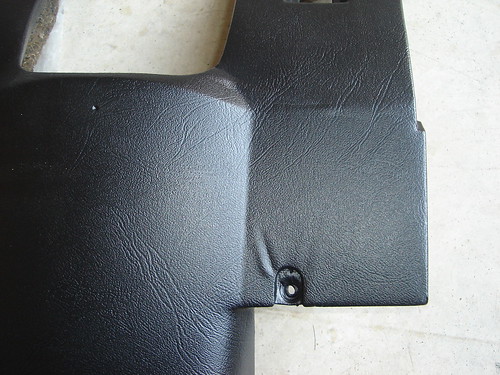
In this picture you can see one of the cables and note that the inner wire is just barely sticking out of the end of the cable. It should be about 1/2 inch.
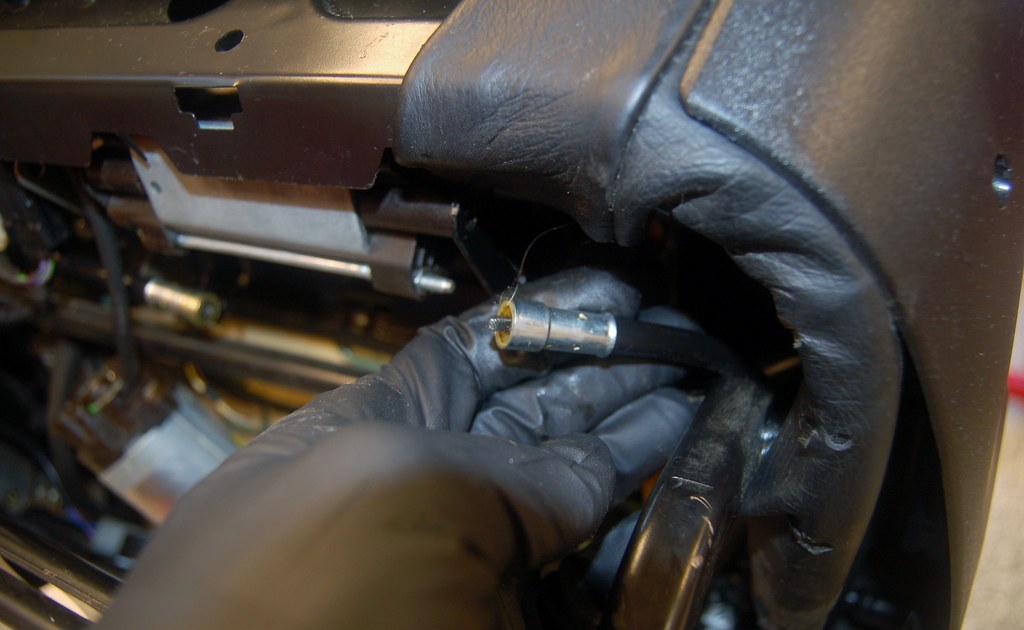
To fix this you have to take the metal sleeve off the end of each cable (at the motor; there are 4 cables under the seat) by heating it up with a torch, cutting the sheath about 3/8". Then you heat back up the sleeve and slide it back on. The hot sleeve slides over the sheath and when it cools and contracts it's tight again.
The hardest part of this job is getting the 8 8mm bolts off of the electric motor mounts so you can pull the cables free. Two of those bolts are hard to reach and it's just tedious. A racheting wrench helps big time.
Once you have the cables fixed you use the seat controls to cause the seat to move back into alignment by leaving one side of the motor disconnected and then the other.
In my case the seat frame actually became bent because of the twisting and while I was able to straighten it some by sitting on the seat in the garage it won't go completely straight until I install it in the car and bolt it down.
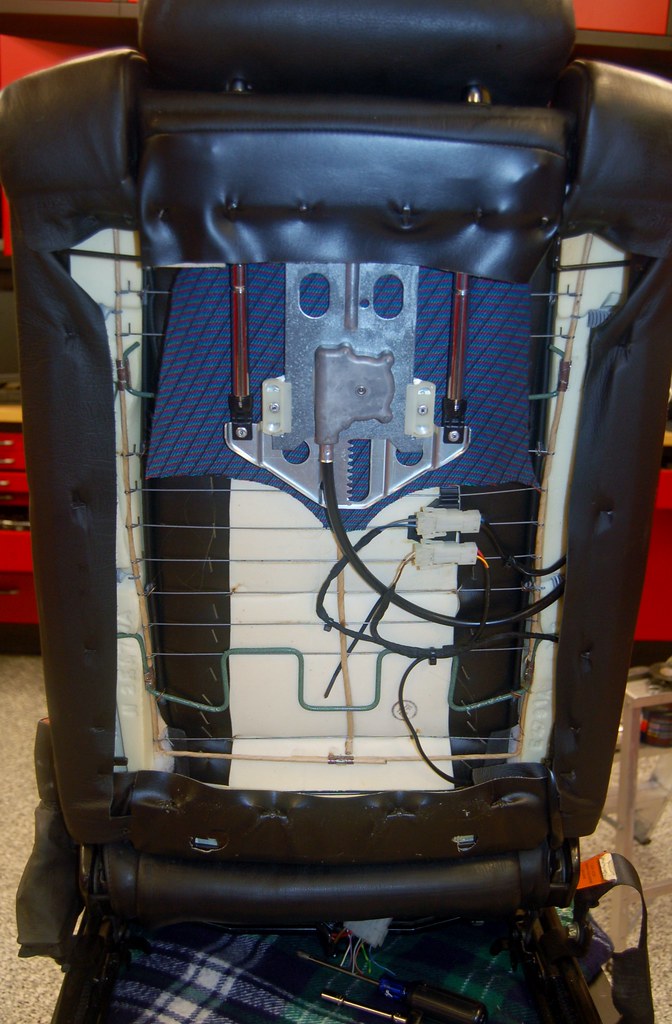
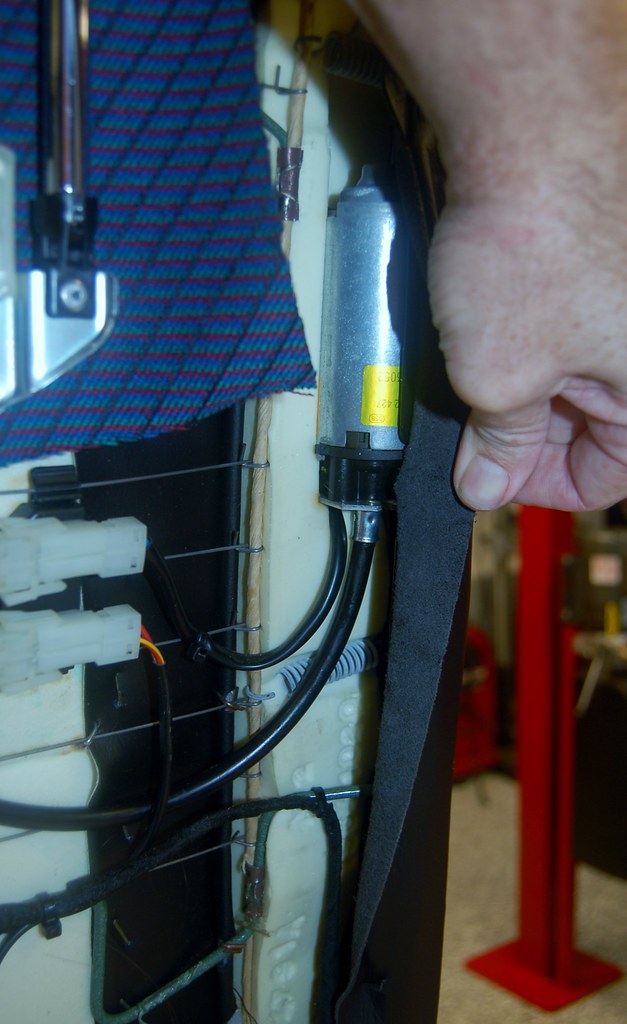
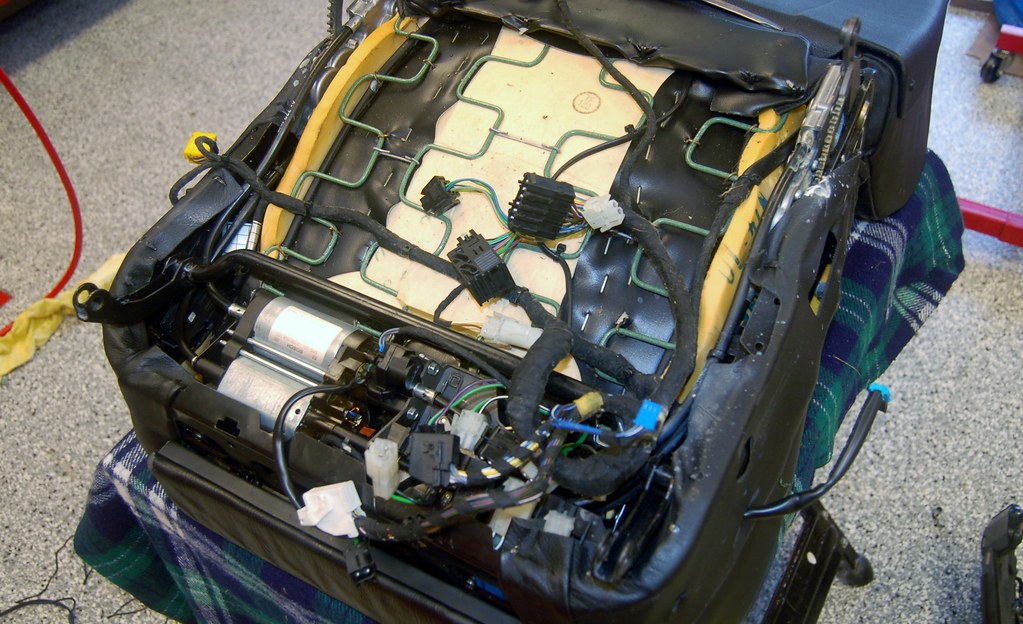
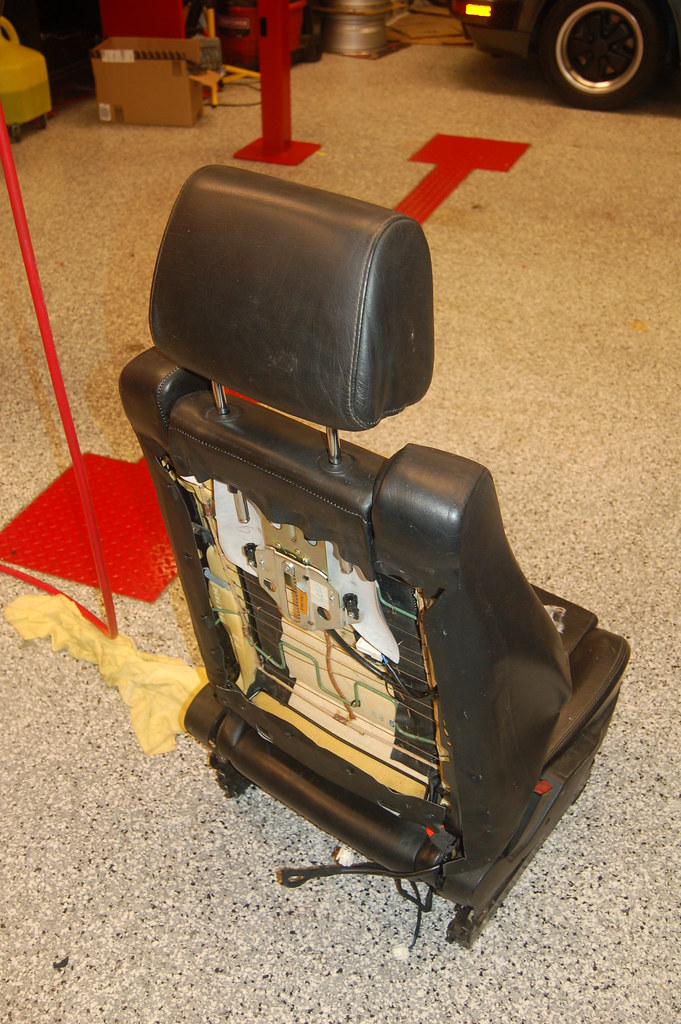
The headrest was inop on this seat too. It turns out for the same reason the seats were twisted: the cable for the headrest motor/actuator had lengthened. Taking the back off of the seat made it clear that the procedure for fixing was the same: unbolt the motor, pull the cable free, pop the metal sleeve off, remove the inner wire, cut the sheath, put the sleeve back on, put the wire back in (putting a little new grease on it), reattach motor.
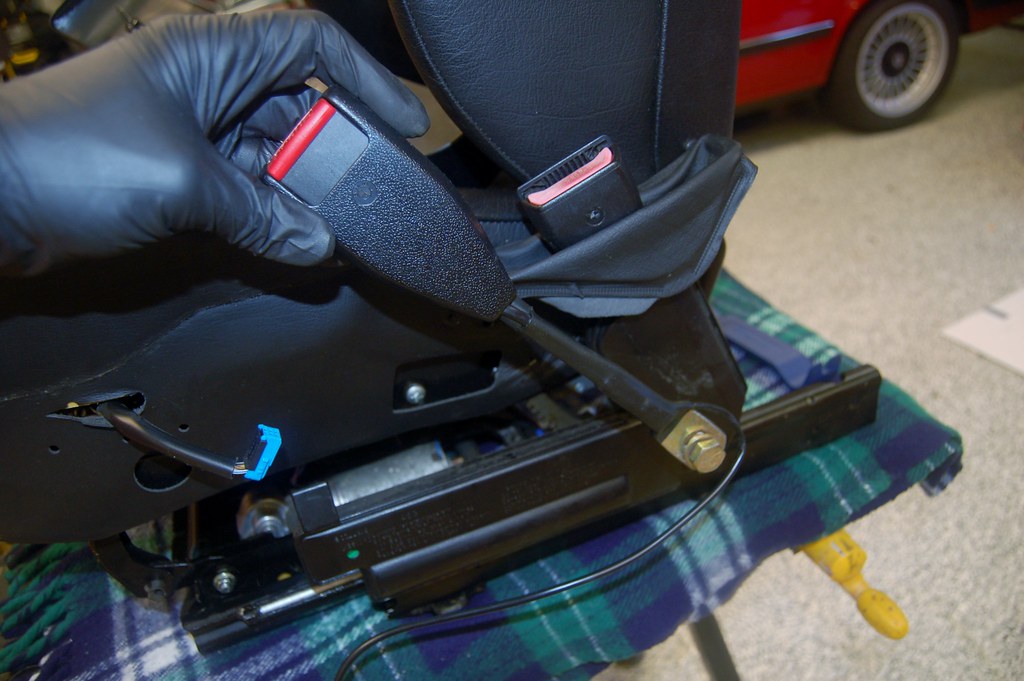
After fixing the cables, I pulled the side plastic pieces off to (1) clean everthing and (2) see exactly how the seatbelts attached.
Before:
After:
I had previously bought a new set of E28 seatbelt receivers. They will work perfectly with these seats. On the other side, the E28 seatbelt bracket will bolt in place (might have to bend it a bit):
The first task to was to fix the twist in the seat. I searched the interwebs and found several Youtube videos that show how to "untwist" E34 seats. Also this link: http://bellsouthpwp.net/m/i/miales/seatcablesfix.htm
It turns out the cluprit are the cables from the motors to the actuators. Over time the rubber/plastic of the cable sheath expands, lengthening the sheath. This causes the inner wire that actually does the work to be too short, pulling out of either the motor or actuator.
In this picture you can see one of the cables and note that the inner wire is just barely sticking out of the end of the cable. It should be about 1/2 inch.
To fix this you have to take the metal sleeve off the end of each cable (at the motor; there are 4 cables under the seat) by heating it up with a torch, cutting the sheath about 3/8". Then you heat back up the sleeve and slide it back on. The hot sleeve slides over the sheath and when it cools and contracts it's tight again.
The hardest part of this job is getting the 8 8mm bolts off of the electric motor mounts so you can pull the cables free. Two of those bolts are hard to reach and it's just tedious. A racheting wrench helps big time.
Once you have the cables fixed you use the seat controls to cause the seat to move back into alignment by leaving one side of the motor disconnected and then the other.
In my case the seat frame actually became bent because of the twisting and while I was able to straighten it some by sitting on the seat in the garage it won't go completely straight until I install it in the car and bolt it down.
The headrest was inop on this seat too. It turns out for the same reason the seats were twisted: the cable for the headrest motor/actuator had lengthened. Taking the back off of the seat made it clear that the procedure for fixing was the same: unbolt the motor, pull the cable free, pop the metal sleeve off, remove the inner wire, cut the sheath, put the sleeve back on, put the wire back in (putting a little new grease on it), reattach motor.
After fixing the cables, I pulled the side plastic pieces off to (1) clean everthing and (2) see exactly how the seatbelts attached.
Before:
After:
I had previously bought a new set of E28 seatbelt receivers. They will work perfectly with these seats. On the other side, the E28 seatbelt bracket will bolt in place (might have to bend it a bit):
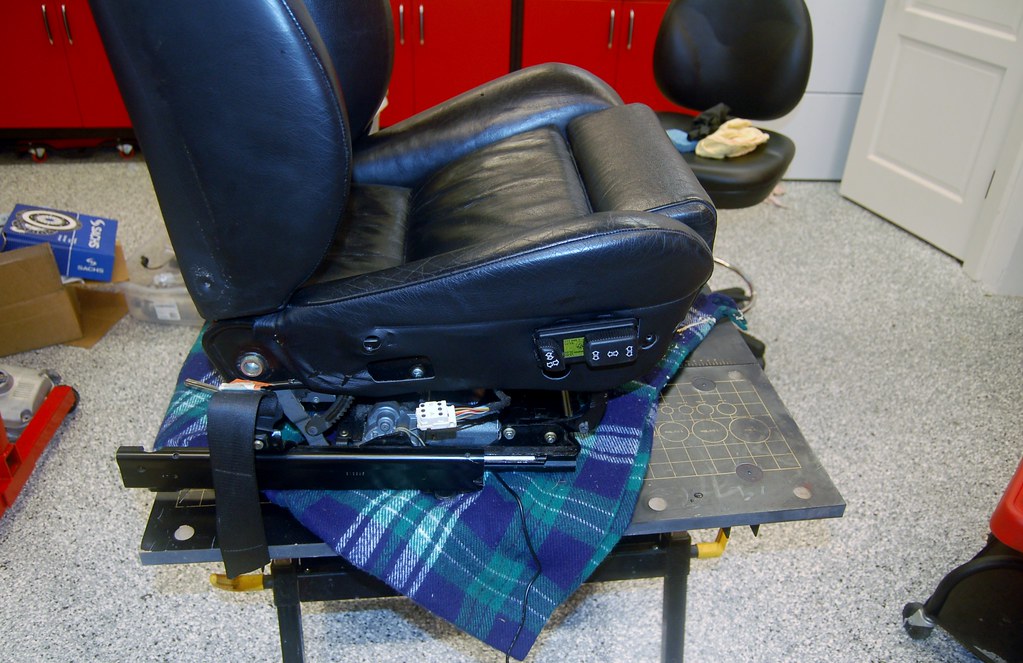
To test/operate the seats on the bench I found an old laptop power adapter that output 12V/5A and used it. These seats are supposed to have a 30A circuit, but I doubt they pull anything near that unless you are actuating multiple motors at the same time, so this technique works fine.
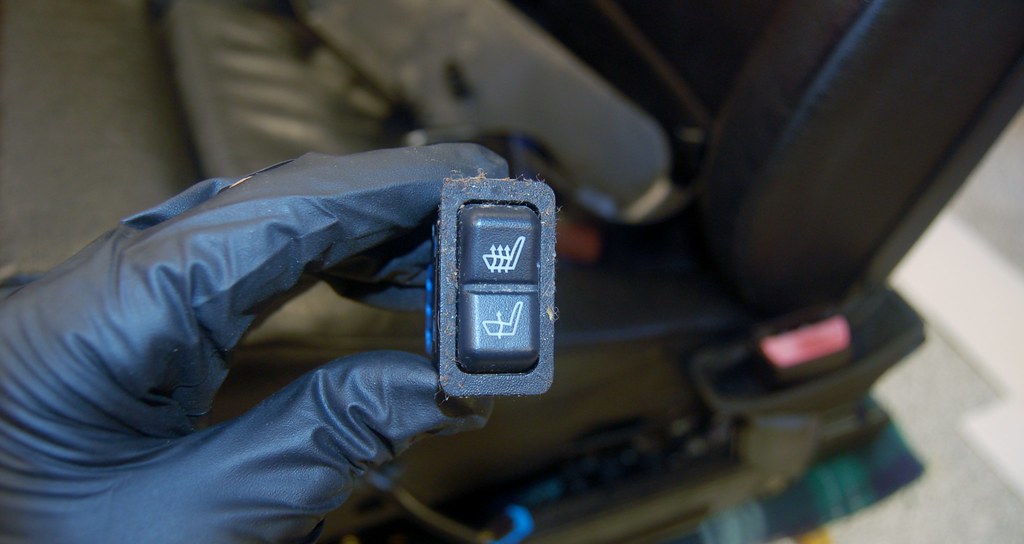
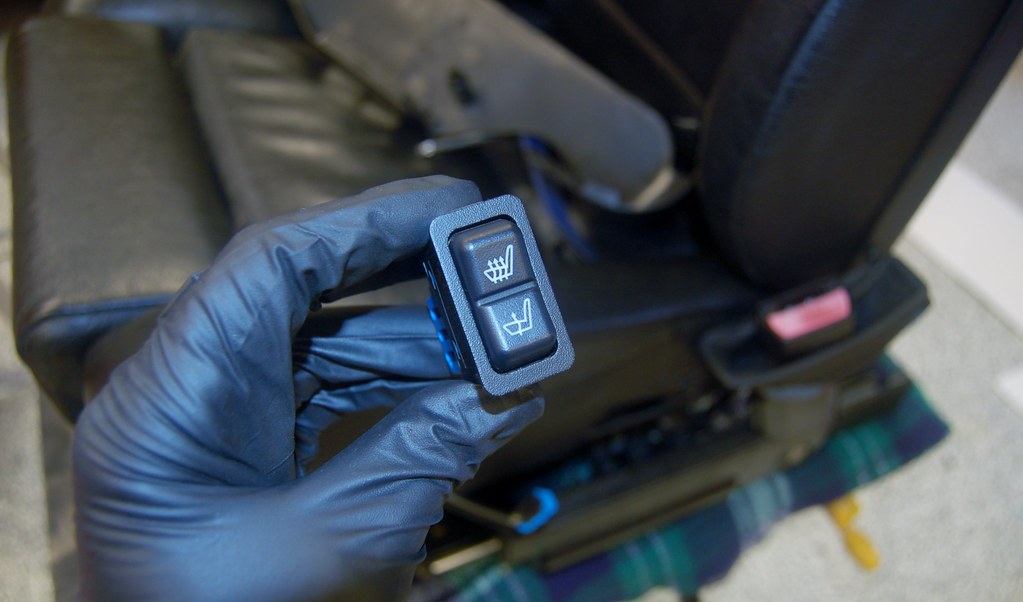
Right now I'm pouring over the E34 ETM to determine what else I need to wire up besides power. This is the connector for the passenger seat:
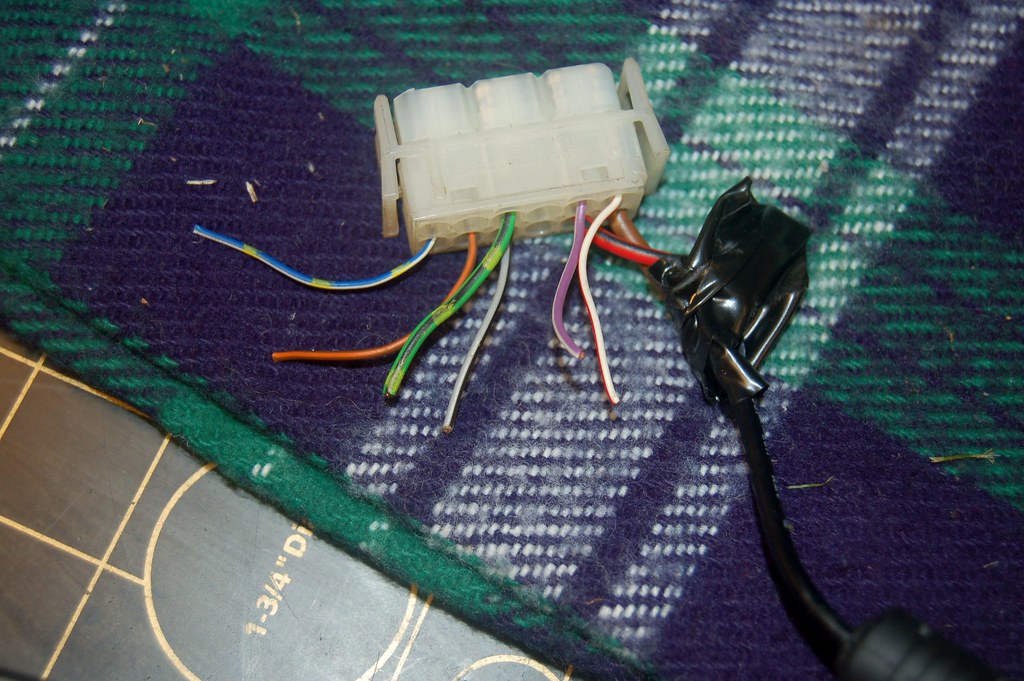
Brown (BR 2.5) - Ground
Red/Black (RT/SW 2.5) - 12V 30A Hot Always - Main power
Green/Black/Yellow (GN/SW/GE 2.5) - 12V 30A Hot in Run and Start - Heated Seats
Gray/Black (GR/SW) - Lights on.
Brown/Orange (BR/OR) - Seat belt switch
Blue/White/Yellow (BL/WS/GE) - SRS (Seatbelt Switch)
Violet/White (VI/WS) - Seat Occupancy Detector
White/Red (WS/RT) - SRS (Seat Occupancy Detector)
The 87 E28 ETM shows the following (5200-1):
Brown (BR 2.5) - Ground
Red/Yellow (2.5) - 12V 25A Hot Always - Fuse 4 - Main Power
Green/Red (1) - 12V 16A Hot in Run Only from Unloader - Fuse 13 - Heated Seats
That page also shows, but I think these are internal to the seat:
Red (1.5) - Not used
Green (1.5) - Not used
Yellow (1.5) - Not used
Red/Yellow (1.5) - Not used
Page 6131-0 of the E28 ETM shows "SEATBELT SWITCH" has BR/RD on one side and BR/WT on the other. Anyone know which lead in the E28 seating loom is for the seatbelt switch?
I will splice into the Gray/Red lead that goes to the ashtray light to hook up to the "Lights on" function of the seats so the buttons are lit. I need to do this anyway for my illuminated shift knob :-).
Fuse 4 is shared with the lighter, SLS, and the antenna. Given Red/Yellow is the same gauge wire and I don't have SLS I think the 25A circuit will be fine to power the main (Read/Black) on the E34 seats.
However, Fuse 13 is only a 16A and uses only "1" gauge wire. Given on the E34 an ENTIRE 30A fuse is dedicated to the heated seats (Fuse 16) I think it's safe to assume the E34 seat heaters draw a lot more than the E28's. Thus I will run a new 30A lead from the battery to power the new seats' heaters, unless I can find another unused wire to do this. Ideas appreciated.
Of course the driver's seat is a whole 'nuther ball of wax. Now that I've dug into the passenger seat, I have a feeling I can actually remove all of the memory stuff from the driver's seat and make it a "memory-less" seat. I think the 2nd set of seats I'm getting may not have memory...I'll know when they arrive on Monday!
Right now I'm pouring over the E34 ETM to determine what else I need to wire up besides power. This is the connector for the passenger seat:
Brown (BR 2.5) - Ground
Red/Black (RT/SW 2.5) - 12V 30A Hot Always - Main power
Green/Black/Yellow (GN/SW/GE 2.5) - 12V 30A Hot in Run and Start - Heated Seats
Gray/Black (GR/SW) - Lights on.
Brown/Orange (BR/OR) - Seat belt switch
Blue/White/Yellow (BL/WS/GE) - SRS (Seatbelt Switch)
Violet/White (VI/WS) - Seat Occupancy Detector
White/Red (WS/RT) - SRS (Seat Occupancy Detector)
The 87 E28 ETM shows the following (5200-1):
Brown (BR 2.5) - Ground
Red/Yellow (2.5) - 12V 25A Hot Always - Fuse 4 - Main Power
Green/Red (1) - 12V 16A Hot in Run Only from Unloader - Fuse 13 - Heated Seats
That page also shows, but I think these are internal to the seat:
Red (1.5) - Not used
Green (1.5) - Not used
Yellow (1.5) - Not used
Red/Yellow (1.5) - Not used
Page 6131-0 of the E28 ETM shows "SEATBELT SWITCH" has BR/RD on one side and BR/WT on the other. Anyone know which lead in the E28 seating loom is for the seatbelt switch?
I will splice into the Gray/Red lead that goes to the ashtray light to hook up to the "Lights on" function of the seats so the buttons are lit. I need to do this anyway for my illuminated shift knob :-).
Fuse 4 is shared with the lighter, SLS, and the antenna. Given Red/Yellow is the same gauge wire and I don't have SLS I think the 25A circuit will be fine to power the main (Read/Black) on the E34 seats.
However, Fuse 13 is only a 16A and uses only "1" gauge wire. Given on the E34 an ENTIRE 30A fuse is dedicated to the heated seats (Fuse 16) I think it's safe to assume the E34 seat heaters draw a lot more than the E28's. Thus I will run a new 30A lead from the battery to power the new seats' heaters, unless I can find another unused wire to do this. Ideas appreciated.
Of course the driver's seat is a whole 'nuther ball of wax. Now that I've dug into the passenger seat, I have a feeling I can actually remove all of the memory stuff from the driver's seat and make it a "memory-less" seat. I think the 2nd set of seats I'm getting may not have memory...I'll know when they arrive on Monday!
greets
greets from capetown,south africa.
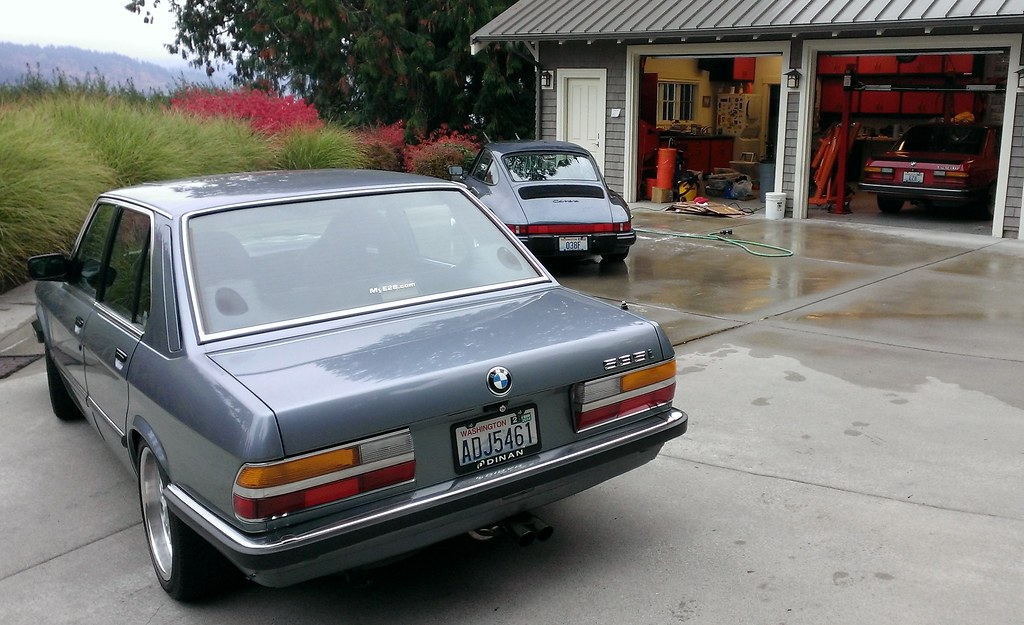
ill definitely be watching this thread. i just recently purchased a 1986 520i e28. she is straight,original and clean. something very difficult to find here, mint/original 535's and even 528's demand stupid money over here.
anyhow, im going to be speccing this car up which includes a big interior refurb.
back when i had a e30 325i 4door, i intalled a set of e36 m3 seats in it, was a major comfort upgrade!
so i definitely want to go the e34 interior route.
The E34 seatbelt receiver accepts the E28 belt.
The E34 receiver has a pre-tensioner that improves safety by tightening the belt when in a head-on accident. It's a purely mechanical system self-contained in the belt assembly.
E28 on right.
E34 on left.
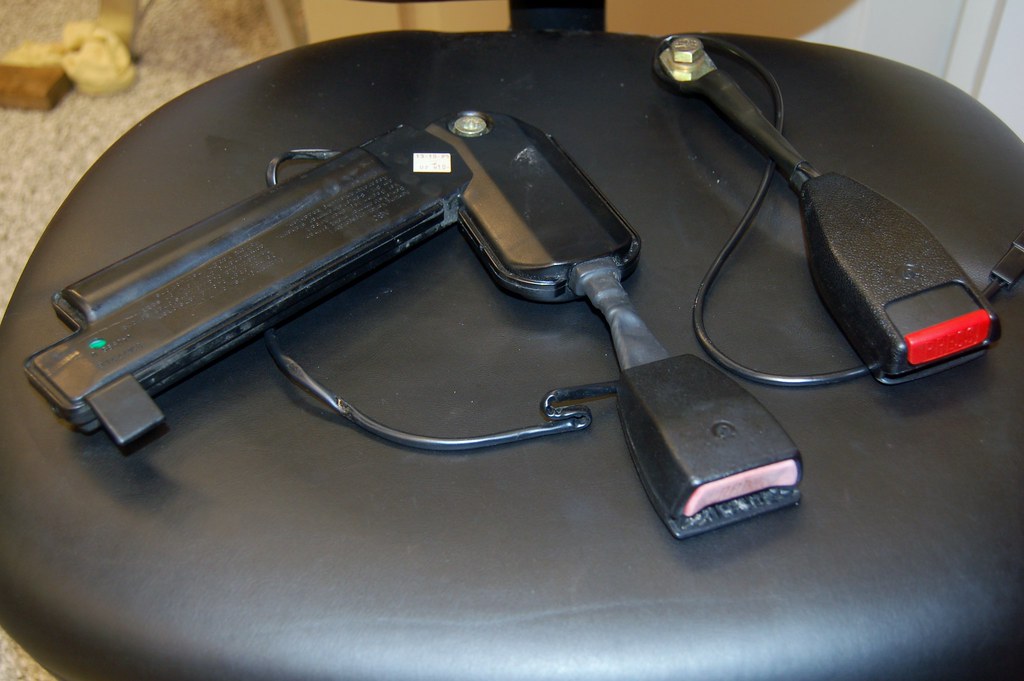
The E34 receiver's have the same disgusting looking pink-aged plastic. This will not do.
So a dilemna: Use the new E28 receivers and be less safe, use the E34 receivers and be safe, or buy NEW E34 receivers and waste money?
The E34 receiver has a pre-tensioner that improves safety by tightening the belt when in a head-on accident. It's a purely mechanical system self-contained in the belt assembly.
E28 on right.
E34 on left.
The E34 receiver's have the same disgusting looking pink-aged plastic. This will not do.
So a dilemna: Use the new E28 receivers and be less safe, use the E34 receivers and be safe, or buy NEW E34 receivers and waste money?
answer
you can fix that disgusting pink you know
mask it off with some tape, then :
http://www.tamiya.com/english/products/list/spray.htm
drumroll....
the stuff is used on model planes, cars etc etc
its enamel based so if u prep the surface it will last im sure !
i would prep the surface by using a strong de-greaser or dishwasher detergent soap.
then give a light scuff with 800 paper
then spray the paint
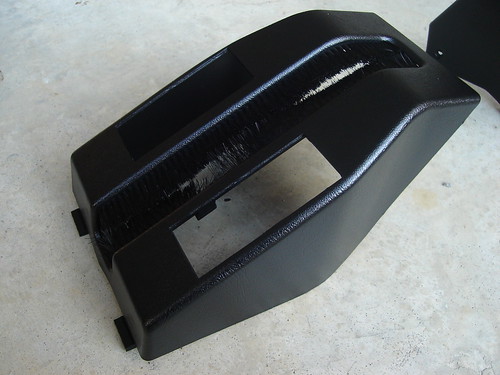
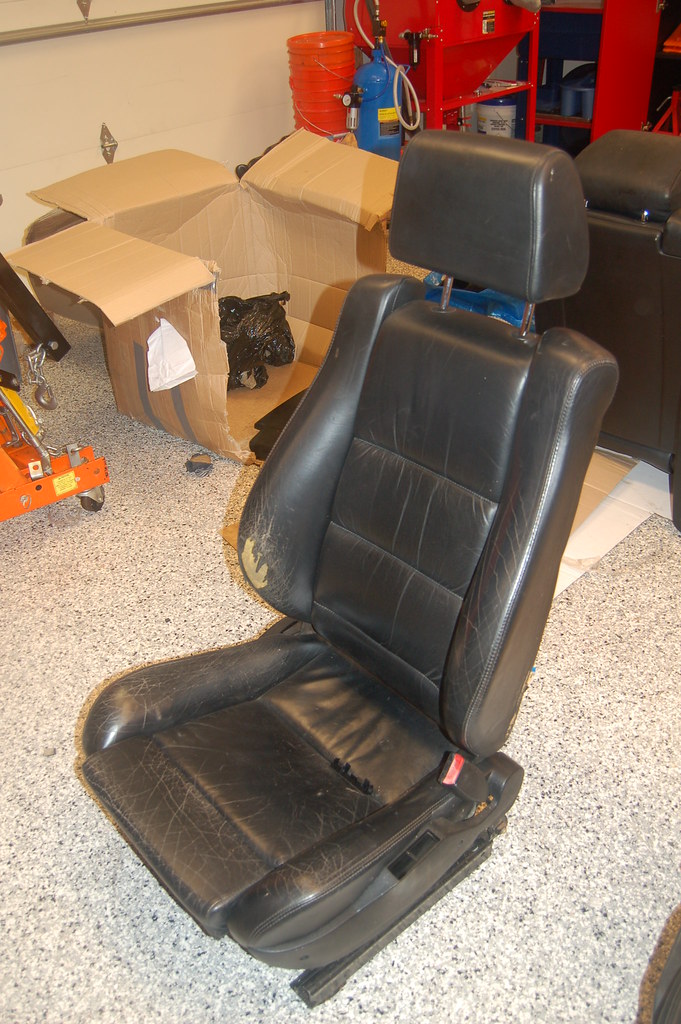
I started the day finishing up work on the passenger seat. It is almost pristine now. The leather could use a light dying, but now that I've cleaned, greased, and tested everything it is basically as good as new.
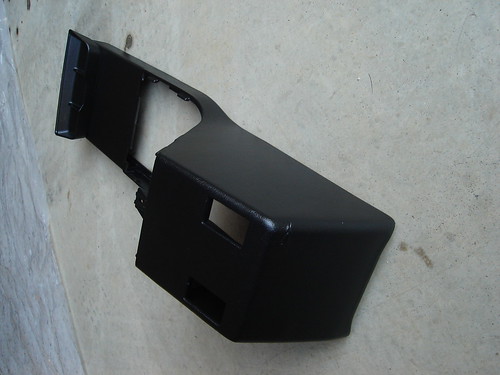
While I had it up on the bench I decided to go ahead and grind off the front mounts that are E34 specific. I'll have to wait to test fit it before I can precisely locate where the bolt hole should go. I used my trusty die grinder to get the E34 mounting thingies off:
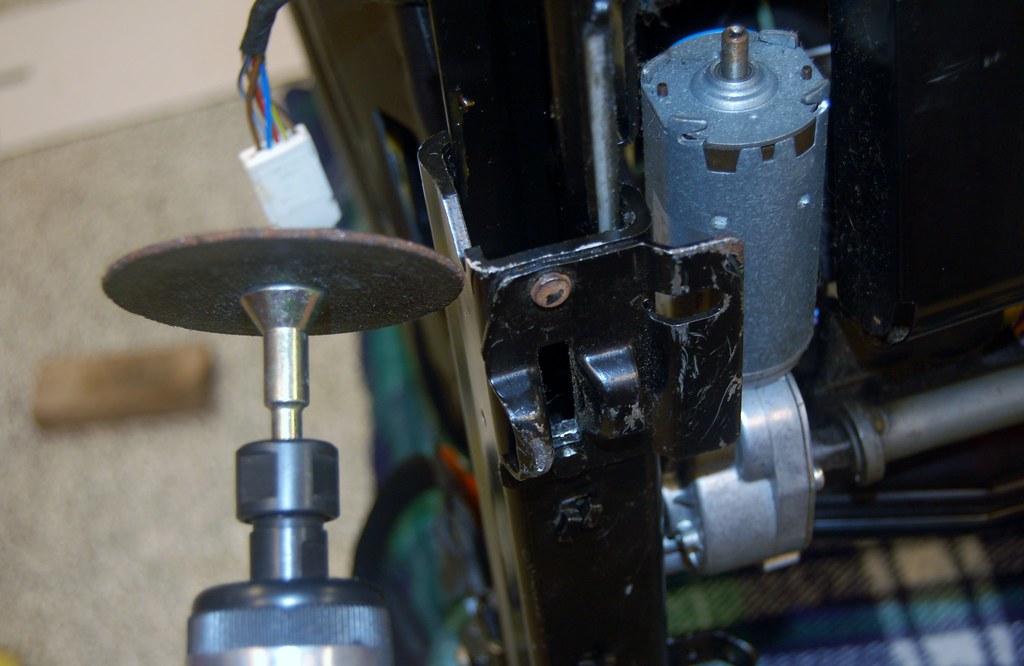
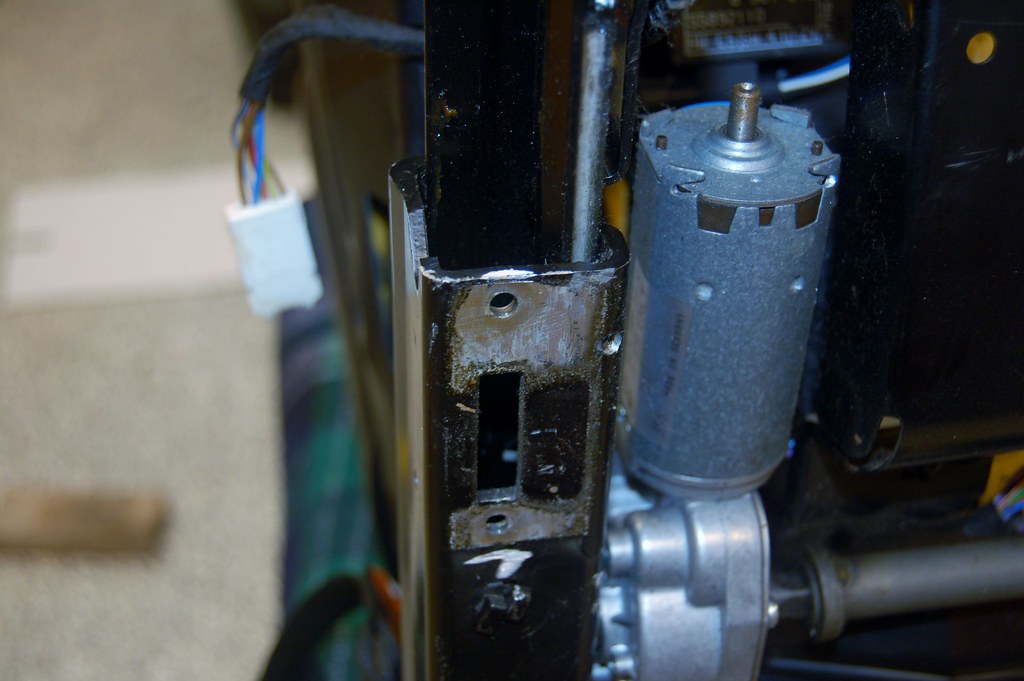
Now onto the driver's seat...
While I had it up on the bench I decided to go ahead and grind off the front mounts that are E34 specific. I'll have to wait to test fit it before I can precisely locate where the bolt hole should go. I used my trusty die grinder to get the E34 mounting thingies off:
Now onto the driver's seat...
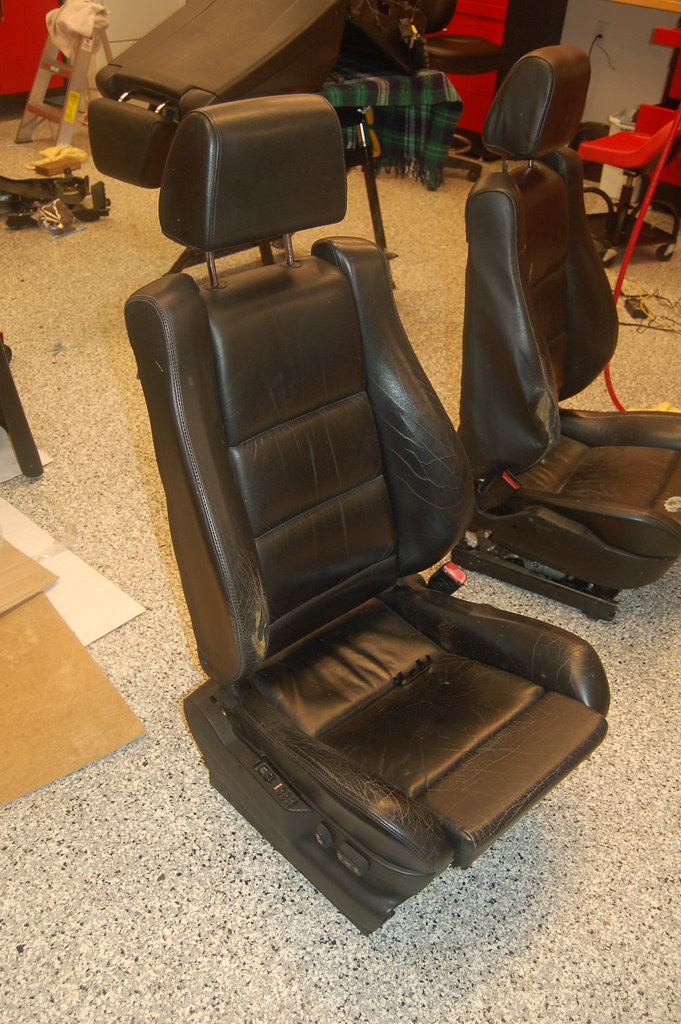
Like most cars, it's clear the car these seats came out of rarely had anyone but a driver in it. The driver's seat has more gunk and grime under it and the bolster is badly worn.
However, it should clean up fine.
The big question is "does it work"? 87Royal, who shipped me the seats was unable to get it to function by applying power & ground and neither was I when I first tried.
After getting it up on the bench and trying again with no joy I decided to test the motors individually. I quickly discovered that all seat functions, including heat, work but the actuator cables needed refurbishing (the twist problem) and I could not get the seat to function via the control switches.
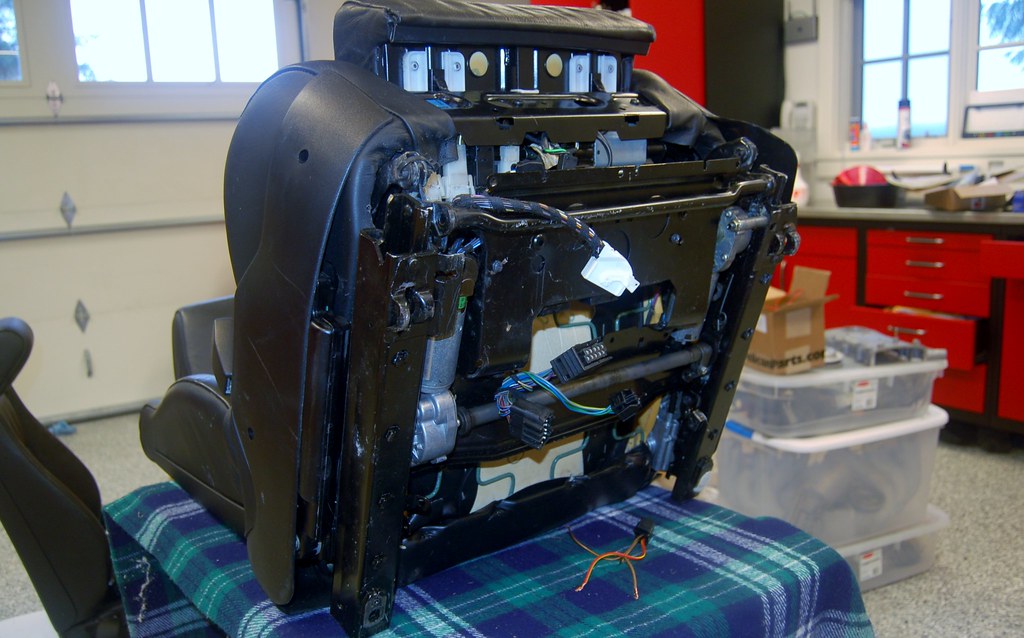
Because this seat has memory, fixing the actuator cables is trickier than on a non-memory seat. Every motor has a sensor attached making the bolts less accessible and there are far more wires in the way.
Initially I struggled because I couldn't get the seat to raise up in the back: the cable for the left side was not working. I un-twisted the seat by using my portable drill to turn the inner wire in the left side cable.
Then I decided to figure out how to actually disassemble rail section from the seat frame. Here's how you do
- There are four pins that hold the rail section to the frame.
- The front pins come out the obvious way: just push the little spring loaded tab in and tap the pin from the other side.
- The rear pins were less obvious: You have to move the seat all the way "back" so that the rail is all the way forward. Then you'll find a hole that lets you tap the rear pins out.
Once I did this, coping with the cables and wiring was much easier. I'll do this 1st thing next time I work on seats like this.
After fixing all the actuator cables and testing that the seat was straight and everything operated, including the headrest, I decided to find out why seat would not work when power was applied to the main connector.
I did this by studying the E34 ETM... And the answer is right here:
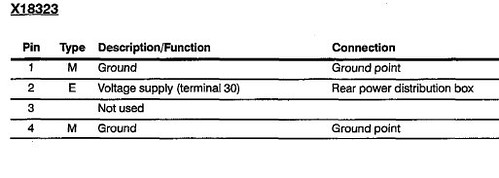
The 4 prong plug that has the Red/Yellow always-on power lead has two ground wires. One a "2.5" and the other a "1.5". BOTH are ground and BOTH must be grounded for the memory module to work.
With power/ground supplied as shown above the seat controls all work (except heat and leg which require other wires to be hooked up).
So, we now definitively know: E34 Sport Seats with memory will work just fine in an E28.
The memory function itself is not currently working. When I press 1, 2, or 3, the actuators in the seat move, but I cannot get "program" to work. I ran out of time, but I suspect I will need to hack the sensor inputs for the mirrors so the module thinks they are 'set'.
Worst case, and I'm totally fine with doing this, I will remove the memory buttons and replace them with a blank plate. There won't be any memory function but the seats will operate just fine.
However, it should clean up fine.
The big question is "does it work"? 87Royal, who shipped me the seats was unable to get it to function by applying power & ground and neither was I when I first tried.
After getting it up on the bench and trying again with no joy I decided to test the motors individually. I quickly discovered that all seat functions, including heat, work but the actuator cables needed refurbishing (the twist problem) and I could not get the seat to function via the control switches.
Because this seat has memory, fixing the actuator cables is trickier than on a non-memory seat. Every motor has a sensor attached making the bolts less accessible and there are far more wires in the way.
Initially I struggled because I couldn't get the seat to raise up in the back: the cable for the left side was not working. I un-twisted the seat by using my portable drill to turn the inner wire in the left side cable.
Then I decided to figure out how to actually disassemble rail section from the seat frame. Here's how you do
- There are four pins that hold the rail section to the frame.
- The front pins come out the obvious way: just push the little spring loaded tab in and tap the pin from the other side.
- The rear pins were less obvious: You have to move the seat all the way "back" so that the rail is all the way forward. Then you'll find a hole that lets you tap the rear pins out.
Once I did this, coping with the cables and wiring was much easier. I'll do this 1st thing next time I work on seats like this.
After fixing all the actuator cables and testing that the seat was straight and everything operated, including the headrest, I decided to find out why seat would not work when power was applied to the main connector.
I did this by studying the E34 ETM... And the answer is right here:
The 4 prong plug that has the Red/Yellow always-on power lead has two ground wires. One a "2.5" and the other a "1.5". BOTH are ground and BOTH must be grounded for the memory module to work.
With power/ground supplied as shown above the seat controls all work (except heat and leg which require other wires to be hooked up).
So, we now definitively know: E34 Sport Seats with memory will work just fine in an E28.
The memory function itself is not currently working. When I press 1, 2, or 3, the actuators in the seat move, but I cannot get "program" to work. I ran out of time, but I suspect I will need to hack the sensor inputs for the mirrors so the module thinks they are 'set'.
Worst case, and I'm totally fine with doing this, I will remove the memory buttons and replace them with a blank plate. There won't be any memory function but the seats will operate just fine.
Second set of seats arrived today. Huge hat-tip to cddallara for sourcing these and getting them shipped...from Ireland. All up this set cost a lot less than I spent on the first set. Corey took care of the whole thing; he was prompt with great communication and I will happily buy from him again.
The packing did it's job...barely:

They came with the tops and bottoms separated. How come none of you jerks told me the tops and bottoms come apart so easily? Would have saved me a HUGE amount of hassle moving them around and working on them.
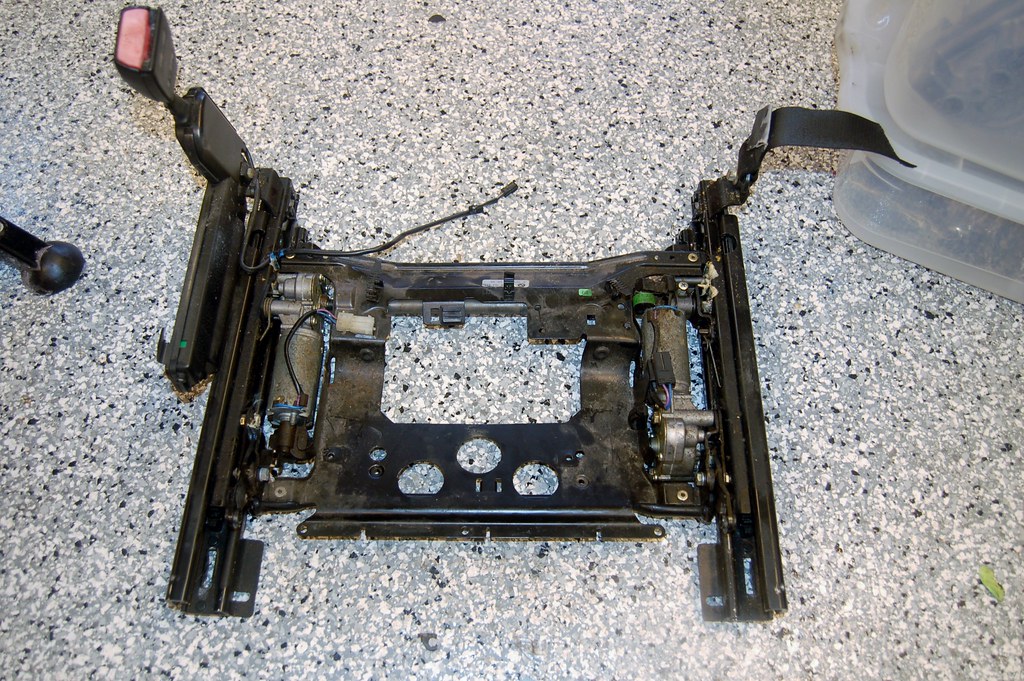
Here's the bottom of the driver's seat. Things to note: It has an old-school memory module in it. I didn't realize earlier E34 seats used a different memory module. Means swapping parts between the two pairs will be harder if I need to.
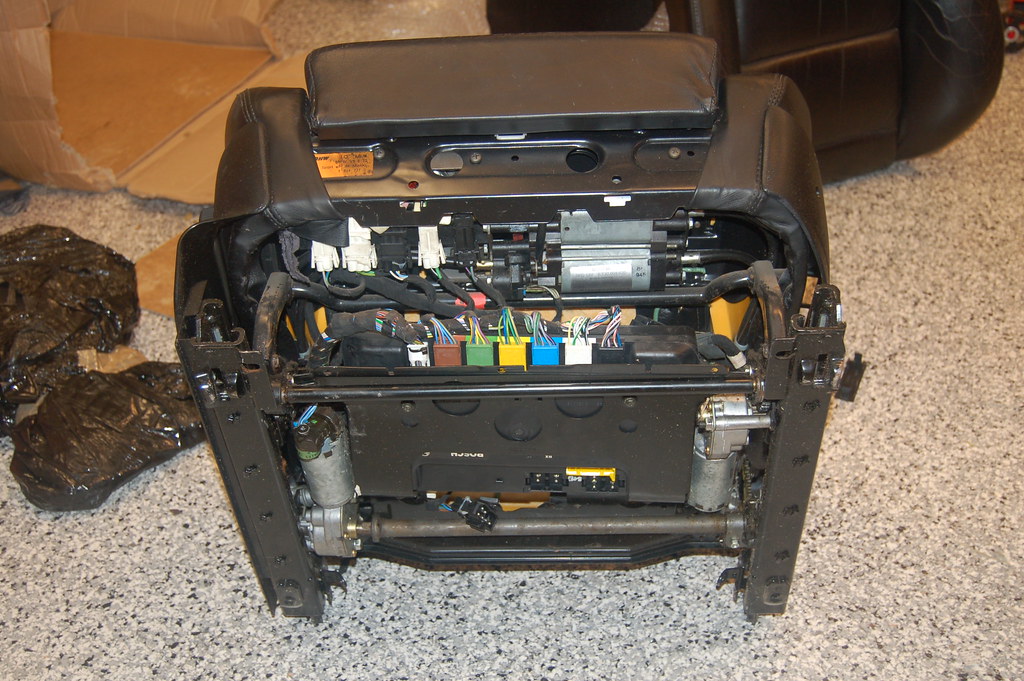
Second thing to note is these are from a RHD car! I didn't even think about that, even though I knew these were coming from Ireland. Swapping the components around will be trivial though now that I know how everything works.
Third point is this set is in far more worn condition than the first set. Neither seat is in what I would consider acceptable aesthetic condition and getting them to my standards will likely require a complete recover.
I may steal the left hand bolster from the passenger seat for the left hand bolster of the driver's seat of the other set. By doing that I will simply have to re-dye the first set to make them like-new.
I have not had a chance to test the mechanicals (and won't until the weekend) but they look to be relatively clean and in good shape. There's no evidence of twist but I will refurbish all the cables anyway.
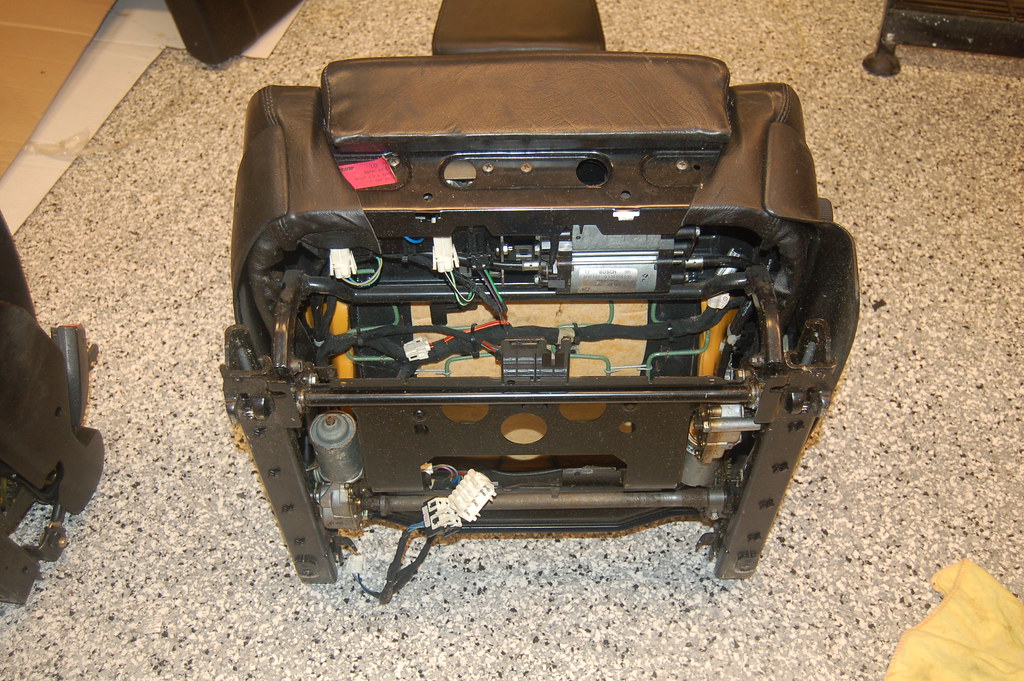
This is actually the passenger seat bottom:
This is the driver's bottom with the other top. As you can see whoever owned the car these came out of swapped the tops at some point so that the RH bolster on both seats got worn down.
I'll test and refurbish the mechanicals on this set ASAP (this weekend?) and see how hard it would be to swap bolsters.
The packing did it's job...barely:
They came with the tops and bottoms separated. How come none of you jerks told me the tops and bottoms come apart so easily? Would have saved me a HUGE amount of hassle moving them around and working on them.
Here's the bottom of the driver's seat. Things to note: It has an old-school memory module in it. I didn't realize earlier E34 seats used a different memory module. Means swapping parts between the two pairs will be harder if I need to.
Second thing to note is these are from a RHD car! I didn't even think about that, even though I knew these were coming from Ireland. Swapping the components around will be trivial though now that I know how everything works.
Third point is this set is in far more worn condition than the first set. Neither seat is in what I would consider acceptable aesthetic condition and getting them to my standards will likely require a complete recover.
I may steal the left hand bolster from the passenger seat for the left hand bolster of the driver's seat of the other set. By doing that I will simply have to re-dye the first set to make them like-new.
I have not had a chance to test the mechanicals (and won't until the weekend) but they look to be relatively clean and in good shape. There's no evidence of twist but I will refurbish all the cables anyway.
This is actually the passenger seat bottom:
This is the driver's bottom with the other top. As you can see whoever owned the car these came out of swapped the tops at some point so that the RH bolster on both seats got worn down.
I'll test and refurbish the mechanicals on this set ASAP (this weekend?) and see how hard it would be to swap bolsters.
It's a good thing I exercise regularly.wkohler wrote:E28s use screws and the gas struts. E30/E24 are similar but you have to remove the backrest release cables. The spring hooking dealie is pretty simple. Probably added 140 pounds to the seats to do it that way though. Might be why they're so heavy.
Thank you!cek wrote:Second set of seats arrived today. Huge hat-tip to cddallara for sourcing these and getting them shipped...from Ireland. All up this set cost a lot less than I spent on the first set. Corey took care of the whole thing; he was prompt with great communication and I will happily buy from him again.
Can't wait to see the finished product(s)!